


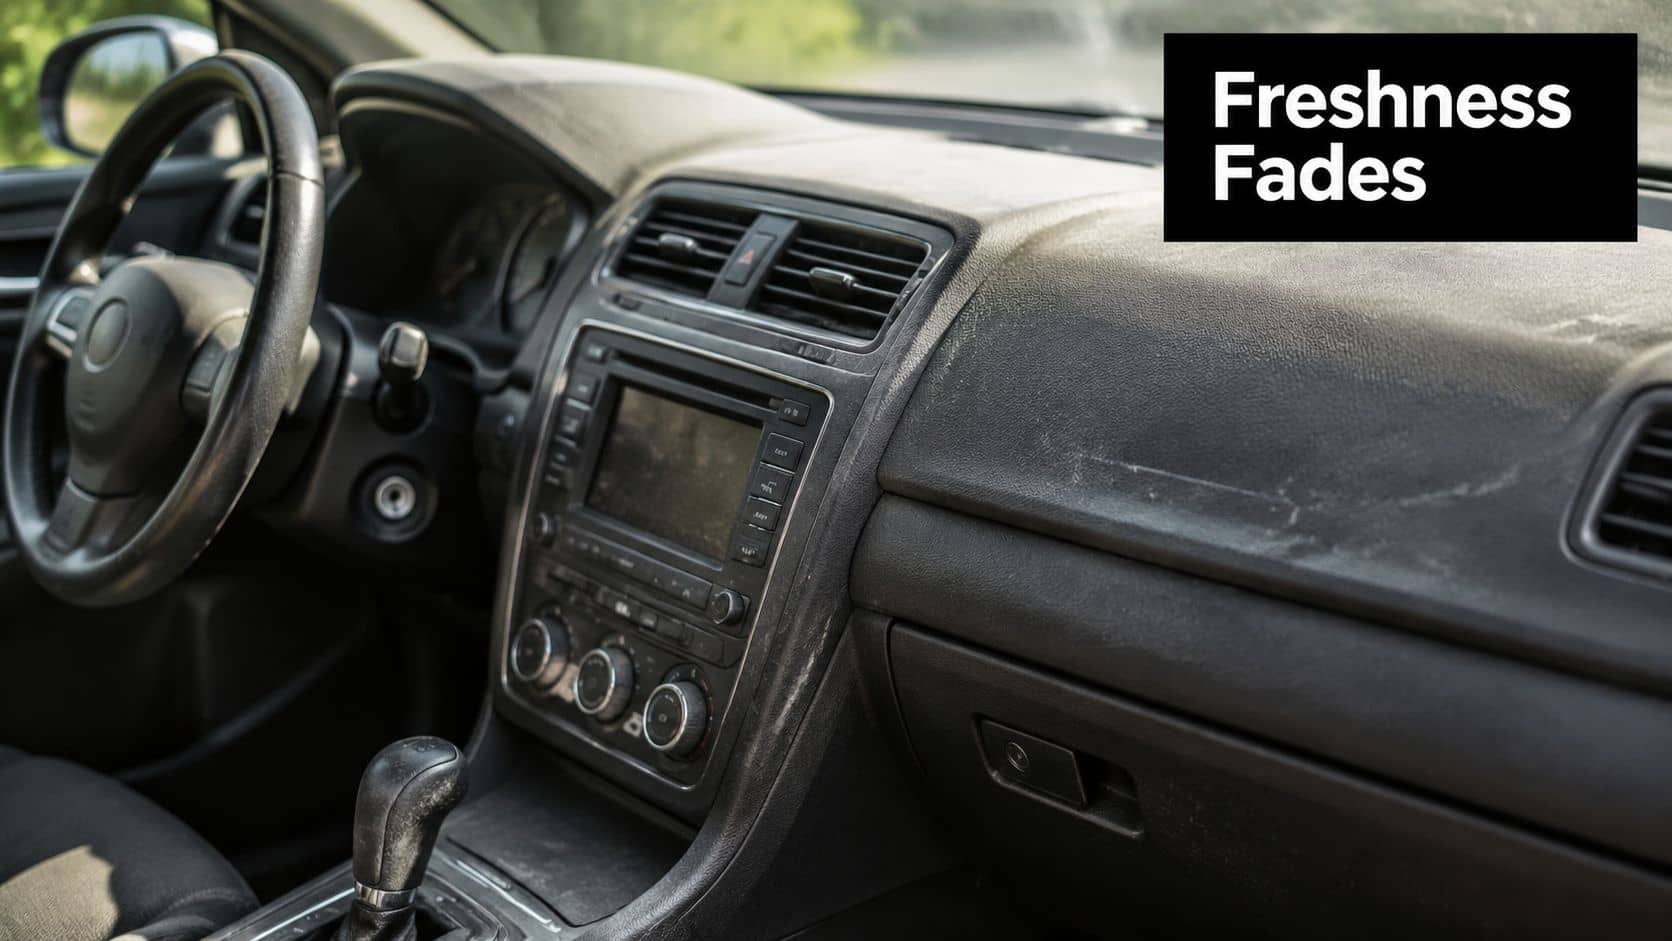
A lot of interiors don't get filthy all at once. They fade into it. The dashboard picks up a grey film, the steering wheel starts feeling slightly tacky, crumbs settle into the seat bolsters, and the screen never quite looks clean no matter how often you wipe it. That slow decline is why many drivers end up buying the wrong bottle. They're not dealing with one problem. They're dealing with dust, skin oils, food residue, UV exposure, and different materials packed tightly into one cabin.
The best car interior cleaning products solve that mix without creating new problems. A cleaner that strips dressings off plastic may be wrong for leather. A shiny protectant can make a dashboard look worse, not better. An aggressive spray might lift grime fast but leave haze on gloss trim or streaks on screens. If you understand the chemistry behind what each product is trying to do, choosing becomes much easier.
Why Your Car's Interior Deserves a Proper Clean
Most owners notice the same pattern. The car still drives well, but inside it starts to feel older than it is. The wheel gets shiny in the wrong way. Seat fabric holds onto smells. Dust builds around vents and switchgear. Plastics lose their even finish and start looking patchy after a few quick wipe-downs with whatever happened to be in the garage.
That matters more in the UK than many people realise. The vehicle parc is both large and ageing. The UK had about 33.0 million licensed vehicles at the end of 2024, and the average car age in Great Britain reached 10.1 years in 2024, while the average van age was 10.2 years, according to Car and Driver's reference to Department for Transport figures. Older cabins usually show wear first on the surfaces you touch every day, including plastics, fabric, leather coatings, switches, seat edges and steering wheels.
Cleanliness isn't only cosmetic
A proper interior clean does three jobs at once. It improves how the car feels to use, it helps preserve surfaces that are expensive or awkward to replace, and it stops dirt turning into wear. Fine grit on a steering wheel or seat base doesn't just look untidy. It acts like an abrasive when you slide in and out.
There's also a practical comfort issue. A cabin full of residue attracts more dust, makes glass smear more easily, and can leave touchpoints feeling greasy. That's why the best results usually come from products designed to clean fully, then leave the surface neutral rather than artificially glossy.
Practical rule: If a product makes every surface look wetter and shinier, it probably isn't the right answer for every surface in a modern interior.
What neglect usually gets wrong
Interior neglect often starts with good intentions and poor product choice. Owners use household wipes on screens, heavy dressings on soft-touch plastics, or one harsh cleaner on everything from door cards to leather seat sides. The result is usually one of these:
Residue left behind: Dust sticks faster and the interior looks dirty again sooner.
Uneven finish: Some panels darken while others go blotchy or streaky.
Material stress: Sensitive coatings on leather, trim and glossy panels can lose their original look.
A good interior cleaning routine doesn't need to be obsessive. It needs to be material-aware.
Decoding the Different Types of Interior Cleaners
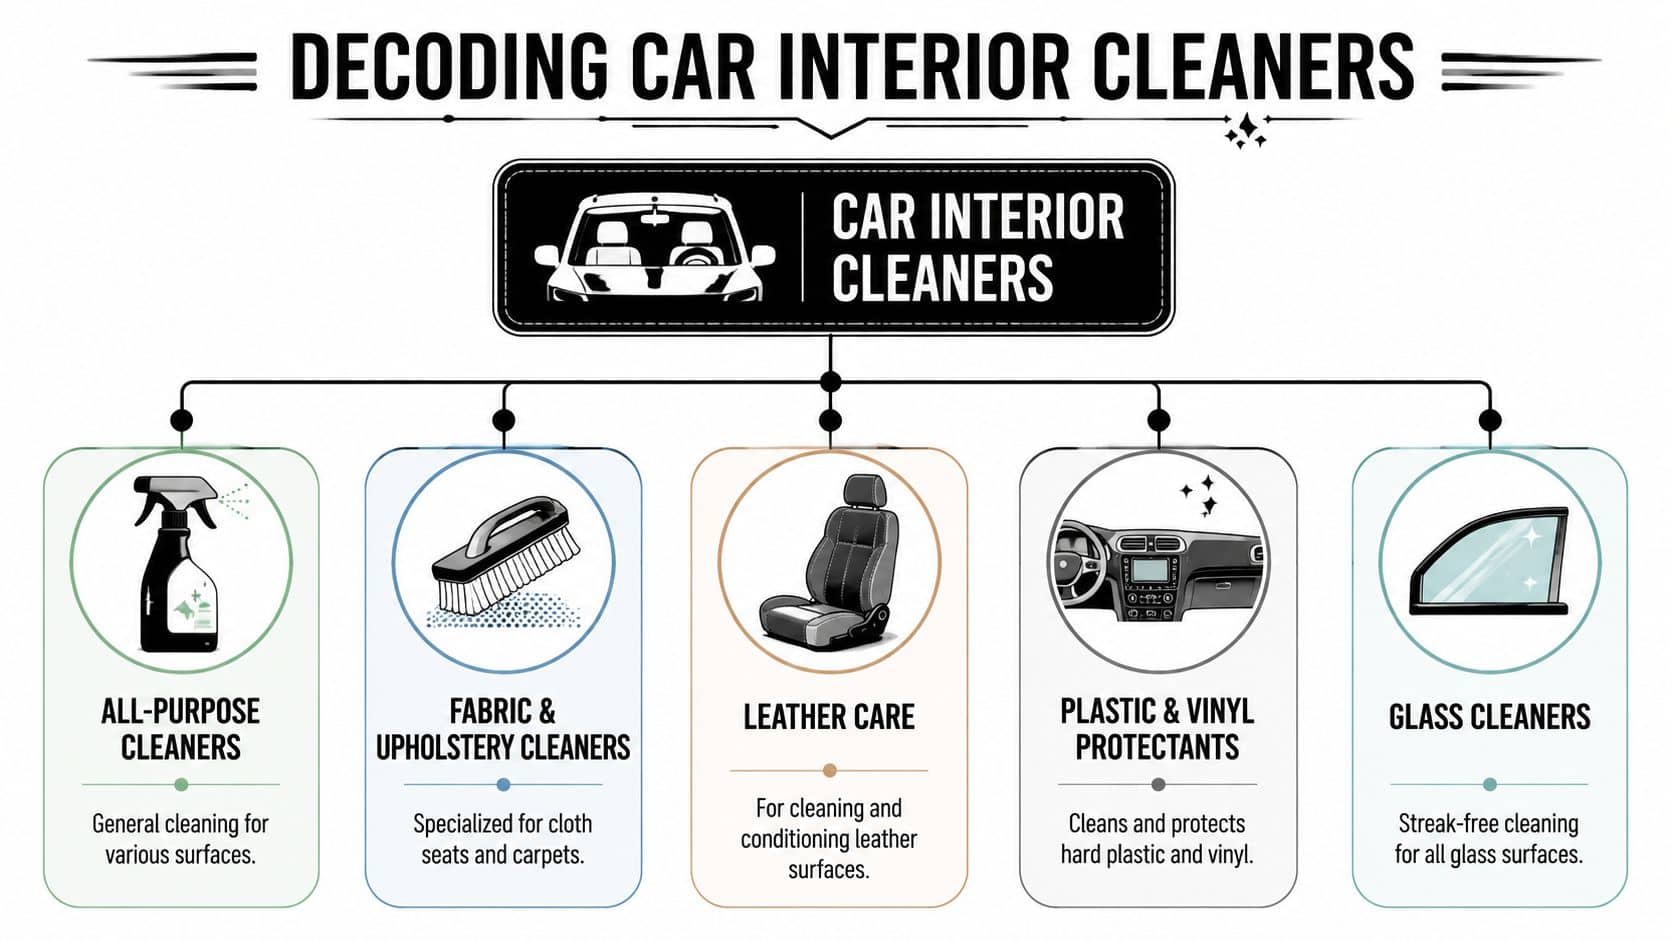
Walk down any detailing aisle and the labels all start sounding similar. Interior detailer. APC. trim cleaner. cockpit spray. upholstery cleaner. protectant. Some are versatile, some are specialised, and a few try to do too many jobs badly.
The easiest way to think about them is this. Some cleaners are generalists, and some are specialists.
The modern all-rounder
Multi-surface interior cleaners have improved because cabins have changed. Newer interiors mix screens, textured plastics, soft-touch coatings, piano black trim, coated leather, synthetic leather and fabric in a very small space. Swapping bottles for every panel is slow and usually unnecessary for routine cleaning.
That shift shows up in recent product testing. In 2026 testing by Car and Driver, Chemical Guys Total Interior Cleaner & Protectant was named Best Overall, while Meguiar's Quik Interior Detailer Cleaner was named Best Value, reflecting a move toward products judged on both performance and affordability in modern interiors, as noted by Car and Driver's interior cleaning product testing.
For most owners, a good multi-surface cleaner is the bottle that gets the most use. It's the jack-of-all-trades. Not perfect for every contamination, but very good for light grime, fingerprints, traffic film on interior plastics, and regular wipe-downs on mixed materials.
You can browse that category through GSF Car Parts interior cleaning products.
The specialist bottles
Specialist products still matter because dirt behaves differently depending on the surface.
Product type | Best use | Where it struggles |
All-purpose interior cleaner | Light to moderate grime on mixed hard surfaces | Heavy fabric staining, neglected leather |
Fabric and upholstery cleaner | Cloth seats, carpets, absorbed spills, odours | Hard plastics and screens |
Leather cleaner and conditioner | Coated leather seats, bolsters, armrests | Fabric, matte plastics, display screens |
Plastic and vinyl protectant | Dashboards, door tops, exposed trim | Touchscreens, glossy trim, steering wheels |
Glass cleaner | Windscreen, mirrors, side glass | Plastics and instrument binnacles |
What works and what doesn't
A common mistake is treating an APC as a miracle product. It isn't. It's useful because it's broad, not because it's magical. If you've got cloth seats with absorbed coffee, ground-in mud in carpet, or body oil built up on a leather driver's bolster, a dedicated cleaner usually works faster and with less agitation.
Another mistake is chasing shine. High-gloss dressings can make an older dashboard look temporarily darker, but they also tend to highlight smear marks, attract dust and look out of place in a modern cabin. The better products clean to an even, factory-style finish.
A clean interior should look original, not freshly varnished.
Matching the Product to Your Car's Materials
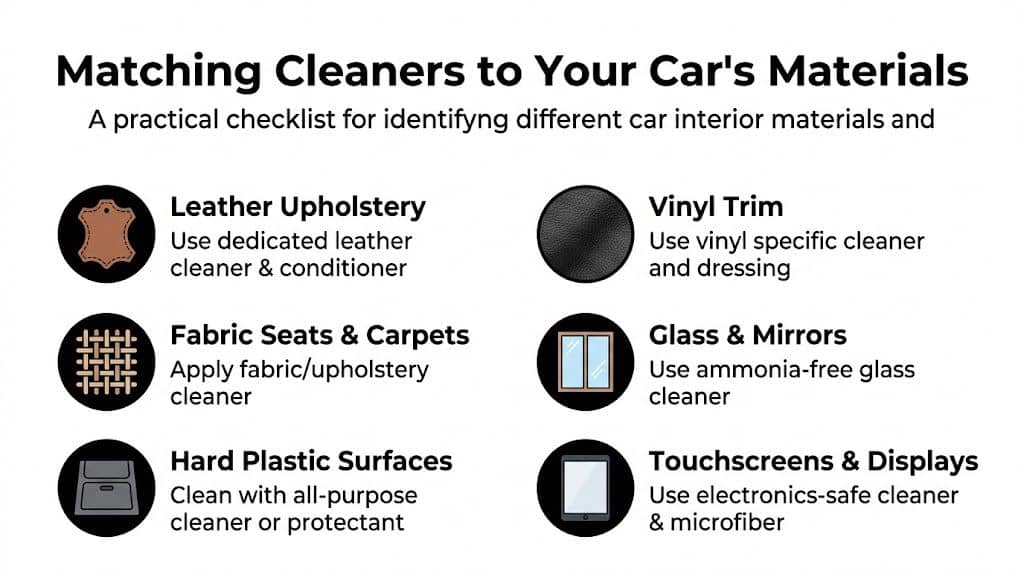
The right cleaner starts with identifying what you're touching. “Interior” isn't one material. It's a stack of different surfaces with different tolerances. If you treat them all the same, one of them usually suffers.
Fabric seats and carpets
Fabric is absorbent, which changes the job completely. Hard surfaces only need soil lifted and wiped away. Fabric often needs soil loosened, suspended and extracted with controlled moisture. If you soak seats, you risk tide marks, slow drying and that stale damp smell that hangs around far longer than the stain.
Use a dedicated fabric or upholstery cleaner when the contamination is in the fibres rather than sitting on top. Agitate gently with a soft interior brush, then blot or extract rather than flooding the material.
Look for leather and fabric cleaners for mixed upholstery care if your car combines cloth inserts with leather or vinyl edges.
Leather and coated leather
Most car leather isn't bare, old-fashioned hide. It's usually coated, which means the cleaner has to remove body oils and dirt without attacking the finish on top. If a leather product feels overly slick after use, it may be leaving too much behind. That can make the seat look richer at first but feel greasy and attract more grime.
For routine care, less is more:
Use a dedicated leather cleaner for dirty bolsters, seat bases and armrests.
Work with a soft microfibre or soft brush rather than scrubbing hard.
Condition only when needed and keep the finish natural, not shiny.
Plastics, vinyl and trim
Hard trim responds well to a good interior cleaner because most of the contamination is surface-level dust, fingerprints, airborne grime and transferred skin oils. The trade-off is finish. Some products clean well but leave a slippery or reflective layer that looks wrong on dashboards and can be unpleasant on steering wheel spokes or switch panels.
For textured plastics and vinyl, the safest target is an even satin finish. If the product leaves visible residue in graining, use less and apply to the cloth first.
Screens, gloss panels and clear plastics
People usually create damage by accident here. Infotainment screens and piano-black trim don't need aggressive chemistry. They need low-residue cleaning and a clean microfibre. Spray directly onto the surface and you increase the odds of overspray around buttons, pooling at edges, and streaking.
Workshop habit: Spray the cloth, not the screen. You'll control the product better and cut down on haze.
If a display only has fingerprints and light dust, a dampened microfibre is often enough. Save stronger cleaners for actual grime.
Reading the Label What to Look for in a Quality Cleaner
A strong label isn't the same thing as a strong formula. The useful terms are the ones that tell you how the cleaner behaves on real materials.
Why pH-neutral matters
A pH-neutral interior cleaner is usually the safest place to start for regular cabin work because it's less likely to stress sensitive finishes. That matters on coated leather, soft-touch trim, plastics and textile fibres. Harsh alkaline cleaners can feel impressive because they cut through grime quickly, but speed isn't the only goal. Material safety matters just as much.
One product often highlighted for this balanced approach is Gtechniq Tri-Clean, noted as pH-neutral and described as killing 99.9% of bacteria while absorbing odours in a product comparison discussed at Mustang7G's interior cleaner shoot-out. That combination makes sense in cabins that see food spills, moisture or lots of hand contact.
Protection matters more than gloss
A quality interior product should tell you whether it cleans only, cleans and protects, or leaves a dressing behind. Those are not the same thing. Protection is useful on exposed hard surfaces because dashboards and trim still face UV exposure in UK conditions. The same source also notes that Meguiar's interior wipes add UV protection, and that matters because UV inhibitors help slow fading and embrittlement of polymers.
The best workflow is simple and technical rather than flashy:
Deep clean first with a pH-neutral cleaner.
Apply UV protection only to exposed hard surfaces.
Keep protectants off touchscreens and glossy trim to avoid haze and dust adhesion.
Red flags on the bottle
Some labels tell you what to avoid, even when they don't mean to.
“High shine” claims: Usually wrong for dashboards and modern trim.
No material guidance: If the bottle doesn't clearly say where it can and can't be used, be cautious.
Heavy fragrance focus: Scent can mask residues or incomplete cleaning.
A good cleaner should leave the surface cleaner than before, not just better scented.
A Professional Step-by-Step Interior Cleaning Method
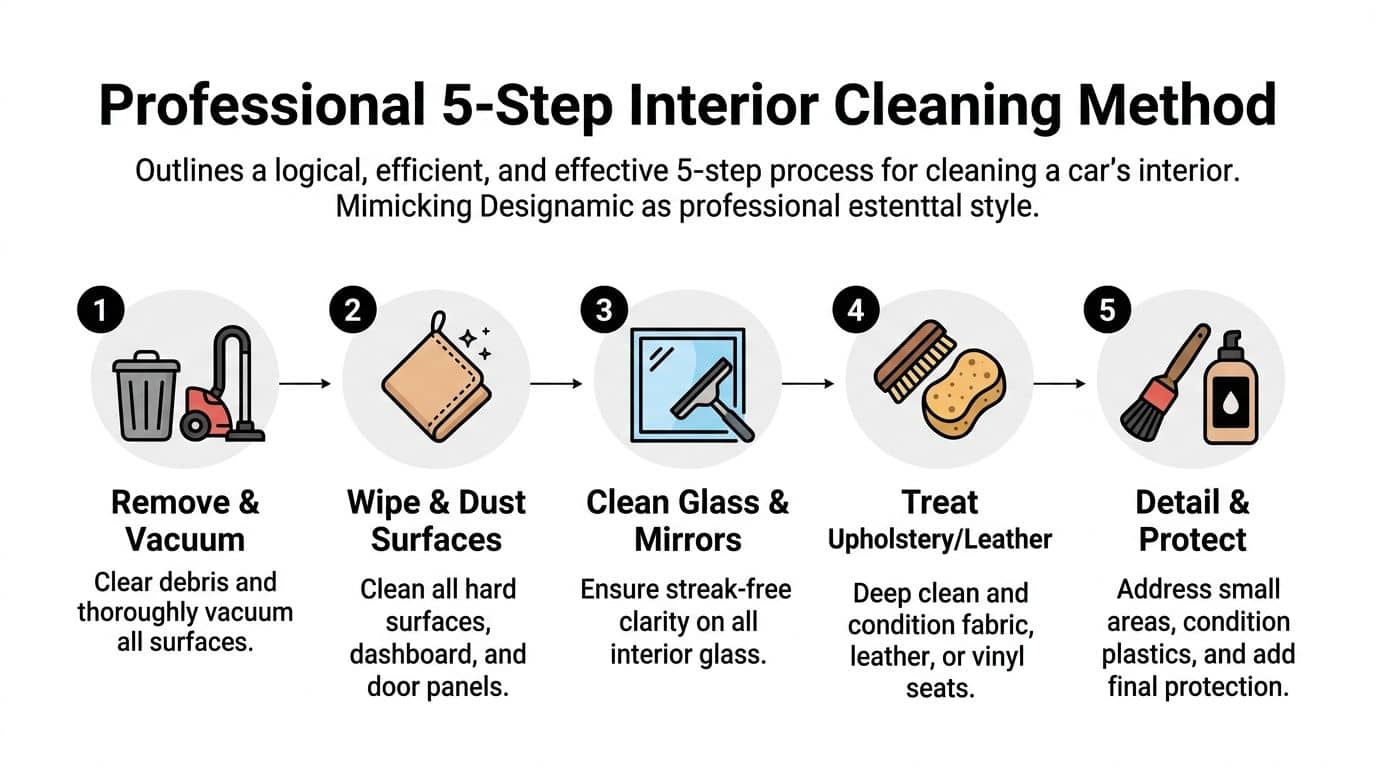
The order matters almost as much as the products. Clean in the wrong sequence and you'll keep redoing areas you've already finished. Professionals work top down and from dry soil to wet cleaning for a reason. It keeps debris moving out of the car instead of around it.
To make the workflow easier to follow at a glance, keep this process in mind.
Step 1 remove clutter and vacuum properly
Take out mats, empty door bins, clear the boot lip area if needed, and vacuum before using any liquid product. This stops you turning dry grit into muddy residue. Use crevice tools around seat rails, handbrake surrounds, seatbelt buckles and console edges.
If you want better agitation around vents, stitching and textured plastics, a set of interior detailing brushes helps loosen debris without forcing a cloth into tight gaps.
Step 2 clean hard surfaces first
Start at the dashboard, instrument surround, door tops and centre console. Use your cleaner on a cloth or brush, not directly onto delicate areas. This keeps product under control and reduces splatter onto glass and screens.
Fold your microfibre often. One side lifts grime. A fresh side removes residue. Keep going with a dirty cloth and you just redistribute contamination.
Here's a useful visual walk-through of the process in action: How To Clean A Car Interior From Top To Bottom!
Step 3 tackle seats and soft trim
Fabric needs controlled moisture and blotting. Leather needs lighter product use and more attention to high-contact zones such as the outer bolster, lower cushion and armrest. Don't saturate either one. The goal is cleaning, not drenching.
Clean the dirtiest touchpoints twice if needed. Steering wheel, gear selector and door pull usually hold more oils than the rest of the cabin.
Step 4 finish with glass and detail work
Clean interior glass late in the process, once sprays and dust are under control. That avoids having to redo the windscreen after wiping the dash. Use a dedicated glass cloth if you have one, and keep protectants well away from glass edges.
Then inspect the details. Cupholders, vent blades, badge recesses, seat base switches and stitching lines are where interiors still look dirty even after a decent general clean.
Smart Buying Habits and Long-Term Maintenance
A good interior kit starts with restraint. Buying five cleaners that all do roughly the same job usually creates more problems than it solves, especially if two of them leave gloss, silicone, or residue on surfaces that should stay dry and natural. The better approach is to buy around the soil you deal with and the materials in front of you.
Chemistry matters here. Body oils, food spills, dust, dye transfer and old dressing residue do not respond the same way, so one bottle will never be perfect for every surface. Mild interior cleaners handle light organic grime without stressing plastics or trim coatings. Fabric cleaners need enough bite to break down spills and trapped odours, while leather products should clean without over-wetting the hide or leaving a slippery finish on high-contact areas.
Buy for the actual problem.
If the cabin mainly picks up dust, fingerprints and light traffic film, a low-residue interior detailer makes sense. If cloth seats are holding onto spills, choose a proper upholstery cleaner instead of spraying the whole cabin with a general-purpose product and hoping for the best. If hard trim is fading or drying out, add a protectant with UV resistance, but keep it off screens, steering wheels and pedals.
A sensible kit usually includes:
One pH-conscious general cleaner for routine wipe-downs on hard interior surfaces.
One material-specific cleaner for fabric or leather, based on the seats in the car.
One glass cleaner and quality microfibres, because a poor towel can leave lint, haze and drag even with a good product.
A soft detailing brush for vents, stitching lines, switches and textured plastics.
Long-term maintenance should feel light, not like a full reset every few months. Fresh contamination is easier to lift because it is still sitting on the surface. Leave it too long and oils, sugars and grime start bonding into texture, fabric fibres and coated trim, which means stronger agitation and a higher chance of wear.
Use a simple schedule:
Weekly: clear rubbish, shake out mats, wipe the steering wheel, gear selector and door pulls.
Monthly: vacuum properly, clean touch surfaces, and inspect for residue buildup in high-contact areas.
Seasonally: deep clean seats, carpets and trim, then reapply protection where the material benefits from it.
That routine saves money because products last longer and you avoid buying harsh cleaners to rescue neglected trim.
If you are replacing tired cloths or adding a few car care accessories to a regular maintenance order, GSF Car Parts is one practical place to source those items alongside other workshop and service basics many owners already buy.





