Ever found your car’s heater or air conditioning has a mind of its own? One minute it’s off, the next it’s blasting like a hurricane, with no settings in between. If that sounds familiar, the likely culprit is a small but essential component called the blower motor resistor.
This part is the command center for your car's fan speed. It’s what gives you precise control over the airflow from your heating, ventilation, and air conditioning (HVAC) system, ensuring you’re not stuck with just ‘off’ or ‘full blast’.
What Is a Blower Motor Resistor and What Does It Do?
At its core, the blower motor resistor is a simple electrical component with one crucial job: to regulate the speed of the fan (the blower motor) that pushes conditioned air through your vehicle’s vents.
When you want a gentle breeze to clear a misty windscreen, the resistor limits the electrical current flowing to the fan motor, causing it to spin more slowly. When you crank the dial up to the highest setting for maximum airflow, the system is designed to bypass the resistor entirely, sending full power directly to the motor for that powerful blast.
A working blower motor resistor is not just a comfort feature; it is a key piece of safety equipment. The ability to control airflow is vital for demisting your windscreen and maintaining clear vision in damp or frosty conditions.
It’s one of the unsung heroes in your vehicle, quietly performing its function every time you adjust the fan speed. It allows you to fine-tune your cabin temperature and, more importantly, maintain a clear view of the road.
Why This Small Part Is So Important
The blower motor resistor has a direct impact on both driving comfort and active safety. Its function extends far beyond simply providing a bit of a breeze. Here’s a breakdown of its critical roles:
Precise Climate Control:It empowers the driver to fine-tune the airflow, from a whisper-quiet low setting to a powerful high setting, putting you in complete control of the cabin environment.
Safety and Visibility:A controllable fan is essential for rapidly clearing condensation, frost, or ice from the windscreen. This is not just a convenience; it is a legal requirement in many regions and a key check during MOT inspections.
System Protection:By managing the electrical current, the resistor also helps protect the blower motor itself from electrical surges that could cause premature failure.
Due to its constant exposure to heat and electrical load, this component has a finite service life. The blower motor resistor is one of the most frequently replaced HVAC parts, with failures observed in a significant number of vehicles. Cold, damp climates can place extra strain on these components, leading to failures in an estimated 12% of vehicles over five years old.
For those undertaking their own vehicle maintenance, this common issue presents an opportunity for significant cost savings by sourcing quality parts from aftermarket suppliers.
The Link to the Heater Motor
It is important to understand that the resistor works in tandem with the main fan, often called the heater motor. The resistor does not generate airflow; it only controls the speed of the motor that performs the mechanical work.
If the heater motor begins to fail, it can draw excessive electrical current. This increased load can cause a brand-new resistor to burn out very quickly. For a deeper technical understanding, our detailed guide on heater motors is an excellent resource.
Thanks to the constant heat and electrical current it manages, the blower motor resistor has a limited lifespan. When it eventually fails, the symptoms are typically very distinct, making it a straightforward component to diagnose and a common task for DIY car repair.
How a Blower Motor Resistor Controls Fan Speed
How Blower Motor Resistors & Fan Speed Controls Work
So, how does this small device actually grant you control over your car's fan? The principle lies in managing the flow of electricity. A helpful analogy is to imagine the electricity destined for your fan motor as water flowing through a set of pipes.
When you select the highest fan speed, your dashboard switch effectively opens the largest available pipe. This allows the maximum volume of "water" (electricity) to flow to the fan motor, causing it to spin at its maximum speed.
But what happens when you only need a gentle airflow? This is where the blower motor resistor comes into play. It functions as a series of narrower pipes, each corresponding to a lower fan speed setting.
The component’s function is revealed in its name: The resistor resists the flow of electricity. Greater resistance results in a slower fan speed, while less resistance allows it to spin faster.
When you select a lower speed, the switch diverts the electricity through one of these smaller "pipes," or resistive circuits. This reduces the current before it reaches the motor, resulting in a slower spin and a quieter cabin.
The Science Bit: Resistance and Heat
Each of the lower fan speeds on your dashboard corresponds to a different electrical circuit within the blower motor resistor. The lowest setting forces the electricity through the path with the most resistance, significantly slowing the current. Each subsequent speed setting uses a path with progressively less resistance.
A natural byproduct of resisting electrical current is heat—a substantial amount of it. A blower motor resistor can become extremely hot during normal operation. This is precisely why it is almost always mounted directly within the HVAC ducting. The continuous airflow from the fan serves to dissipate this heat and prevent the resistor from burning out.
This leads to a critical point: if the fan motor itself fails, the airflow needed to cool the resistor ceases. This often causes the resistor to overheat and fail very quickly. It is why a failed fan motor frequently leads to a failed resistor as well.
Traditional Resistors vs. Modern Modules
The technology within these components has evolved, and the type in your car likely depends on its age. Understanding the difference is useful for diagnosis.
Coiled Wire Resistors: Found in older vehicles, these consist of a small circuit board with several metal springs or coils. Each coil provides a different level of resistance. They are simple, effective, and have been a reliable solution for decades.
Solid-State Modules: Newer vehicles typically use a more advanced design with a printed circuit board (PCB), often called a blower motor controller or final stage unit. These use transistors to manage voltage more precisely, which generates less heat and offers greater durability.
While modern solid-state modules are generally more robust, they are not immune to failure. The constant heat cycles and electrical demands can eventually cause the delicate electronics to fail, resulting in the same symptoms as a classic coiled resistor failure.
Regardless of the type, the function remains the same: providing control over the fan speed. When this small but vital part fails, you lose that control, which is why replacing it is a common and necessary repair.
Common Symptoms of a Failing Blower motor Resistor

Fortunately, a faulty blower motor resistor typically presents with very specific symptoms, making it relatively easy to diagnose. When this component begins to fail, your ability to control the airflow is compromised, leading to some classic tell-tale signs.
The most common symptom is the fan suddenly operating only on its highest speed setting. You might turn the control knob through its lower settings and get no response—no air, no sound. But the moment you select the maximum setting, the fan roars to life.
There is a simple electrical reason for this. The highest fan speed is designed to completely bypass the blower motor resistor, sending the full 12-volt current directly to the fan motor. When the resistor’s internal circuits for the lower speeds burn out, they create an open circuit, and those speeds stop working. The high-speed setting, however, does not rely on the resistor and continues to function normally.
No Fan Speed at All
While a fan stuck on high is the most common indicator, a complete loss of fan function on all settings can also point to a failed resistor. In some cases, the entire component can fail catastrophically, often due to a significant electrical surge or extreme heat. This can sever the main connection that supplies power to all the speed circuits.
However, if your fan is completely inoperative, it is wise to investigate other potential causes first:
Check the fuses: A blown fuse is a simple and common reason for a dead blower motor. Your owner’s manual will indicate the location of the relevant fuse panel.
Inspect the blower motor: The fan motor itself could have seized or burned out.
If the fuses are intact, the resistor becomes the next logical component to inspect. While complete failure is less common than losing only the lower speeds, it does occur.
Other Key Signs of Failure
Beyond the all-or-nothing scenarios, a dying blower motor resistor can cause other unusual behaviors. These symptoms may be intermittent, making diagnosis trickier, but they all point to an electrical issue within the resistor pack.
You might find that some fan speeds work while others do not. For example, speeds one and two might be inoperative, but three and four function correctly. This indicates that the specific resistor coils or circuits for the lower speeds have failed, while the others remain intact.
Another classic sign is an intermittent fan that cuts in and out while driving. This is often caused by a cracked solder joint or a loose internal connection within the resistor. As the vehicle vibrates, the connection makes and breaks contact, causing sporadic fan operation.
A burning smell, often of hot plastic or an electrical fault, is a serious warning sign. This can occur when the resistor overheats to the point of melting its plastic connector or housing. If you notice this odor, cease using the fan and inspect the resistor and its wiring immediately.
In fact, data from UK repair networks indicates the blower motor resistor is implicated in as many as 65% of all HVAC complaints logged by independent garages. This has led to over 200,000 replacements in a single year, often because a failing blower motor was drawing excessive current and destroying the resistor. To learn more about common faults, explore the full data and findings on heating components.
How to Diagnose and Test Your Blower Motor Resistor
So, your car’s heater fan has started acting up. Perhaps it's stuck on full blast, only works on certain settings, or has stopped working entirely. These are the classic symptoms of a failing blower motor resistor.
Before purchasing a new part, a few minutes of diagnostic work can confirm the resistor is the root cause. These simple checks can be performed with basic tools and will definitively tell you whether the fault lies with the resistor, a fuse, or the blower motor itself.
The first step is a simple visual inspection. Once you have located the resistor (it’s typically located in the passenger footwell, near the blower motor housing), remove it for a thorough examination.
Often, the damage is immediately apparent.
Visual Inspection What to Look For
A failed blower motor resistor frequently exhibits visible signs of damage, especially older coiled-wire types which generate significant heat. Look for these clear indicators:
Burn Marks or Discolouration: This is a primary sign. Any dark, scorched spots on the resistor body or its plastic connector are a clear indication of overheating.
Corrosion: Look for rust or a greenish-white powdery residue on the electrical terminals. Moisture from a leaky heater core or ambient humidity can cause corrosion, which degrades the electrical connection.
Melted Plastic: In severe cases, the resistor can become hot enough to melt the plastic on the wiring connector. If this is observed, the connector pigtail may need to be replaced along with the resistor.
Broken Coils: On older, wire-wound resistors, you may literally see that one of the thin metal coils has snapped. A broken coil creates an open circuit, which is why that specific fan speed has ceased to function.
If you observe any of these signs, you can be highly confident that you have identified the faulty component. However, modern solid-state resistors can sometimes fail internally without leaving any external clues. For a conclusive diagnosis, an electrical test is recommended.
Electrical Testing with a Multimeter
The professional method for testing a blower motor resistor is to check its continuity using a multimeter. This process involves using the multimeter’s resistance (Ohms) setting to verify if the internal circuits are intact.
A multimeter test is the method used by professional technicians because it provides empirical data, removing guesswork and confirming whether the resistor's circuits are open or closed.
Here is a step-by-step guide to performing the test:
Safety First: Before proceeding, always disconnect the negative terminal of your car battery. This is a critical safety measure to prevent short circuits.
Set Up Your Multimeter: Switch your multimeter to the lowest resistance setting, usually marked with the omega symbol (Ω).
Test the Resistor Pins: The resistor will have one "common" power input pin and several output pins for the different fan speeds. Touch one multimeter probe to the common pin, then sequentially touch the other probe to each of the speed pins.
Check the Readings: A functional resistor will show a distinct, low resistance (Ohms) reading for each fan speed pin. If the multimeter displays "OL" (Over Limit) or infinite resistance for any pin, it signifies an open (broken) circuit. This confirms the resistor is faulty and requires replacement.
If you are new to using such tools, you can learn more about the essentials of using voltage testers and multimeters to build your confidence. A multimeter provides a definitive answer in minutes.
You have now identified that the source of your fan speed issues is a faulty blower motor resistor. The good news is that replacing it is one of the more straightforward jobs you can perform on your car. The repair typically takes less than an hour with basic tools and can save significantly on garage labor costs.
This guide will help you restore your car’s heating and cooling system to full functionality. While the resistor's exact location varies between models, the replacement process is largely consistent.
Before starting, this flowchart provides a final check to ensure the resistor is indeed the problem.
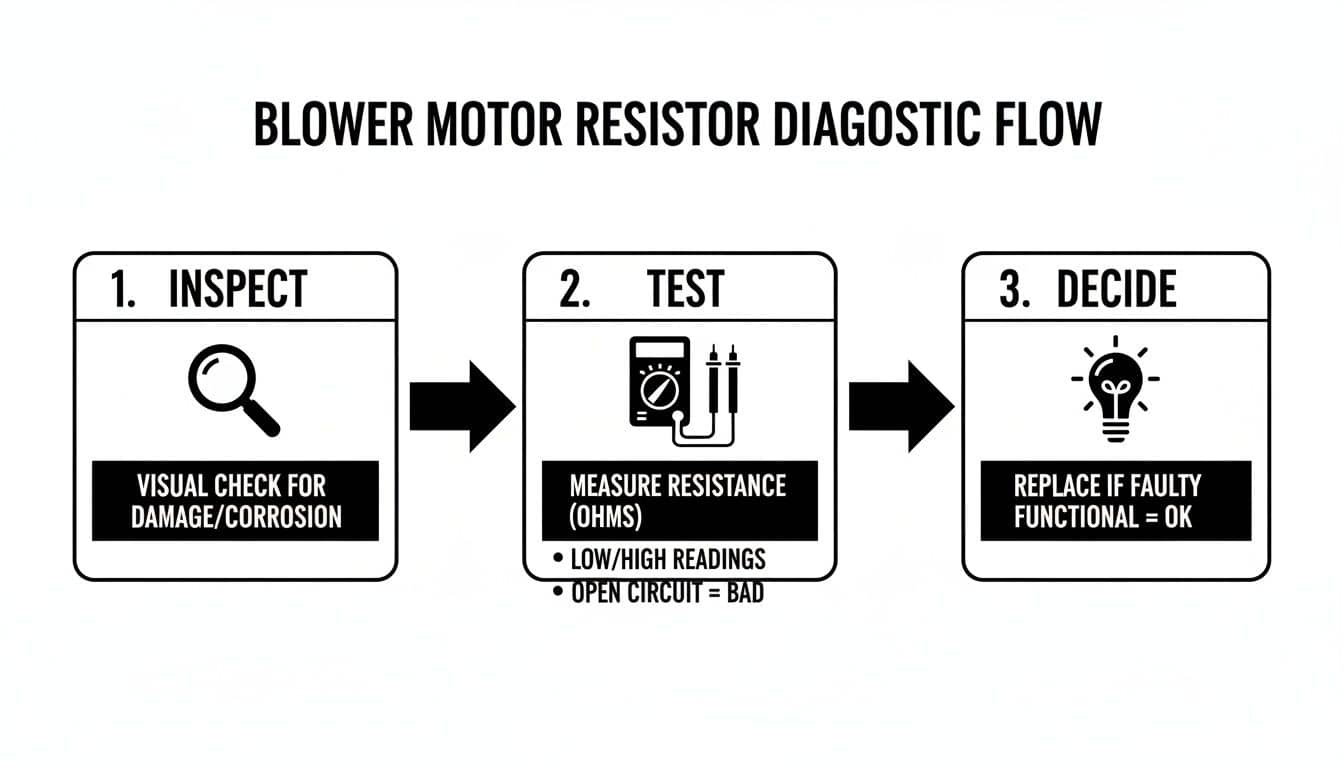
It outlines the simple logic: perform a visual check, test the component, and then make a final decision. There is no point in replacing a part that is not broken.
Step 1: Locate the Faulty Resistor
First, you need to find the component. In over 90% of cars, the blower motor resistor is located in the passenger-side footwell. It is almost always mounted directly on the heater box or air ducting, in close proximity to the blower motor itself.
You will likely need to get on your hands and knees with a torch. Look under the dashboard, typically behind the glove box. You are searching for a small electrical part with a wiring plug connected to it, secured by one or two screws (often an 8mm hex head or a Torx screw).
Step 2: Prepare for a Safe Replacement
Before proceeding, prioritize safety. The most crucial step is to disconnect the negative terminal of your car battery. This simple action eliminates the risk of an electrical short, which could damage fuses or other electronic components.
With the battery disconnected, you may need to remove a plastic trim panel or the glove box assembly to gain clear access to the resistor. This varies by vehicle but usually involves just a few clips or screws. Work patiently and keep all fasteners organized.
Step 3: Unplug and Remove the Old Part
Once you have a clear view of the resistor, disconnect the wiring harness. There is a small plastic tab on the connector that you will need to press or lift to release it. These can be stiff after years of heat cycles, so apply firm but steady pressure.
Pro Tip: Before disconnecting the plug, inspect it closely. Any signs of melting, burn marks, or green-and-white corrosion indicate that the connector should also be replaced. A faulty connector is a common cause of premature failure for a new resistor.
After unplugging it, simply remove the screws holding the resistor in place. The old part should then slide out of the ductwork.
Step 4: Fit the New Blower Motor Resistor
This is the most straightforward step. Take your new blower motor resistor and compare it to the old one to ensure they are an identical match. This is why using an online vehicle registration lookup tool is recommended, as it helps guarantee you get the correct part for your specific vehicle.
Slide the new resistor into its slot, ensuring it sits flush against the housing. Reinstall the original screws, tightening them until they are snug—over-tightening is not necessary.
Next, connect the wiring harness firmly to the new resistor. You should hear or feel a "click" as it seats properly. Give it a gentle tug to confirm it is secure. Now you can refit any trim panels or the glove box that were removed.
Finally, reconnect the negative battery terminal. It is time for the final test. Start the car, turn on the fan, and cycle through all the speed settings. If all speeds are working correctly, you have successfully restored your climate control system.
Choosing the Right Resistor and Understanding the Costs
You have correctly diagnosed the blower motor resistor as the faulty component. The next step is to procure a replacement, and making an informed choice here is beneficial for long-term reliability. While it may be tempting to select the lowest-priced option, not all aftermarket parts are created equal.
Opting for a trusted brand such as DriveTec, Delphi, or Mahle is a sound strategy for ensuring reliability. These manufacturers produce components that meet or exceed original equipment (OE) specifications. A well-manufactured resistor is designed to withstand the constant heat and electrical loads, preventing the need to repeat the repair in the near future.
The Real Cost of a Blower Motor Resistor
Replacing a blower motor resistor yourself is an excellent way to save money. A professional garage might charge between £60 and £120 for labor, but the component itself is relatively inexpensive. By performing the replacement yourself, your only cost is the part.
The aftermarket parts industry offers significant value. In the UK, the automotive HVAC sector is a large market, with blower motor resistors accounting for approximately £55 million in annual sales. This high demand means you can obtain high-quality parts from reputable brands, often at half the price charged by a main dealer. If you are interested in the market data, you can find out more about the automotive HVAC sector's growth.
Choosing a quality component is an investment in your vehicle’s reliability. Paying a small premium for a trusted brand now can prevent the cost and inconvenience of a premature failure later.
When purchasing from a reputable supplier, you receive more than just a component:
Long-Term Warranties: A 12-month warranty (or longer) provides coverage against unexpected defects.
Fast Delivery and Collection: Services like free UK delivery or same-day collection minimize vehicle downtime.
Expert Support: Access to knowledgeable staff via live chat or phone can help confirm you are ordering the correct part for your vehicle.
Combining a quality part with the satisfaction and savings of a DIY repair results in an efficient and cost-effective solution. If you require other components for your vehicle's climate control system, you can explore our full range of cooling and heating parts.
Frequently Asked Questions About Blower Motor Resistors
Even with a solid understanding of the component, you may have some remaining questions. Here are answers to some of the most common queries about blower motor resistors, providing practical knowledge to help you complete the repair with confidence.
Can I Drive My Car with a Faulty Blower Motor Resistor?
While it may be technically possible, it is strongly discouraged. If your fan is stuck on the highest speed, the noise can be a significant distraction from driving.
More critically, if the fan is completely inoperative, you lose the ability to demist the windscreen. In damp or cold weather, this presents a major safety hazard by severely impairing visibility, and it is an automatic MOT failure. For your own comfort and, more importantly, your safety, a faulty blower motor resistor should be replaced as soon as possible.
Why Did My New Blower Motor Resistor Fail Again?
This frustrating situation almost always points to an underlying issue within the heating system. Premature failure of a new resistor is a classic symptom of a worn-out blower motor. As a motor ages, its bearings wear, and it requires more electrical current to spin.
This excessive current draw overloads the new resistor's delicate circuitry, causing it to overheat and burn out. Before installing another new resistor, you must inspect the blower motor. If it feels stiff to turn by hand or makes a grinding noise, it is failing and needs to be replaced along with the resistor to achieve a lasting repair.
A repeat failure is not bad luck; it is a diagnostic clue. The resistor often acts as a sacrificial component, failing first when the blower motor begins to draw too much power, thus serving as an early warning of a more significant problem.
Is Replacing a Blower Motor Resistor Hard for a Beginner?
For most vehicles, this is an excellent entry-level DIY task. It is one of the more straightforward repairs, typically taking between 30 and 60 minutes and requiring only basic tools like a screwdriver or a small socket set.
The resistor is usually located in the passenger footwell, making it accessible without extensive disassembly of the dashboard. By following a clear guide and working carefully, most people can successfully complete this job and save on garage labor fees.
How Do I Find the Exact Resistor for My Vehicle?
The most reliable method is to use an online parts finder that utilizes your vehicle's registration number. Simply enter your number plate, and the system will display only the components that are guaranteed to fit your specific make and model.
This removes all guesswork and prevents you from ordering an incorrect part. If you have any doubts, a good supplier will have experts available via live chat or telephone to help you verify the correct fitment.
Ready to restore your car's heating and demister functions? At GSF Car Parts, we make it simple to find the exact blower motor resistor for your vehicle. Just use our number plate tool to find guaranteed-fit parts from trusted brands and get back on the road with confidence. Find your parts today at https://www.gsfcarparts.com.


