You turn the key, pull out onto the road, and the temperature gauge does something that doesn't make sense. Maybe it creeps far higher than usual when you sit in traffic. Maybe it barely moves off cold, even though you've been driving long enough for the heater to start working properly. Both are frustrating. Neither should be ignored.
A thermostat is a small part, but it has a big job. It's the gatekeeper of coolant flow, opening and closing as the engine warms so the car reaches and holds the right operating temperature. When it works, the engine warms up properly, the heater behaves, and coolant circulates when it should. When it doesn't, the symptoms can feel confusing until you understand what the thermostat does.
If you want to know how to change a car thermostat, the job is usually manageable for a careful DIYer. The trick is not rushing straight to the spanners. Key to success is diagnosing it properly first, fitting it the right way round, and finishing the refill and bleed properly so you don't create a fresh problem after solving the first one.
Is Your Car's Temperature Gauge Lying to You?
One of the most common thermostat stories starts on a cold morning. The engine seems to take ages to warm up, the cabin heater is weak, and the gauge sits stubbornly low. The car still runs, so it's tempting to ignore it. But that pattern often points to a thermostat stuck open.
The other version is more urgent. The gauge climbs too quickly, especially when the car is stationary or moving slowly, and you start watching it instead of the road. In that case, the thermostat may be stuck closed, stopping coolant from circulating when the engine needs it most.
What the thermostat actually does
Think of the thermostat as a temperature-operated valve in the cooling system. When the engine is cold, it stays shut so the engine can warm up efficiently. As temperature rises, it opens and allows coolant to circulate through the radiator.
That's why thermostat faults stand out more clearly than many other cooling issues. They often change warm-up behaviour, not just overall temperature.
A thermostat doesn't just affect overheating. It affects how the engine gets to temperature in the first place.
Why this part matters more than it looks
A modern engine is designed to run within a stable temperature range. Too cold, and it won't warm up properly or heat the cabin well. Too hot, and you risk serious engine trouble. The thermostat sits right in the middle of that balance.
The good news is that replacing one usually isn't a huge strip-down job. On many cars, the thermostat housing is accessible once you follow the upper radiator hose back to the engine. The less good news is that small mistakes matter here. Fit it backwards, damage the sealing surface, or leave air trapped in the system, and you can end up chasing the same symptoms again.
Confirming a Faulty Thermostat Before You Start
Before you buy parts or drain a drop of coolant, make sure the thermostat is the likely culprit. A thermostat fault is one of the few cooling-system problems that can quickly change engine warm-up behaviour, which is why replacement is usually recommended only when symptoms confirm failure, as noted by Cars.com's thermostat guidance.

Stuck open and stuck closed feel different
A stuck-open thermostat usually gives itself away with slow warm-up. The engine takes too long to reach normal temperature, the heater output is poor or inconsistent, and the gauge may sit lower than usual. The car often feels fine otherwise, which is why drivers put up with it longer than they should.
A stuck-closed thermostat is more serious. The engine can heat up rapidly because coolant isn't circulating properly through the radiator. You may see the gauge rise faster than normal, and you should stop diagnosing by driving if overheating is already obvious.
Checks you can do before dismantling anything
Use simple evidence, not guesswork:
Watch the warm-up pattern. A thermostat issue often changes how the car behaves from cold start to operating temperature, not just what happens once it's fully hot.
Check heater performance. If the engine seems slow to warm and the heater stays weak, that supports the case for a thermostat stuck open.
Feel the top radiator hose carefully. As the engine warms, the hose should stay relatively cool at first, then get hot when the thermostat opens. If it warms too early or doesn't seem to follow the gauge behaviour, that's useful information.
Look for obvious coolant loss. A leak can create overheating symptoms without the thermostat being at fault.
Think about other suspects. A faulty radiator fan, clogged radiator, failing water pump, or low coolant can all mimic parts of the same complaint.
Workshop habit: Don't replace a thermostat because the gauge looked odd once. Replace it because the symptoms form a pattern.
What counts as convincing evidence
The strongest thermostat diagnosis usually comes from behaviour that repeats. Slow warm-up and weak cabin heat point one way. Quick overheating points another. Random temperature swings with visible coolant loss point you toward leaks first.
A capable DIYer saves the most time by ruling out the obvious before opening the system. If the coolant is low, fix that question first. If the fan never cuts in, the thermostat may not be your main problem. If the engine warm-up behaviour has clearly changed and the rest of the system looks intact, thermostat replacement becomes a sensible next step.
Gathering Your Tools and the Correct Parts
This job goes smoothly when the parts are right and the bench is set up before you start. It goes badly when you've got the housing off and realise the new thermostat doesn't match, the gasket is wrong, or you forgot a drain pan.
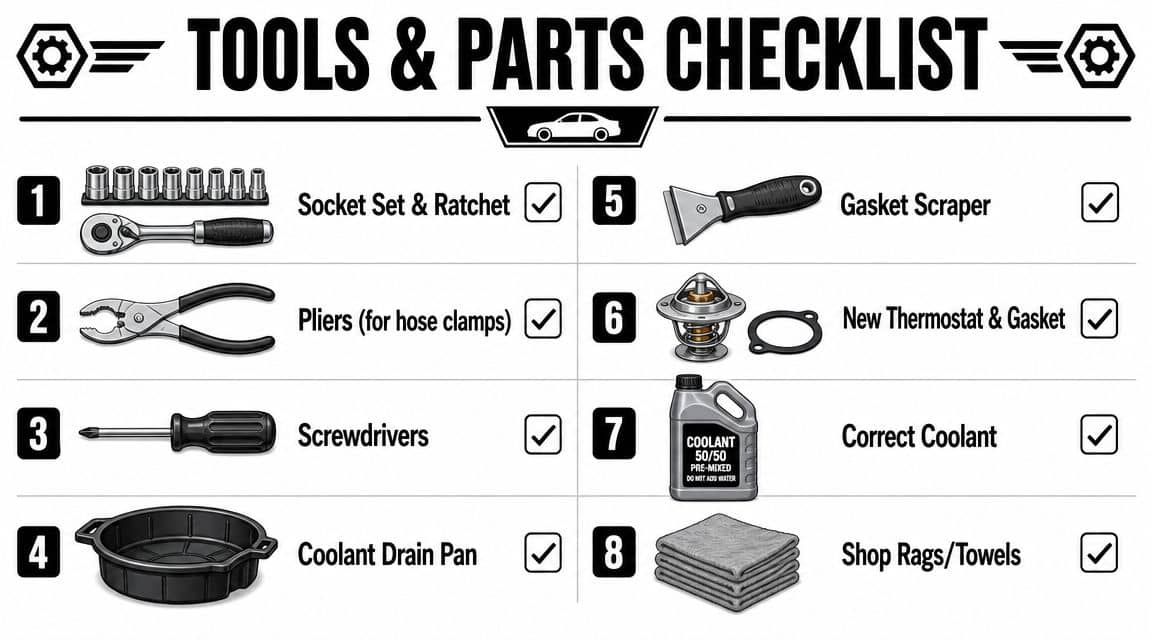
The basic kit that makes the job easier
You don't need a specialist workshop to do this, but a few basics matter:
Socket set and ratchet for housing bolts and any covers in the way
Pliers for spring hose clips
Screwdrivers for hose clamps or trim pieces
Coolant drain pan to catch what you remove cleanly
Gasket scraper or plastic scraper to clean the mating face without gouging it
Funnel to refill without spilling coolant everywhere
Clean rags for sealing faces, drips, and final checks
Parts to buy before the car is apart
The essentials are straightforward:
Part | Why it matters |
New thermostat | The actual control valve you're replacing |
New gasket or seal | Prevents leaks at the housing |
Correct coolant | Needed for refill and proper protection |
Replacement housing bolts if required | Useful if yours are corroded or damaged |
Some thermostats come with a seal. Some don't. Never assume.
Getting the right thermostat the first time
Vehicle fitment matters more than many DIYers expect. Housing shape, seal style, opening arrangement, and even the way the thermostat sits in the recess can vary. If you're sourcing parts online, a reg lookup is the safest route. One option is the GSF Car Parts thermostat range, where the number plate finder helps match the part to the vehicle.
Buy the gasket or seal with the thermostat unless the listing clearly states it's included. Reusing the old seal is one of the easiest ways to turn a simple repair into a leak chase.
A quick prep check before you begin
Lay out the new thermostat next to the old one before fitting anything. Compare diameter, depth, flange shape, and seal design. That simple side-by-side check catches wrong parts before coolant is on the floor and the car is half apart.
Also have the correct coolant ready before you loosen the housing. This isn't a job where you want to stop halfway and drive to the shop.
Your Step-by-Step Thermostat Replacement Process
The first rule matters more than every tool on the bench. The engine must be completely cool before you open the cooling system. Guidance for DIY and trade users consistently warns against working on a hot engine because pressurised coolant can cause severe burns, and the core job involves draining enough coolant so the level drops below the thermostat housing before removal.

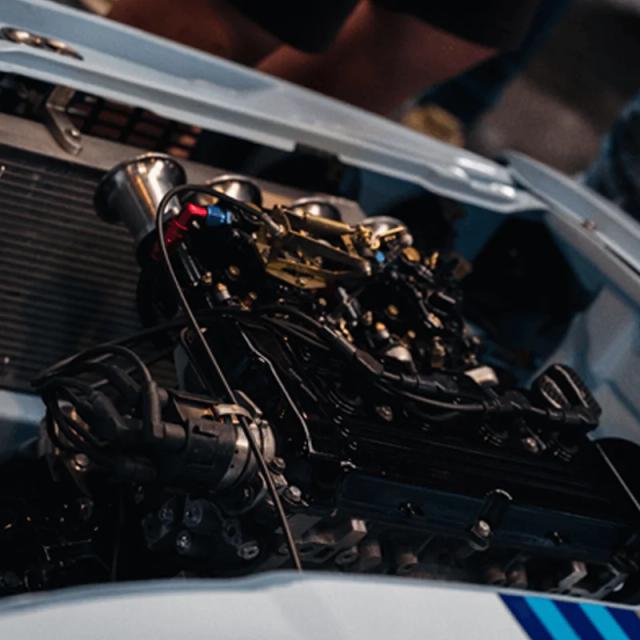
Find the housing before you touch anything
On many engines, the easiest route is to follow the top radiator hose back to where it joins the engine. That connection usually leads you straight to the thermostat housing. Some cars hide it under intake pipework or covers, so remove only what you need for clear access.
Before loosening bolts, take a moment to study the layout. Notice hose routing, bolt lengths, and how the housing sits. A quick phone photo helps when you're putting everything back together.
Lower the coolant level, not necessarily all of it
This is one place people make more mess than necessary. In many cases, you don't need a full drain. You only need to lower the coolant enough so the level sits below the thermostat housing.
Use a drain pan and work cleanly. If the coolant is old, contaminated, or you've got any doubts about its condition, this can be a good moment to refresh the system properly. If the coolant is still serviceable and you're keeping it, keep the catch pan clean.
Remove the housing carefully
Crack the housing bolts evenly rather than fully removing one side first. If the housing is stuck, don't lever hard against a delicate sealing face. Gentle persuasion beats damage.
Once the housing lifts off, note exactly how the old thermostat sits. That matters.
Orientation is critical. The sensing element needs to face toward the engine for the thermostat to regulate temperature properly.
Seal position matters. A twisted or pinched gasket will leak even if the bolts feel tight.
Corrosion tells a story. Heavy crusting around the housing often points to a past seep or poor sealing surface.
Common mistake: Fitting the thermostat in the wrong direction. The housing may bolt down perfectly and still leave you with the wrong cooling behaviour.
Clean and refit with patience
Remove every trace of the old gasket or sealant from the mating faces. Use a scraper gently. You want a clean surface, not scratches or gouges that create leak paths. Wipe the area dry before offering up the new parts.
Set the new thermostat into place in the same orientation the design requires. If your thermostat has a small bleed feature or jiggle pin, it's commonly positioned uppermost so air can escape during filling. Then fit the new gasket or seal and reinstall the housing.
Tighten the bolts evenly, alternating from side to side so the housing seats squarely. You're aiming for firm, even clamping, not brute force. Overtightening cracks housings and distorts seals.
If you need purpose-made gear for draining, pressure work, or cooling-system service, it helps to look through dedicated cooling system service tools before you begin.
A visual walkthrough can help if you want to compare your layout with a typical job: How to Replace a Bad Thermostat in Your Car
The Final Step Refilling and Bleeding the System
A thermostat replacement isn't finished when the housing bolts are tight. It's finished when the cooling system is full, free of trapped air, and behaving normally. Many first-time DIY jobs frequently go wrong at this point.
Bleeding matters because air pockets stop coolant circulating properly. That can create hot spots, poor heater output, or gauge readings that make you think the new thermostat is faulty when the actual issue is trapped air.
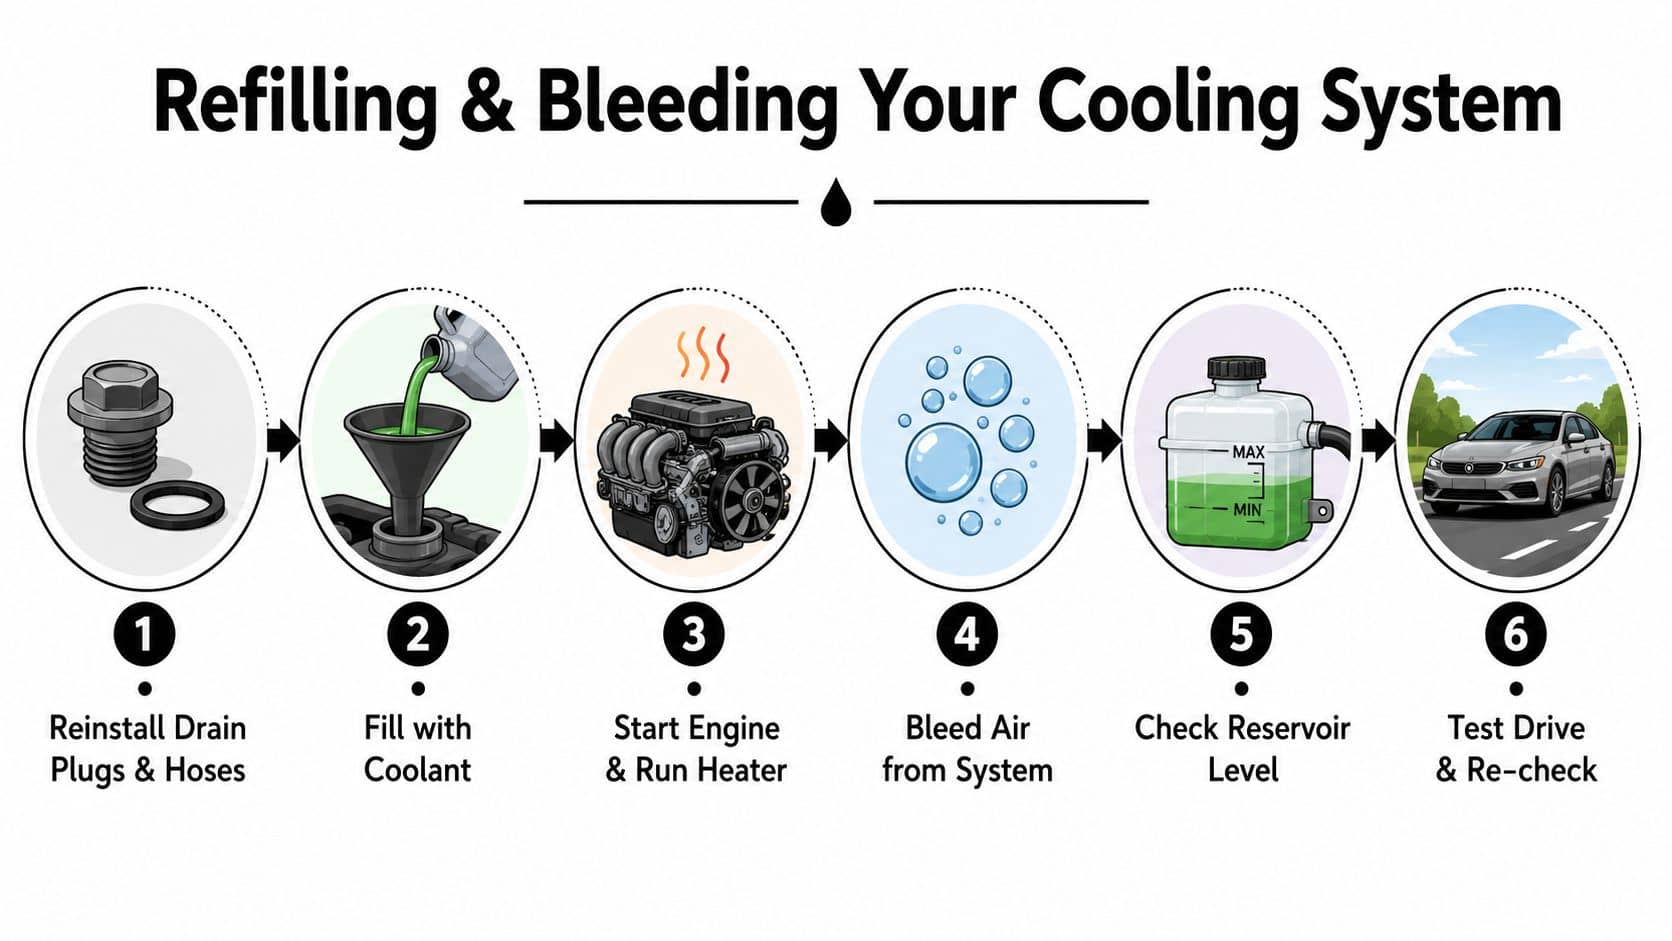
Refill slowly and use the correct coolant
Most guides specify refilling with the vehicle's correct coolant mixture, then running the engine to full operating temperature and checking for leaks and stable gauge readings after the thermostat opens. That sequence matters because bleeding the system is a standard post-installation step, not an optional extra.
If you still need fluid, use the correct engine coolant options for your vehicle rather than mixing unknown types.
A simple bleed routine that works
Use a calm, methodical process:
Recheck everything first. Make sure the housing is bolted down, hoses are secure, and any drain points are closed.
Fill slowly through the radiator or expansion tank, depending on the system design.
Open bleed screws if fitted. Some cars have dedicated bleed points. Use them.
Set the heater to hot so coolant can circulate through the heater circuit.
Start the engine and let it warm up while monitoring the level.
Top up as the level drops and air works its way out.
Trapped air can mimic thermostat failure. If the heater stays cold after the repair, suspect an airlock before you blame the new part.
What you're looking for as it warms up
You want to see the system settle, not behave dramatically. The level may drop as air escapes. The heater should begin to produce heat. Once the thermostat opens, coolant circulation should become more obvious and the gauge should stabilise rather than climb erratically.
After the engine reaches operating temperature, inspect the housing and hose joints for leaks. Shut the engine off, let it cool, and recheck the level again. A road test is useful, but the first proper one should be close to home, with an eye on the gauge the whole time.
Troubleshooting and Final Checks
A successful thermostat replacement shows itself in normal behaviour. The engine warms up properly, the heater works, and the gauge stays where it should. If it doesn't, don't assume the whole job has failed. Work through the likely causes.
If something still isn't right
Here's how I'd read the most common post-repair issues:
Still overheating. Recheck for trapped air first. Airlocks are a very common reason a freshly repaired car still runs hot.
Leak at the thermostat housing. The gasket may be out of place, the sealing face may not be clean, or the housing may not be sitting square.
Heater still blows cold. That points back to circulation and bleeding. The system may not be fully purged.
Gauge now behaves oddly in a new way. Double-check thermostat orientation. A backwards thermostat can create symptoms that feel baffling until you reopen it.
Your final road-test checklist
Keep the last checks simple and deliberate:
Check | What you want to see |
Temperature gauge | Stable in the normal range |
Heater output | Consistent warm air |
Housing area | No fresh drips or staining |
Hose joints | Dry after warm-up |
Coolant level after cooling | Settled at the correct mark |
If the car runs to temperature, the heater works, and everything stays dry, you've done the job properly.
Changing a thermostat is one of those repairs that rewards careful work more than speed. Diagnose first. Fit it in the correct orientation. Bleed the system thoroughly. Do those three things well, and this is a very achievable driveway repair.
If you're ready to tackle the job, GSF Car Parts is one place to source the thermostat, coolant, tools, and other workshop essentials you'll need, whether you're planning ahead or picking parts up quickly for a same-day repair.