It's easy to overlook the parts you can't see, but your car's rear wheel bearing is a small component that performs a massive job. It serves as the critical connection between the stationary axle and the spinning wheel, ensuring every journey is smooth and, most importantly, safe. When this component begins to fail, your car will certainly let you know.
Why Your Rear Wheel Bearing Is So Important

In technical terms, a rear wheel bearing is a set of hardened steel balls or rollers (known as rolling elements) held within a metal ring called a race. Housed inside the wheel hub, its primary function is to allow the wheel to rotate with minimal friction. Without it, the metal-on-metal contact between the hub and the axle would generate immense heat and friction, bringing your car to a very loud and sudden stop.
To understand its role, imagine trying to spin a heavy fairground wheel on a rusty axle—it would be stiff, noisy, and difficult to move. Now, picture placing smooth, greased marbles between the wheel and the axle. It would spin freely for ages. This is precisely the principle a wheel bearing applies to your car.
The Foundation of a Stable Ride
Beyond enabling rotation, the rear wheel bearing is fundamental to your vehicle's handling and stability. It supports the entire weight of the car's rear end while enduring the immense forces generated during braking, acceleration, and cornering.
A healthy rear wheel bearing is the cornerstone of your car's safety and performance. As the component that connects the wheel to the car, its integrity is non-negotiable for maintaining control, especially during sudden manoeuvres or on challenging road surfaces.
This is particularly vital on the UK’s varied road network. From tight city roundabouts to bumpy B-roads riddled with potholes, your bearings are constantly under load. A well-functioning bearing keeps the wheel perfectly aligned, providing the predictable and secure handling you depend on.
More Than Just a Spinning Part
The condition of your rear wheel bearing affects more than just ride quality; its failure can have a cascading effect on other vehicle systems and your finances. Here’s why paying attention to them is crucial:
Fuel Economy: A worn bearing increases friction, creating drag. This forces your engine to work harder to turn the wheel, which can lead to a noticeable decrease in your miles per gallon (MPG).
Tyre Wear: As a bearing wears, it allows for a small amount of "play" or wobble in the wheel. This slight misalignment is enough to cause uneven and accelerated tyre wear, forcing you to buy new tyres much sooner.
Safety Systems: In most modern cars, the wheel speed sensor for the Anti-lock Braking System (ABS) is integrated into the bearing assembly. A faulty bearing can disrupt this sensor, triggering the ABS warning light and compromising braking performance in an emergency.
Given their critical role, it's no surprise that wheel bearings are a significant part of the vehicle maintenance landscape. In the UK, the bearings market is expected to grow at a compound annual growth rate (CAGR) of 9.1% through 2032. They account for approximately 15-20% of all steering and suspension repairs, with rear wheels involved in about 40% of those cases—a figure influenced by the stresses of British weather and road conditions. You can explore more on these market trends and their impact on UK drivers.
How to Spot a Failing Rear Wheel Bearing
When a rear wheel bearing begins to fail, your vehicle will typically provide several auditory and physical clues. The key is knowing what to listen and feel for. Early detection can save you from more extensive repair bills and, more importantly, ensure your safety. Ignoring these symptoms is a significant risk.
The first and most common symptom is a noise emanating from the rear of the car. It often starts as a faint, low-frequency hum or drone, which you might only notice at speeds above 30 mph.
As the bearing deteriorates, this subtle hum will intensify into a much more pronounced grinding, groaning, or rumbling sound. The noise will become progressively louder as your speed increases.
If you’re hearing unusual noises from the rear, it's important to determine whether you’re dealing with a bearing, a tyre, or another component. This quick-reference table breaks down the most common symptoms.
Symptoms of a Failing Rear Wheel Bearing
Symptom | Description | What It Means |
Humming or Droning | A low-pitched hum from the rear, especially at speeds over 30 mph. | This is the classic early warning sign. The bearing's internal rolling elements are beginning to wear. |
Grinding or Rumbling | A loud, aggressive noise that gets worse with speed. | The bearing has deteriorated significantly. The metal components are likely grinding against each other. |
Vibration | A noticeable vibration felt through the steering wheel, floor, or seats. | The worn bearing is causing the wheel to wobble, creating an imbalance that you can feel. |
Uneven Tyre Wear | The inside or outside edge of a rear tyre is wearing down much faster than the rest. | The "play" in the bad bearing is making the wheel sit at a slight angle, causing improper tyre contact with the road. |
ABS Warning Light | The ABS light on your dashboard suddenly comes on. | The wheel speed sensor, often part of the bearing hub, is being disrupted by the bearing's excessive movement. |
Once you have an idea of the potential issue, it's time to confirm your diagnosis with a simple test.
Distinguishing Bearing Noise from Other Sounds
One of the most effective methods for pinpointing a failing bearing is the "turning test". A bad bearing's noise will often change in pitch or volume when you turn. As you corner, your car's weight shifts, placing more stress on the outside wheel.
Therefore, if you turn left and the noise gets louder, the problem is almost certainly the right rear wheel bearing. If it gets louder when you turn right, your focus should be on the left side. This is a classic diagnostic technique that helps differentiate bearing failure from a tyre or drivetrain issue.
It’s easy to mistake bearing noise for tyre roar, but there’s a key difference. Tyre noise tends to remain consistent when you turn and often changes with the road surface. A failing bearing noise, on the other hand, is more consistent across different surfaces but intensifies with speed and during turns.
A worn rear wheel bearing isn't just an annoyance; it's a critical safety issue. Neglecting it can lead to higher rolling resistance, hitting your fuel economy, and in the worst-case scenario, a complete loss of wheel control.
Physical Clues and Warning Lights
While noises are the primary indicator, you might also feel or see other signs. Pay close attention to your car's handling, as this can provide additional clues.
A common physical sign is a vibration you can feel through the steering wheel, floor, or seats. This is caused by the excess "play" in the worn-out bearing, which prevents the wheel from spinning smoothly. The vibration will usually worsen as you increase speed.
That looseness in the bearing can also cause other issues:
Uneven Tyre Wear: A wobbly wheel won’t sit flat on the road. This leads to the inner or outer edge of your tyre wearing out prematurely, which can seriously shorten its life.
Vague or Loose Steering: Your car might feel "sloppy" or less responsive. You may find yourself making constant small steering corrections to maintain a straight line.
Illuminated ABS Light: In most modern cars, the Anti-lock Braking System (ABS) sensor is integrated into the wheel bearing assembly. As the bearing wears, it can create a gap or allow excessive movement, which disrupts the sensor's reading and triggers the ABS warning light.
The consequences extend beyond simple wear and tear. Department for Transport statistics indicate that wheel defects, including bearings, were a contributing factor in 2.8% of reported road accidents. Furthermore, research has shown that a bad rear bearing can increase rolling resistance by up to 15%, reducing your fuel efficiency by as much as 5%. You can find more analysis on the importance of industrial bearings if you wish to delve deeper into the data.
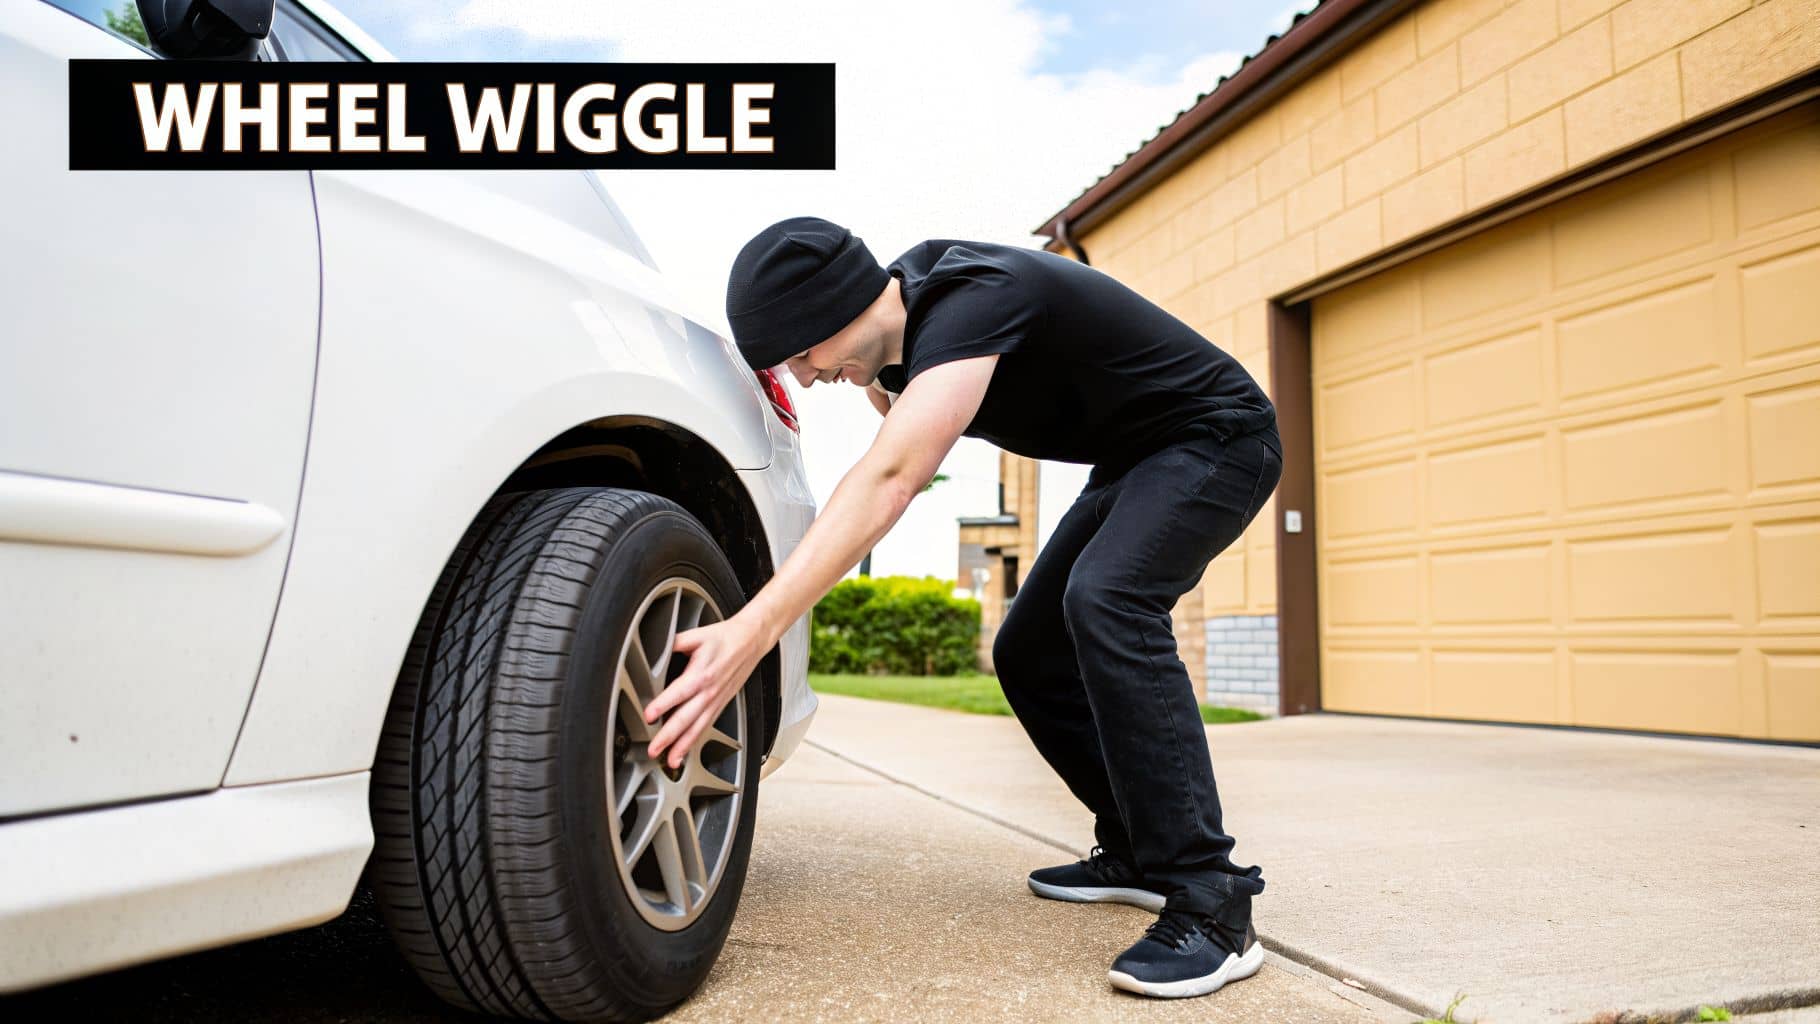
The At-Home Diagnostic Check
If you've noticed any of these symptoms, there’s a simple physical check you can perform at home to confirm the issue. It's often called the "wheel wiggle test," and it requires a jack and axle stands.
Safely Lift the Vehicle: Park on a flat, solid surface and chock the front wheels. Use a jack to lift the rear corner of the car with the suspected bad bearing. Crucially, secure the car with an axle stand before proceeding.
Perform the Wiggle Test: Grasp the tyre firmly with your hands at the 12 o'clock and 6 o'clock positions. Attempt to rock the wheel by pushing in with one hand while pulling out with the other.
Check for Play: If you feel any looseness, clicking, or movement—what technicians call "play"—it’s a definitive sign that the wheel bearing is worn and needs immediate replacement. A healthy bearing will exhibit no movement at all.
Choosing the Right Replacement Bearing for Your Car
Once you've diagnosed a faulty rear wheel bearing, selecting the correct replacement part is the most critical step. With numerous types, brands, and quality levels available, it’s easy to feel overwhelmed. This guide will equip you with the knowledge to choose the perfect component for your car, ensuring a durable repair and excellent value for money.
The single most important factor is achieving an exact fit. Even a minuscule difference in dimensions can prevent installation or, worse, lead to premature failure. The most reliable method to ensure a perfect match is by using your car's registration number.
Here at GSF Car Parts, our number-plate finder simplifies this process. Just enter your registration, and our system instantly cross-references your vehicle's specifications with our extensive parts database. This eliminates guesswork and guarantees the bearing you order is the correct one for your car’s make, model, and year.
As you can see, the process is straightforward. Entering your reg on the GSF Car Parts website instantly filters out incompatible parts, presenting a curated list of components guaranteed to fit your vehicle perfectly.
OE vs Aftermarket Parts
When searching for a rear wheel bearing, you'll encounter two main categories: Original Equipment (OE) and aftermarket. Understanding the distinction is key to making an informed purchase.
Original Equipment (OE): These are the identical parts that were installed in your car during its factory assembly. They are supplied by the vehicle manufacturer, so quality and fit are assured, but they typically come with a premium price from main dealers.
Aftermarket Parts: These parts are produced by independent companies that specialise in manufacturing automotive components. High-quality aftermarket brands design their parts to meet or exceed OE specifications, offering comparable performance and reliability without the dealership markup.
A common misconception is that aftermarket parts are inherently inferior. The truth is, trusted brands like Brembo, Delphi, and DriveTec invest heavily in research and development to deliver OE-matching quality, often at a more accessible price point.
A rear wheel bearing from a reputable aftermarket supplier, for example, is engineered to handle the exact same loads and stresses as its OE counterpart. It represents a smart, cost-effective choice for DIY mechanics and professional garages who demand reliability without paying a premium for the car maker’s logo.
Understanding Bearing Types and Quality
Not all bearings are the same. Depending on your car's design, you will need one of two main types. Knowing which one you're dealing with will inform the complexity of the replacement job.
Common Bearing Types
Hub Assembly: This is an all-in-one, pre-assembled unit that includes the bearing, hub, and often the ABS sensor. These are generally much easier to install as they simply bolt onto the suspension knuckle.
Press-in Bearing: This is the bearing itself as a standalone component. The old bearing must be pressed out of the hub or knuckle, and the new one pressed in using specialised tools, making it a more labour-intensive task.
The UK aftermarket for these components is expanding, driven partly by an expected 22% rise in electric vehicle adoption by 2025, which places different demands on parts. A 2026 Which? survey found that 65% of mechanics prefer sealed hub units because their sealed design offers a roughly 25% longer life—a quality standard you'll find across GSF's inventory. You can read more about the automotive wheel bearing market trends and how they impact part availability.
Finally, always check the warranty. A minimum 12-month warranty is a strong indicator that the manufacturer has confidence in its product's quality and durability. It provides peace of mind that your new rear wheel bearing is built to last. Our entire range of wheel bearings and hub units are all backed by this assurance.
A Quick Guide to Replacing Your Rear Wheel Bearings
Ready to get your hands dirty? Changing a rear wheel bearing is a highly rewarding job for a confident home mechanic. While this guide is not a substitute for a vehicle-specific workshop manual, it will provide a clear overview of the process.
Consider this your project outline. We'll walk through the stages, the necessary tools, and give you a realistic perspective on the time and cost involved, helping you decide if this is a job you want to undertake yourself.
Getting Your Tools and Parts Ready
Before jacking up the car, the key to a smooth repair is having everything you need within arm's reach. There’s nothing more frustrating than being halfway through the job, covered in grease, only to discover you’re missing a specific tool.
You'll need a combination of standard garage tools and potentially some specialist equipment. Most DIY enthusiasts will have the basics, but items like a bearing press may require purchasing or hiring.
Your Essential Tool Checklist
Vehicle Jack and Axle Stands: Never work under a car supported only by a jack. Axle stands are a non-negotiable safety requirement.
Wheel Chocks: These prevent the vehicle from rolling while you are working on it.
Socket Set and Breaker Bar: You will encounter some very tight bolts, particularly the main hub nut. A long breaker bar will be invaluable.
Torque Wrench: This is absolutely essential. Tightening bolts, especially the hub nut, to the manufacturer’s exact specifications is crucial for the new bearing's longevity.
Pliers and Screwdrivers: For removing components like cotter pins, clips, and dust caps.
Hammer and Pry Bars: Sometimes, parts like brake drums require gentle persuasion to come free.
Specialist Tools: Depending on your vehicle, you might need a bearing puller kit or a hydraulic press if you have press-in style bearings. For modern bolt-on hub assemblies, these are usually not required.
Before you start, you must have the correct part. This flowchart illustrates how simple it is to find the exact bearing for your vehicle.

As you can see, starting with your car’s registration is the fastest way to guarantee a perfect fit, directing you to the correct parts for your model.
The Replacement Process Step-by-Step
Once you have your tools and your new rear wheel bearing ready, it’s time to begin. The exact procedure can vary depending on whether your car has drum or disc brakes, and whether it uses press-in bearings or bolt-on hubs. However, the general sequence of tasks is largely the same.
Prep and Safety First: Park on a flat, level surface, engage the handbrake, and chock the front wheels. It’s good practice to slightly loosen the rear wheel nuts before lifting the car. Then, use your jack and securely place the car on axle stands.
Remove Wheel and Brakes: Take off the wheel. Now, you need to get the brake assembly out of the way. For disc brakes, this involves removing the brake calliper and its carrier bracket; for drum brakes, you'll remove the drum. Tip: use a piece of wire or a bungee cord to hang the calliper safely, preventing strain on the brake hose.
Access the Bearing: With the brakes clear, you can now access the hub. You'll need to remove the dust cap, cotter pin, and then the large hub nut. This nut is usually extremely tight and will likely require a breaker bar.
Remove the Old Bearing: This is where the bearing type dictates the process. For a bolt-on hub assembly
, you simply unbolt the entire unit from the suspension knuckle and it should slide off. For a press-in bearing, the job is more involved. You will need to remove the entire hub or knuckle from the car and use a hydraulic press or a special puller tool to force the old bearing out.
Install the New Bearing: Before proceeding, thoroughly clean all mating surfaces. For a hub assembly, slide the new unit onto the axle shaft and bolt it in place. For a press-in type, you must carefully press the new bearing into the knuckle, ensuring it goes in straight to avoid damage.
Reassemble and Torque Down: Reinstall the hub nut and tighten it to the manufacturer’s specified torque—this is critically important. Then, reassemble the brakes, mount the wheel, and lower the car. The final step is to correctly torque the wheel nuts.
Pro Tip: The single most important step for a long-lasting repair is using a torque wrench. Incorrect torque on the hub nut is the leading cause of premature bearing failure. Overtightening will overload the bearing; under-tightening allows for play, which will quickly destroy it.
DIY vs. Professional Replacement: Cost and Time
So, should you do it yourself or go to a professional? The decision comes down to cost, time, and your confidence level. For many, the financial savings and satisfaction of a job well done are significant motivators.
Replacing a bolt-on rear wheel hub assembly is a very manageable job for a home mechanic, typically taking 1-2 hours per side. A more complex press-in bearing is a bigger task, potentially taking 2-4 hours, and requires specialist tools. A professional garage will almost always be quicker due to their experience and equipment.
To see the different types of parts available, check out our full range of wheel hubs and assemblies.
The cost difference can be substantial. Here’s a rough breakdown of what you might expect to pay.
DIY vs Professional Rear Wheel Bearing Replacement Cost
Cost Component | DIY Replacement Estimate | Professional Garage Estimate |
Part Cost | £40 - £120 (depending on part type and brand) | £50 - £150+ (part cost plus garage markup) |
Labour Cost | £0 (your own time) | £100 - £200+ (approx. 2 hours labour) |
Specialist Tools | £0 - £50 (if hiring/buying a press or puller) | £0 (included in labour cost) |
Total Estimated Cost | £40 - £170 | £150 - £350+ |
As you can see, by doing it yourself, your main expense is the part. This can easily cut the total bill in half, leaving you with more money for your next project
Essential Safety Rules for a Successful Repair
When tackling any car repair, particularly one involving wheels and suspension, safety is not just a suggestion—it's the absolute foundation of a successful job. Replacing a rear wheel bearing is well within the capabilities of a home mechanic, but compromising on safety can have disastrous consequences. Adhering to these essential rules will keep you out of harm's way.
The first and most important rule is simple: never work under a car supported only by a jack. A jack is a lifting device, not a support device. Hydraulic seals can fail without warning, causing the vehicle to drop instantly.
Always use a pair of correctly rated axle stands to securely support the car. Place them on a strong, level part of the chassis or subframe, as recommended in your owner’s manual. This creates a stable and safe platform from which to work.
Secure the Vehicle and Yourself
Before grabbing the jack, ensure the car is completely immobile. Park on a hard, level surface—never on grass, gravel, or a slope. Apply the handbrake firmly and chock the wheels that will remain on the ground.
Once the car is secure, turn your attention to personal safety. Personal Protective Equipment (PPE) is non-negotiable. Here's a minimum list of what you'll need:
Safety Glasses: To protect your eyes from flying rust, debris, and brake dust.
Mechanic’s Gloves: To shield your hands from grease, sharp metal edges, and impacts.
Sturdy Footwear: Steel-toed boots are ideal for protecting your feet from dropped tools or heavy parts.
These simple items prevent the vast majority of workshop injuries, turning a potential trip to A&E into just another step in the process.
The difference between a smooth repair and a disaster often comes down to preparation. Taking an extra five minutes to correctly place axle stands and put on your PPE is the best investment of time you can make during any DIY car maintenance job.
The Importance of Correct Torque
One of the most critical steps in a rear wheel bearing replacement is tightening fasteners to the correct specification. This is not a step where "that feels tight enough" is acceptable. Every key bolt, especially the main hub nut, has a specific torque setting provided by the manufacturer.
Using a calibrated torque wrench is the only way to achieve this accurately. Overtightening can crush the new bearing's internal components, causing it to fail almost immediately. Under-tightening is equally damaging; it allows for movement or "play," which will quickly destroy the bearing and could even lead to the wheel becoming loose. If you're planning on doing your own repairs, a good set of axle stands is an essential investment for your toolkit.
Final Checks Before Your Test Drive
With the new bearing installed and everything reassembled, don't be tempted to pack away your tools just yet. Your final safety checks are vital before the car moves.
First, double-check that all tools are removed from under and around the car. Next, spin the wheel by hand. It should rotate smoothly and quietly, with no grinding noises or wobble. Finally, before lowering the car, pump the brake pedal several times to reseat the brake pads. This ensures you have a firm pedal from the very first stop.
After lowering the car, perform a final torque check on the wheel nuts. Only then is it safe to proceed with a cautious test drive, listening carefully for any unusual noises and feeling for vibrations.
Frequently Asked Questions About Rear Wheel Bearings
Even after understanding the replacement process, you might still have some questions. That's perfectly normal. We’ve compiled the most common queries we receive about the rear wheel bearing to provide you with clear, direct answers.
Consider this the final piece of your knowledge puzzle, giving you the confidence to complete the job correctly.
Can I Drive My Car with a Bad Rear Wheel Bearing?
In short, you absolutely should not. Driving with a faulty rear wheel bearing is extremely dangerous. The faint humming noise is an important warning sign, and ignoring it can lead to catastrophic failure.
As the bearing disintegrates, it generates a tremendous amount of heat from friction. This can cause the bearing to seize, locking the wheel solid while you are driving. In a worst-case scenario, the entire wheel and hub assembly can detach from the vehicle, causing a complete loss of control. It’s a serious safety risk that demands immediate attention.
Should I Replace Rear Wheel Bearings in Pairs?
This is an excellent question. Unlike components like brake pads, it is not strictly necessary to replace both rear wheel bearings simultaneously. They wear out independently, so if only one has failed, replacing just that single bearing is an acceptable repair.
However, it is important to remember that both bearings have been subjected to the same mileage and road conditions. It is very common for the second bearing to show signs of wear shortly after the first one has been replaced. For this reason, many experienced mechanics and DIY enthusiasts choose to replace them as a pair to save time and effort in the near future.
What Is the Difference Between a Hub Assembly and a Press-In Bearing?
Understanding which type of bearing your car uses is crucial, as it determines the complexity of the job and the tools required.
Sealed Hub Assembly: This is an "all-in-one" unit. It’s a complete component containing the bearing, hub, and sometimes the ABS sensor, all pre-assembled from the factory. These are significantly easier to replace—you just unbolt the old unit and bolt the new one into place.
Press-in Bearing: This is the bearing as a standalone part. To replace it, the old bearing must be physically pressed out of the suspension knuckle or hub carrier, and the new one pressed in. This task requires a hydraulic press or a specialised bearing puller kit, making it a more labour-intensive job.
Your car’s design determines which type you need, but using a number-plate finder tool will provide a definitive answer.
How Long Does a New Rear Wheel Bearing Last?
A high-quality replacement rear wheel bearing, when installed correctly, is a durable component. It should typically last between 85,000 to 100,000 miles, with some lasting even longer.
The lifespan of your new bearing ultimately depends on three factors: the quality of the part itself, the precision of the installation, and your driving conditions.
Frequent driving on poorly maintained roads with potholes will naturally shorten its life. Conversely, fitting a premium part from a trusted brand and—most importantly—tightening all fasteners to the manufacturer's exact torque specifications will help you achieve the maximum possible service life from your repair.
For all your vehicle maintenance needs, from a rear wheel bearing to essential service parts, GSF Car Parts has you covered. Use our simple number-plate finder to locate the perfect component for your car and enjoy the convenience of our free Click & Collect service or fast UK-wide delivery. Find what you need today at https://www.gsfcarparts.com.


