You press the pedal at the end of your road, the car stops fine, and then that sharp squeak cuts through the cabin. It's one of the most common brake complaints in a UK driveway, and it often sends people straight to “I need new pads”.
Sometimes you do. Often you don't.
Brake noise usually comes from a system problem, not just a pad problem. Pads, discs, shims, clips, carrier faces, slide pins, backing plates and lubrication points all work together. If one part binds, vibrates, dries out or sits crooked, you can fit brand-new pads and still end up with the same noise.
If you want to know how to stop car brakes from squeaking, start by thinking like a mechanic rather than a parts changer. Listen to when the noise happens, inspect the hardware properly, clean what should move, lubricate only the right contact points, and replace worn parts with the correct fitment. That approach usually fixes the squeak for longer and avoids paying main dealer money for a rushed swap.
Why Your Brakes Are Squeaking in the First Place
You roll up to a junction, brush the pedal, and the car gives you that thin, high-pitched squeak. Braking still feels normal, so it is easy to assume it is just pad wear. In practice, brake noise usually starts earlier than that, and the cause is often in the hardware around the pads rather than the friction material itself.
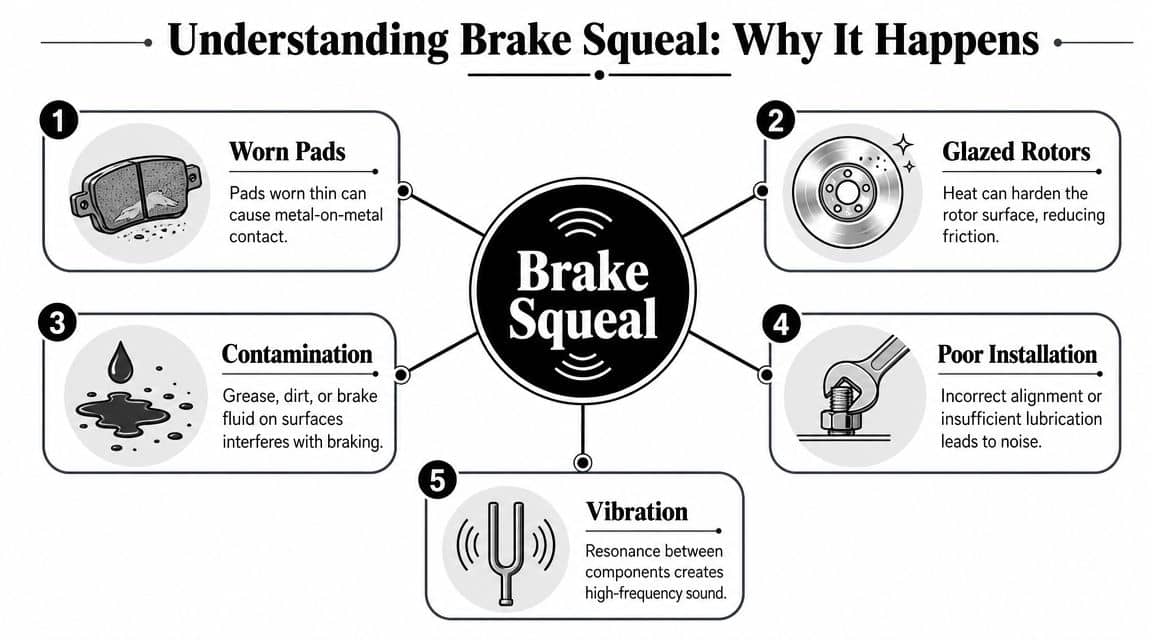
Brake squeal is vibration. The trick is working out what is letting that vibration happen. A pad can squeak because the surface is glazed, but it can also squeak because the anti-rattle clips have lost tension, the carrier has rusted up under the clips, the slide pins are dry, or the shim is missing or fitted badly. That is why a simple pad swap does not always cure it.
The common causes in real life
Some noise is temporary. A light squeak on the first stop of the morning often comes from moisture on the disc face or a thin film of surface corrosion after the car has been parked overnight. Once the pads wipe the disc clean, the sound can disappear.
Noise that keeps coming back usually points to a part that is not moving, seating, or damping vibration properly. On home-serviced brakes, I would check the hardware before blaming the pad brand. Sticking pins, worn abutment clips, uneven pad ears, contamination on the pad face, and cheap pads that do not fit the carrier cleanly are all common causes.
Noise pattern | What it often suggests |
Only first thing in the morning | Moisture or light surface corrosion |
During gentle braking at low speed | Pad vibration, glazing, or hardware contact |
After recent brake work | Poor pad fit, missing shims, dry contact points, or bedding-in noise |
Constant and getting worse | Wear, contamination, or a sticking caliper or slider |
Don't blame the pads too early
Pads wear out. So do the smaller parts that support them.
A lot of squeaks come from the brake hardware ecosystem: clips that no longer hold the pad snugly, pins that should slide but do not, backing plates that touch the disc, and carriers with enough corrosion to cock the pad over slightly under load. Fit fresh pads into that lot and you can still end up with the same noise, or a worse one.
That is the trade-off with going for the quickest fix. Replacing only the obvious worn part costs less today, but if the pins, clips, or shims are tired, you may be back in the wheel arch next weekend. It is usually better value to inspect the full assembly once and replace the pieces that are causing the movement or vibration. If you are building your tool kit first, the right brake servicing tools for DIY inspection and fitting make that job much easier.
What the squeak is telling you
Treat squeak as a symptom, not just a nuisance. It can mean the pads are dragging slightly, the disc face is uneven, or the caliper is no longer floating freely side to side.
Noise and braking consistency are linked. If the pads cannot move cleanly in the carrier, or the caliper cannot centre itself properly, the brakes will not wear evenly and the pedal feel often goes off with them.
Essential Tools and Safety Before You Start
If you're going to work on brakes at home, safe support comes first. The job itself isn't complicated, but the consequences of rushing it are serious. A quiet brake job done badly is still a bad brake job.
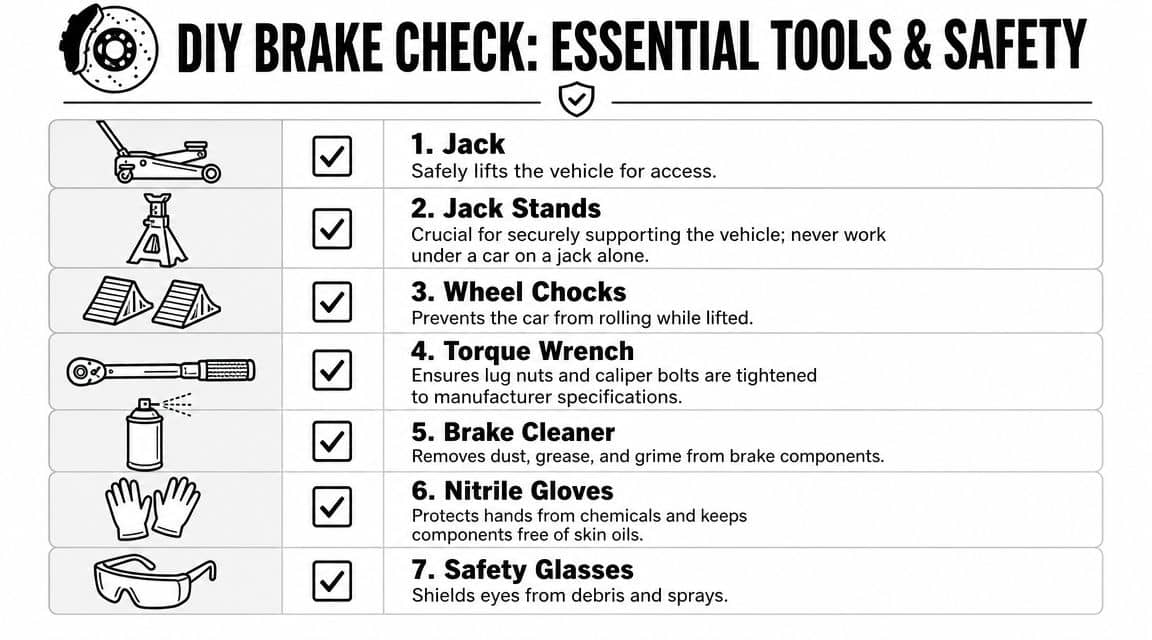
What you need before the wheel comes off
A trolley jack lifts the car. Axle stands keep it there safely. Never work on brakes with the car supported only by a jack. Add wheel chocks at the opposite end, engage gear or park, and work on level ground.
You'll also want proper hand and eye protection. Brake dust, old grease and brake cleaner overspray all have a habit of ending up in the wrong place.
A sensible brake kit for home use includes:
Axle stands and wheel chocks. These stop the car moving or dropping while you work.
Torque wrench. You need this for wheel bolts and any fasteners that require correct tightening on reassembly.
Brake cleaner. Useful for washing off dust, old residue and contamination from non-friction surfaces.
Wire brush and small hand brush. Handy for cleaning carrier faces, clips and hub surfaces.
Caliper wind-back tool or piston tool. Needed when fitting thicker pads and retracting pistons correctly.
High-temperature brake lubricant. Use a brake-specific product, not general-purpose grease.
Nitrile gloves and safety glasses. Cleaner, safer, and better for handling parts.
If you need to build your tool kit first, braking service tools from GSF Car Parts cover the basics such as piston tools and other workshop items relevant to brake jobs.
Why the right consumables matter
The wrong grease causes trouble. Heavy general grease can swell rubber components, attract dirt or migrate where it shouldn't. Brake parts need high-temperature lubricant used sparingly and only at the correct contact points.
Brake cleaner also needs some common sense. It's for cleaning metal parts and removing residue. It isn't a substitute for proper servicing, and it isn't something to drench onto friction material hoping for a miracle cure.
A jack helps you lift the vehicle. It does not make the vehicle safe to work under.
Before you touch the first bolt
Do this quick check first:
Confirm the symptom. Is it only on light braking, only cold, or all the time?
Look for recent work. New pads often point to fitting or bedding issues.
Check you have enough time. Brake jobs go wrong when people rush reassembly at dusk.
Have all parts and consumables ready. Half-finished brakes on the drive are no fun.
That preparation saves more grief than any trick product ever will.
Simple Fixes You Can Try This Weekend
You don't always need a full strip-down on day one. If the brakes are otherwise working normally and there's no grinding, fluid leak or warning light, start with the simple wins.
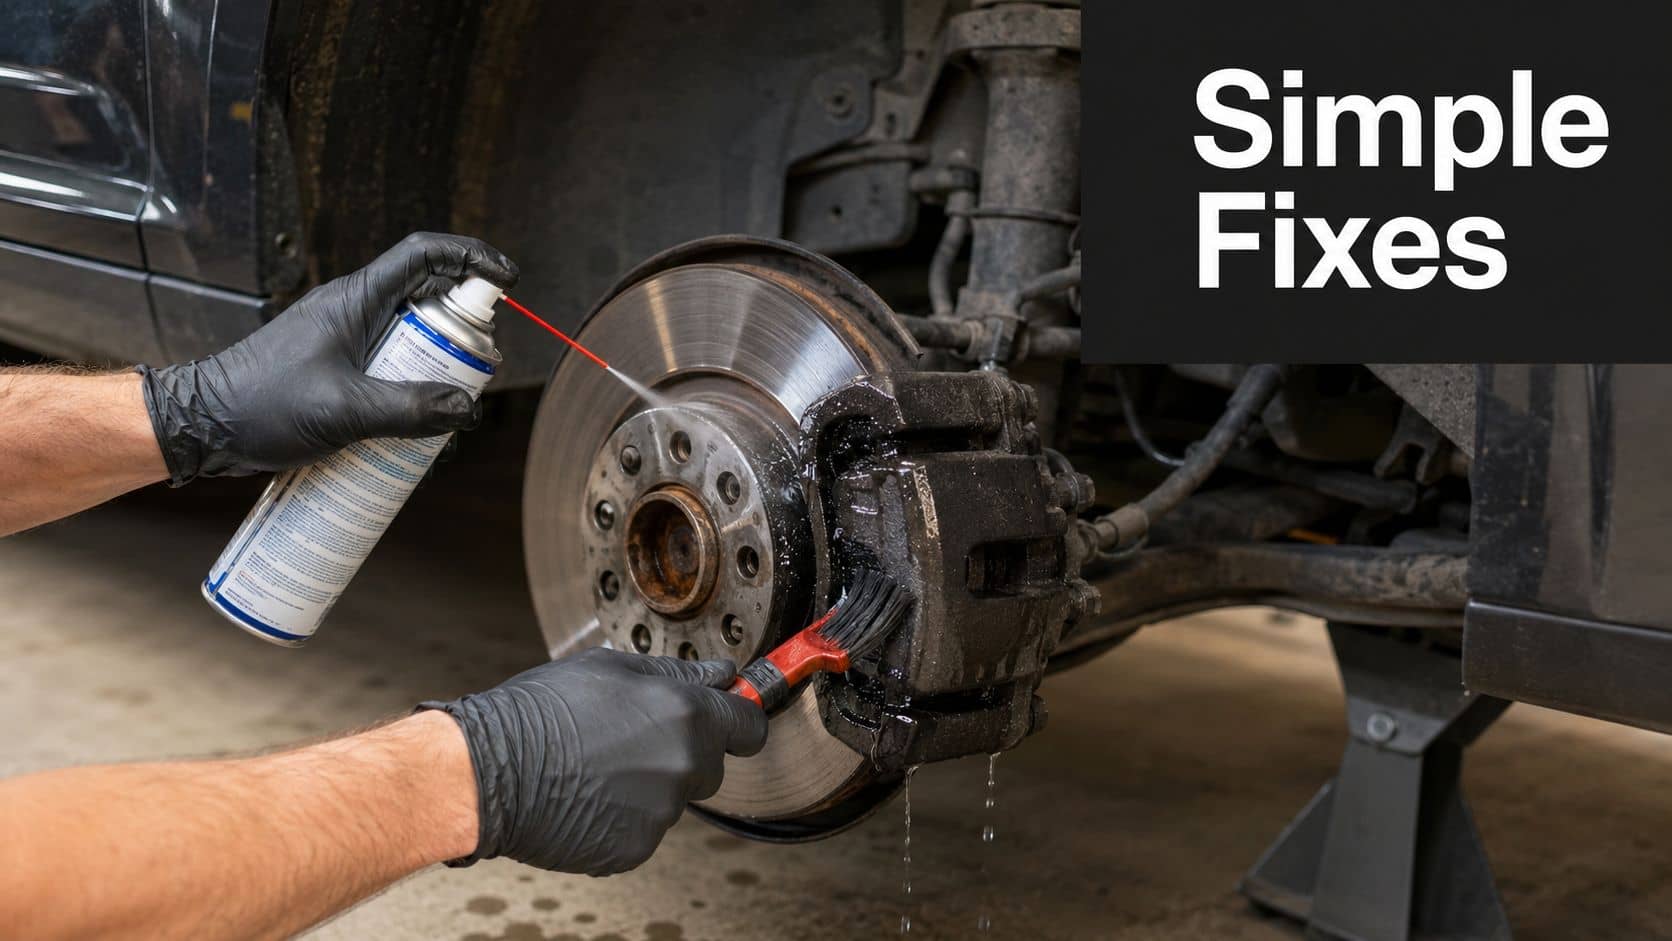
Start with cleaning and a close look
Brake dust cakes up around calipers, carriers and pad edges. Road grime does the rest. That build-up can help create the tiny vibrations that become squeal.
Take the wheel off and inspect what you can see clearly. Look for obvious dirt packed around the pad ends, a shiny glazed-looking pad face, loose hardware, or a disc face that doesn't look evenly swept.
A useful first pass is:
Clean the visible assembly. Use brake cleaner on the caliper exterior, carrier area and surrounding metal parts.
Check for trapped debris. Small stones and heavy grime can create surprisingly sharp noises.
Inspect pad thickness visually. You don't need a full measurement to spot a pad that's clearly near the end.
Compare both sides of the axle. Uneven appearance can point to a sticking side.
Light glazing can sometimes be rescued
If the pads or disc faces look polished and shiny rather than evenly dull, glazing may be part of the problem. Mild glazing on removable pads can sometimes be reduced with careful abrasion of the pad surface and cleaning of the mating areas before refitting.
That only makes sense if the pads still have good life, the discs aren't badly worn, and the rest of the hardware checks out. It's a tidy-up move, not a cure for damaged parts.
If a brake only goes quiet after you spray something blindly through the wheel, you haven't fixed it. You've delayed the diagnosis.
Later in the job, it helps to see the hardware layout and contact points in motion: Most Common Brake Installation Mistakes!
What not to do
A lot of home fixes make the noise worse.
Avoid these mistakes:
Don't grease the friction material. Pads and discs must stay clean and dry on the braking surface.
Don't assume one noisy corner means one bad pad. The cause might be in the caliper movement.
Don't sand or file at random. Remove only light glazing or burrs where appropriate, not chunks of friction material.
Don't ignore heat signs. Blueing, burning smells or heavy drag point to a bigger issue.
If cleaning and a light inspection don't change anything, move on to servicing the brake hardware properly. That's where the lasting fixes usually are.
Inspecting and Servicing Brake Components
A brake can have plenty of pad material left and still squeak because the parts around the pad are no longer letting it sit and move properly. That is why this stage matters. Noise often starts in the clips, pins, shims and carrier, not in the friction material itself.
Read the wear marks before you disturb them
Take the caliper off and remove the pads carefully. Before you clean anything, study how the parts have been wearing together. The marks tell you where the noise is coming from.
An inner pad worn much more than the outer usually points to sticky caliper movement. A pad that is tapered across its length often means it has been binding in the carrier. Shiny rub marks on the backing plate or on one pad ear can show exactly where vibration or contact has started.
Check these areas closely:
Pad ears and edges for burrs, rust build-up or tight spots
Carrier lands under the abutment clips for corrosion lifting the clips
Shims and anti-rattle hardware for damage, looseness or poor fit
Backing plates for witness marks where the caliper or piston has been contacting unevenly
If the pads have been forced into place on rusty hardware, replacing the pads alone rarely keeps the brake quiet for long.
Clean and lubricate the contact points properly
Brake noise is often a fit and movement problem. The cure is usually careful cleaning, correct lubrication in the right places, and replacing tired hardware where needed.
Use a proper brake cleaner for removing dust and old residue before reassembly. Clean the carrier, clips, pad contact points and surrounding metal parts so you are not trapping grit or old grease in the assembly.
Then apply high-temperature brake lubricant sparingly only where the manufacturer intends metal-to-metal contact to happen. That usually means pad ears, backing plate contact points, and slide pins if the caliper design uses them. Keep grease off the disc face and off the pad friction material. The RAC notes the same basic rule in its guidance on squeaky brakes and brake lubrication points.
A thin film is enough. Excess grease attracts dirt and can migrate where it should not.
Service the slide pins as if they matter, because they do
On a floating caliper, the slide pins decide whether both pads apply and release evenly. If one pin is dry or corroded, the caliper twists slightly under braking. That can give you squeal, uneven wear, heat build-up and a brake that never quite frees off.
Work through them in order:
Remove each pin carefully and keep track of its position if the upper and lower pins differ.
Clean off all old grease so you can inspect the metal properly.
Check for pitting, scoring or corrosion on the pin surface.
Inspect the rubber boots for splits, hardening or poor seating.
Relubricate lightly with the correct grease and confirm the pin moves freely by hand.
If a pin is rough or the boot no longer seals, replace the hardware. I would not spend half an hour polishing a badly corroded pin to save a part that is already on its way out.
Remove the clips and inspect the carrier underneath
This is the part many DIY jobs miss. The stainless clips can look fine from above while rust underneath is lifting them just enough to pinch the pad. That small loss of clearance is enough to stop the pad sliding back cleanly after braking.
Brush or abrade the carrier lands back to solid metal. Then refit good clips or fit new ones if the old set is bent, loose or heavily corroded. Pads should sit squarely and move without force. If you have to tap them into the bracket, the job is not right yet.
Cheap pad kits sometimes come with clips that fit poorly or have weak spring tension. That is one of the reasons brake noise can appear straight after a pad change. Getting the correct hardware set from a proper vehicle lookup usually costs less than chasing the squeak twice.
Check the disc and piston with a mechanic's eye
Look over the disc face for heavy scoring, obvious heat spots, cracking, or a pronounced outer lip that affects pad contact. Then inspect the piston boot and the caliper body for signs of leakage or contamination.
Stop the job and reassess if you find:
Brake fluid seepage around the piston or hose connection
A piston that will not retract smoothly
Split or displaced dust boots
Severe pad taper or heat damage that points to a sticking caliper
At that stage, the noise is a warning, not the main fault. The brake needs repair before the car goes back on the road.
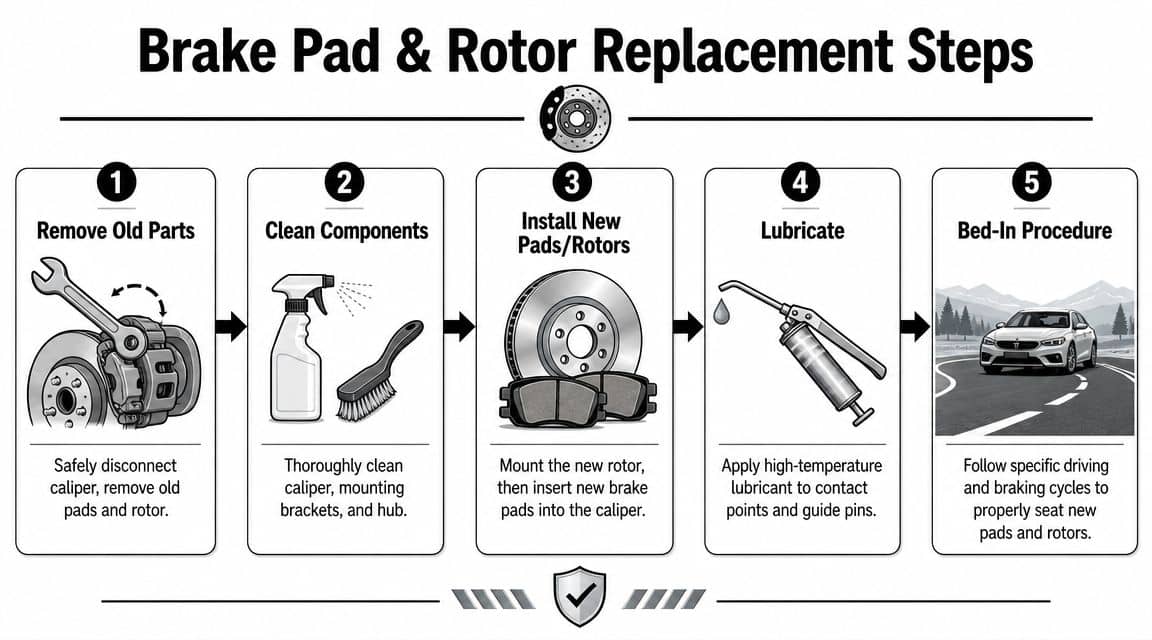
Fitting New Parts and Bedding Them In Properly
A brake job can still squeak with brand new pads if the rest of the assembly is wrong. I see that all the time. Fresh friction material gets blamed first, but noise often starts with poor pad fit in the carrier, weak shims, tired clips, or a disc that is not sitting true on the hub.
Buy the exact parts for the brake setup on the car
Brake systems vary across the same model, sometimes by engine size, year, axle load, or supplier. Pads that look close can have different backing plate shapes, chamfers, shim layouts, or spring hardware. Any of those can leave you chasing a squeak that was built in at the parts counter.
If you are ordering replacements, use a proper fitment search for vehicle-specific brake pads rather than matching by eye. It is a simple way to avoid the common mistake of fitting parts that technically go in, but do not sit or move as they should.
Price matters, but so does hardware quality. Very cheap kits can save money up front, then lose it again with poor clips, thin shims, or inconsistent finish on the pad ears. You do not need main dealer prices for quiet brakes. You need parts that match the car and a hardware set that controls pad movement.
Fit the whole assembly, not just the pads
This stage decides whether the brakes stay quiet.
New discs need a clean hub face so they run true. New pads need clean carrier lands, correctly seated clips, and the right lubricant only where the manufacturer allows it. If the pad has anti-squeal shims or backing plates, make sure they are fitted exactly as supplied. Missing or mispositioned hardware is one of the fastest ways to create noise with new parts.
Use this checklist as you build it back up:
Clean the hub face so the new disc sits flat
Refit or replace clips and shims correctly so the pad is controlled, not pinched
Check pad movement in the carrier before the caliper goes back on
Lubricate only the approved contact points and keep grease off friction surfaces
Torque caliper and carrier fixings correctly and check everything again before refitting the wheel
The trade-off is simple. Rushing saves ten minutes now and can cost you another strip-down next weekend.
Bedding-in is part of the repair
New pads and discs need a short settling-in period so the pad face and disc work together evenly. If that process is rushed, or the brakes are overheated straight away, the result can be noise, uneven deposits on the disc, and a pedal feel that never quite settles.
Some light noise early on can be normal. Persistent squeal after the brakes have had time to bed in is not something to ignore. At that point, I would go back to basics and check fitment, pad movement, clip tension, and whether the disc is running cleanly.
A practical guide looks like this:
After fitting new brakes | What to do |
Light noise during early use | Drive normally and allow the parts to bed in |
Braking feels smoother with each trip | Usually a good sign |
Squeal continues after a reasonable bedding period | Recheck hardware, pad fit and disc condition |
Noise comes with drag, pulling or heat | Stop and inspect the brakes immediately |
A sensible bedding routine
Follow the pad maker's instructions if they provide a bedding procedure. If they do not, use controlled stops to build heat gradually, give the brakes time to cool between applications, and avoid repeated heavy braking straight after the job. Do not hold the pedal hard when the brakes are very hot unless traffic leaves you no choice.
That last point matters more than many DIYers realise. Holding a hot pad against one spot on a new disc can leave uneven material on the surface, and that can feel and sound like a bad parts issue when the cause was in the first road test.
Done properly, this is more than a pad swap. It is a full brake hardware reset, with the pads, clips, shims, pins and disc all working together. That is what gives you the best chance of a quiet brake job that stays quiet.
Preventative Care and Knowing When to Call a Pro
A brake job that stays quiet usually comes down to habits after the repair, not just the parts fitted on the day. I see plenty of cars come back with "new pads, still squeaking" because the friction material was replaced but the rest of the hardware was left to age in place. Pins dry out, clips lose tension, shims corrode, and pad ears start sticking in the carrier. That is how noise returns.
The maintenance mindset that keeps brakes quiet
You do not need to strip the brakes every month.
What helps is checking them properly whenever the wheels are already off for tyres, suspension work, or a seasonal inspection. Look for uneven pad wear, rough disc faces, split slider pin boots, missing anti-rattle clips, and pads that do not slide freely in the carrier. If one pad is wearing faster than its mate on the same axle, treat that as a hardware fault until proved otherwise.
A light service at the right time saves money. Cleaning rust from the carrier lands, renewing tired clips, and lubricating the correct contact points can prevent pad drag and heat build-up that would otherwise mark the discs and bring the squeal back. Caliper sliders and pins also need periodic attention as the car ages. Left alone, they corrode slowly and then start causing the kind of noise that gets blamed on the pads.
This is the part many DIYers skip. It is also where a quiet brake job is usually won or lost.
Know when DIY stops being the right call
Some problems need more than a careful weekend service. If any of the faults below show up, stop chasing the noise and deal with the brake fault itself:
Spongy pedal feel. That points to air in the system, fluid issues, or a hydraulic problem.
A piston that will not retract smoothly. A seized or corroded piston needs repair or replacement, not force.
Visible brake fluid leakage. The car should not go back on the road until it is fixed properly.
ABS or brake warning lights. Brake noise may be the smallest part of the problem.
Pulling under braking or uneven braking effort. That suggests the brakes are not working evenly side to side.
A simple rule works well here. If the fault changes pedal feel, braking balance, wheel temperature, or fluid containment, it has moved beyond routine DIY noise control.
Why this matters for MOT as well as noise
Brake squeal is not an MOT failure on its own, but the cause behind it often can be. The MOT checks brake performance and also looks for worn, insecure, contaminated, or damaged brake components. That matters because the same neglected hardware that causes squeal can also cause binding, uneven braking, and disc damage.
For UK drivers, that is reason enough to inspect the system early rather than wait for the test date. PowerStop's guide to noisy brakes and brake-related inspection issues gives a useful overview of the kinds of faults that sit behind brake noise.
The practical order is straightforward:
Listen for the pattern of the noise
Inspect the full hardware set, not just the pad material
Clean and service the moving parts properly
Replace worn clips, shims, pins, pads, or discs with the correct fitment
Hand the job over when brake function is affected
That is how to stop car brakes from squeaking for the long term. Treat it as a system check. Pads matter, but so do the small hardware parts around them.
If you're ready to sort the noise properly, GSF Car Parts is one place to source brake pads, discs, tools, cleaners and other service items for a full brake hardware check, without defaulting to main dealer prices.


