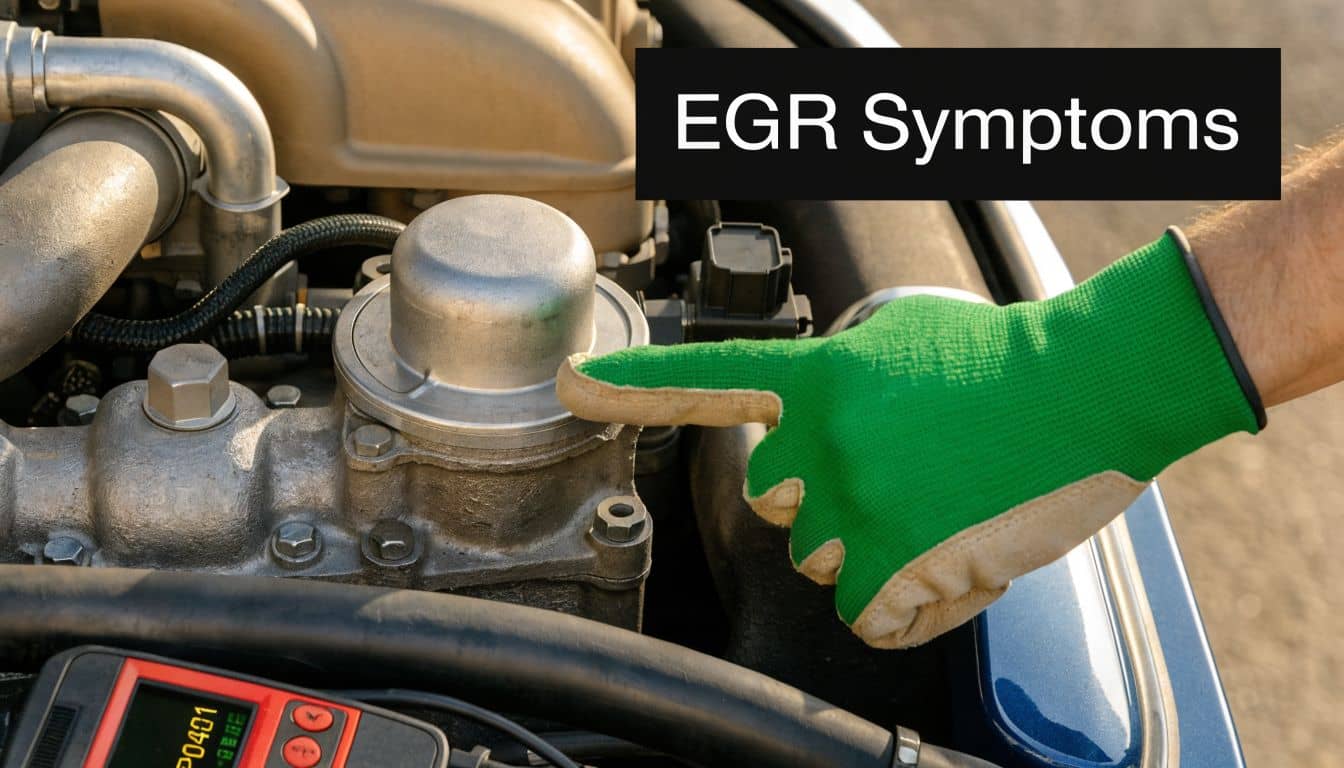
A faulty Exhaust Gas Recirculation (EGR) valve is a common issue that can significantly impact your car's performance. One day your vehicle runs smoothly, the next it’s rough, sluggish, and consuming more fuel. If this sounds familiar, you've come to the right place. An EGR valve that is stuck open or closed, often due to carbon soot buildup, is a frequent culprit, especially in modern diesel engines.
So, when does an EGR valve need replacing? A faulty valve can lead to poor engine performance, increased emissions, and even a failed MOT. Understanding the signs of a failing EGR valve is the first step toward a correct diagnosis and repair.
Understanding the EGR Valve's Function and Symptoms of Failure
Has your car started to feel a bit ‘off’? Maybe it’s idling poorly, hesitating when you accelerate, or you’re spending more time at the petrol station than usual. These are classic tell-tale signs, and a faulty Exhaust Gas Recirculation (EGR) valve is a very common suspect.
The EGR valve plays a crucial role in your car's emissions control system. Its function is to recirculate a small, precisely-controlled amount of exhaust gas back into the engine's intake manifold. Mixing this inert gas with the incoming air-fuel mixture lowers the peak combustion temperature. This process significantly reduces the formation of harmful Nitrogen Oxides (NOx), a major pollutant. A properly functioning EGR valve also contributes to better fuel efficiency. When it fails, the symptoms can range from a minor annoyance to serious performance issues.
How Driving Conditions Affect the EGR Valve
The way you drive can directly impact the lifespan of your EGR valve. For UK drivers, the biggest enemy of the EGR system is the short, stop-start journey—think school runs and city commutes. These trips don't allow the engine to reach and maintain its optimal operating temperature for long enough to burn off the carbon deposits that naturally build up. Over time, this soot clogs the valve, causing it to stick.
Key Takeaway: Short, stop-start journeys are the primary cause of premature EGR valve failure. Carbon deposits build up and prevent the valve from operating correctly, leading to performance problems.
Common Signs in Petrol and Diesel Engines
While some symptoms are universal, others are more common depending on your engine type.
Poor Engine Performance: If the valve is stuck open, it creates a constant vacuum leak. This disrupts the air-fuel mixture, leading to a rough idle, hesitation during acceleration, and sometimes even stalling. If it's stuck closed, combustion temperatures can rise excessively, causing engine 'knocking' or 'pinging' as the fuel detonates improperly.
Increased Fuel Consumption: A malfunctioning EGR valve disrupts the engine’s precise air-fuel ratio. Whether it’s stuck open or closed, the Engine Control Unit (ECU) struggles to compensate, making the engine run less efficiently and burn more fuel.
Excessive Smoke from the Exhaust: This is a significant indicator, particularly for diesel owners. A faulty EGR valve can cause clouds of black smoke to billow from the exhaust, especially under hard acceleration. This is a clear sign that the combustion process is incomplete and inefficient.
Using Diagnostic Tools for Confirmation
The most obvious sign, of course, is the engine management light illuminating your dashboard. While this light can indicate numerous issues, it's your car's primary way of alerting you to a problem that needs investigation.
This is where an On-Board Diagnostics (OBD2) scanner becomes an invaluable tool. Plugging it into your car’s diagnostic port allows you to read the specific Diagnostic Trouble Codes (DTCs) that the ECU has logged. This helps you move from guesswork to an accurate diagnosis.
For EGR problems, you’re looking for codes like:
P0401:EGR Flow Insufficient Detected
P0402: EGR Flow Excessive Detected
P0403: EGR Circuit Malfunction
P0404: EGR Circuit Range/Performance
Finding one of these codes is a very strong indication that the EGR system is the source of your troubles. For instance, if you see a P0401 code on a diesel van that’s also emitting black smoke, you can be almost certain the valve is either stuck shut or completely blocked by carbon. Combining real-world symptoms with a diagnostic code provides the confidence to tackle the right problem.
So, you've diagnosed a faulty EGR valve. Now you must choose the right replacement part. This is a critical step, as selecting the wrong or low-quality component can result in the same problems returning, forcing you to repeat the entire repair
How does the EGR system work and what parts does it need?
Your first major decision is choosing between an Original Equipment Manufacturer (OEM) part from a main dealer and a high-quality aftermarket alternative. While an OEM part is identical to the factory-fitted component, it usually comes with a significantly higher price. This is where the aftermarket sector provides excellent value.
OEM vs High-Quality Aftermarket Parts
OEM parts are manufactured by or for the car maker and are identical to the original components. They guarantee a perfect fit and function but are almost always the most expensive option. For a common vehicle like a Ford Transit, the main dealer price for an EGR valve can be substantial.
This cost difference is why the aftermarket parts industry is so popular. Reputable brands like Delphi and DriveTec, both stocked at GSF Car Parts, produce parts engineered to meet or exceed original specifications. You receive the same performance and reliability without the premium price tag. In many cases, a top-tier aftermarket EGR valve can be up to half the price of the OEM equivalent. On that Ford Transit, you could be saving £150 or more on the part alone.
It's a clear trend. Aftermarket EGR valve replacements now make up 15-18% of all sales in this category. It makes sense, especially in the UK where over 70% of car repairs are done by independent garages and savvy DIYers who depend on affordable, reliable parts. You can dig into the numbers in the full 360 Research Reports analysis.
Choosing a trusted aftermarket brand ensures you are not sacrificing quality for cost. These parts undergo rigorous testing to ensure they function flawlessly and withstand the harsh conditions inside an engine. It’s a solution that offers both peace of mind and significant savings.
Why a Complete Kit Is Non-Negotiable
When purchasing a new EGR valve, it is essential to buy a complete kit. A successful EGR valve replacement depends on a perfect seal, and attempting to reuse old gaskets and bolts is a false economy. Over time, gaskets become compressed and brittle; an old one will not seal properly against a new valve.
Taking this shortcut can lead to two major problems:
Exhaust Leaks: A poor seal allows hot, noisy exhaust fumes to escape. Not only is this loud and potentially hazardous, but it can also trigger new fault codes as sensors detect the leak.
Coolant Leaks: If your EGR valve is coolant-fed, a compromised gasket seal is an open invitation for a coolant leak, which can lead to engine overheating.
Always choose a kit that includes the new valve, fresh gaskets, and ideally, new bolts. These components are inexpensive but absolutely critical for a durable, leak-free repair. Skipping them is a recipe for frustration and rework.
Finding the Exact Part for Your Vehicle
The final step in sourcing parts is ensuring you buy the exact component for your vehicle. An EGR valve for a diesel Vauxhall Astra is fundamentally different from one for a petrol Ford Fiesta. Getting this wrong means wasted time and money.
A reliable vehicle parts finder is your best friend here. At GSF Car Parts, you simply enter your car’s registration number. Our system instantly filters out all incompatible parts, showing you only the EGR valves and kits that are guaranteed to fit your car’s specific make, model, and engine. It eliminates all guesswork.
Using a tool like this ensures you get the right part the first time, backed by a comprehensive warranty. Combined with options like our free Click & Collect service, you can have the correct, high-quality part in your hands quickly, setting you up for a successful repair. To see what’s available for your vehicle, you can browse the full range of EGR valves at GSF Car Parts.
Getting Prepped: Tools and Safety for Your EGR Valve Job
With the new parts ready, the next step is preparation. Organising your tools and workspace is not just about efficiency; it's about ensuring the job is done safely and correctly, avoiding the frustration of sheared bolts and skinned knuckles.
A little time spent in preparation will save significant headaches later.
The Essential Toolkit
While some EGR valves are easily accessible, many are located in tight, awkward spaces within the engine bay. A basic spanner set may not be sufficient. You should be prepared for a challenging removal.
To maximise your chances of success, here is a checklist of tools and supplies that are essential for this job.
Essential Toolkit for EGR Valve Replacement
Tool/Supply | Specification/Type | Why You Need It |
Socket Set & Spanners | Metric, various sizes | The fundamental tools for removing the valve’s mounting bolts and any obstructing brackets. |
Flexible-Head Ratchet | 1/4" or 3/8" drive | An indispensable tool for reaching bolts at difficult angles deep within the engine bay. |
Torque Wrench | Click-type or digital | Crucial for achieving a leak-free seal. It ensures bolts are tightened to the manufacturer's specification without damaging the new valve or gasket. |
Penetrating Oil | High-quality spray | Due to the UK's climate, exhaust system bolts are often heavily rusted. This spray helps break them free. |
Scraper & Wire Brush | Gasket scraper, brass brush | Essential for cleaning the mounting surface on the engine. A perfectly clean surface is required for the new gasket to seal correctly. |
Mechanic's Gloves | Nitrile or heavy-duty | Protects your hands from grease, hot components, and sharp edges. |
Safety Glasses | Clear, wrap-around | Non-negotiable. This protects your eyes from rust, dirt, and sprayed fluids. |
Having these items ready means you won't have to interrupt the job to find the right tool, making the entire process faster and less stressful.
Pro Tip: For a stubborn bolt, apply penetrating oil generously and let it soak for at least ten minutes. A few sharp taps on the head of the ratchet with a small hammer can also help break the corrosion's grip.
Safety First, Always
Working on your car can be rewarding, but an engine environment is unforgiving. The EGR system operates at extremely high temperatures, and other hazards are present. Your safety must be the top priority.
This infographic outlines the three pillars of any safe and successful DIY automotive repair.
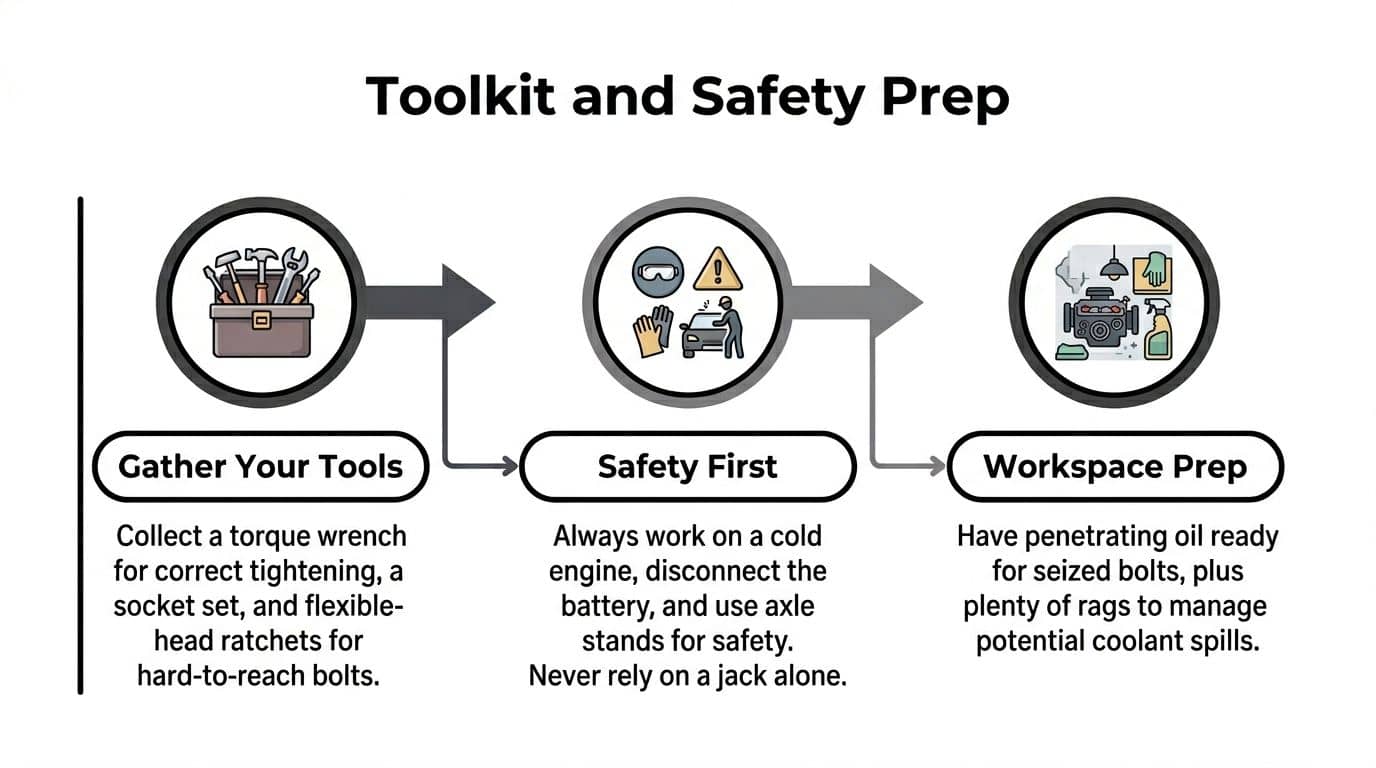
Before you begin, perform these critical safety checks:
Work on a Cold Engine: The EGR valve is part of the exhaust system and can cause severe burns. Allow the car to cool down completely for several hours.
Disconnect the Battery: Always disconnect the negative terminal. This simple action prevents accidental short circuits that could damage your car’s electronics or cause an electric shock.
Use Axle Stands: If you need to lift the vehicle, never rely on a jack alone. Once the car is raised, secure it with properly rated axle stands on a flat, solid surface.
Wear Your Gear: Safety glasses and gloves are essential. Protect your eyes and hands.
If you’re looking to build up your home garage setup, you can find a solid range of workshop and vehicle service tools that will have you ready for this job and many more to come.
Replacing Your EGR Valve Step by Step
With your tools and new parts ready, it's time to begin. Replacing an EGR valve can range from straightforward to challenging, but this guide will walk you through the process, highlighting common pitfalls to ensure a successful repair.
Consider this your guide, as if a seasoned mechanic were there to assist you from start to finish.
Locating the EGR Valve
First, you need to find the valve. Its location determines whether the job is a 30-minute fix or a half-day project. On some engines, it is positioned conveniently on top. On others, it is tucked away at the rear of the engine bay, close to the firewall.
The most reliable method for locating it is to trace the metal pipe running from the exhaust manifold toward the engine’s intake. The EGR valve will be integrated into this pipework. If you are unsure, an online search for your vehicle's make, model, and engine type will typically provide a helpful diagram or video.
Disconnecting and Removing the Old Valve
Once you have identified the valve, inspect the surrounding area. You will likely need to remove a plastic engine cover or carefully reposition vacuum lines to gain clear access. Now, you can begin removal.
Follow this general procedure:
Unplug the Electrical Connector: Locate the wiring loom connected to the valve. There will be a small plastic tab to press or lift to release the plug. Be gentle, as these clips can become brittle from years of heat exposure.
Remove Any Hoses: If rubber hoses are attached, it indicates a coolant-fed valve. Place a drain pan underneath, as some coolant will escape when you use pliers to slide back the clamps and detach the hoses.
Unbolt the Valve: This step often requires patience. Use your socket set—and perhaps the flexible-head ratchet—to loosen the bolts securing the valve. Apply steady, firm pressure.
A word of warning: seized bolts are a common issue, especially on cars that have endured many salty UK winters. If a bolt is stuck, do not apply excessive force, which could cause it to shear. Instead, apply penetrating oil, wait ten minutes, and try again. Sharp taps on the ratchet head can also help break the corrosion.
With the bolts removed, the old valve should come free. It may require a gentle wiggle or a light tap with a rubber mallet to break the old gasket’s seal.
The Most Important Step: Cleaning
Examine the mounting surfaces on the engine and intake manifold where the valve was fitted. You will find them coated in a thick, black layer of carbon soot. This next step is absolutely critical.
Do not skip cleaning these surfaces. Failure to do so will prevent the new gasket from sealing correctly, resulting in an exhaust leak. This will trigger the engine management light and require you to repeat the entire process.
Start with a gasket scraper to carefully remove the bulk of the carbon from the flat metal faces. Then, use a wire brush to clean the surface until it is perfectly clean and shiny. A brass brush is ideal as it is less likely to score softer aluminium surfaces. Be careful to prevent large carbon chunks from falling into the intake port; stuffing a clean rag into the opening is an effective way to avoid this.
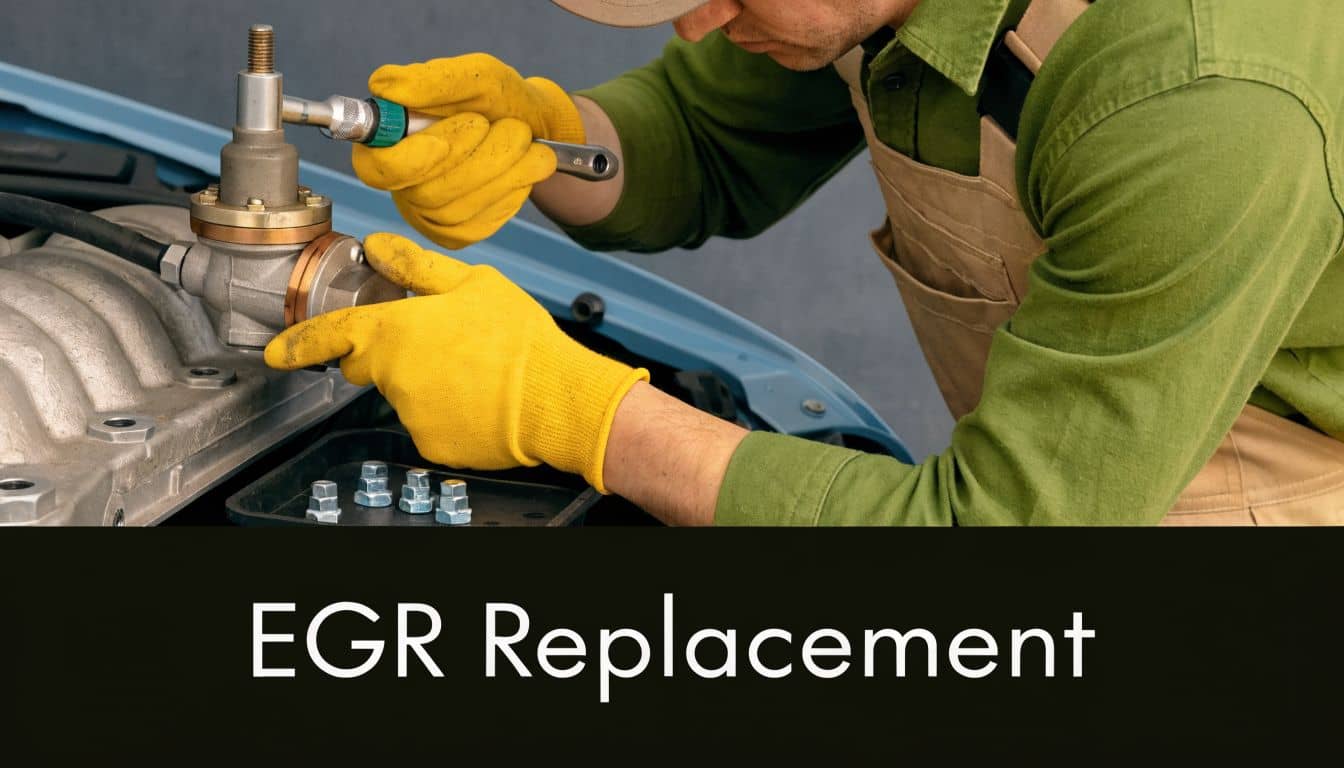
Installing the New EGR Valve
This is the rewarding part. With the mounting surfaces spotless, you are ready to install the new EGR valve.
First, place the new gasket onto the clean engine surface. Gaskets are designed to fit only one way, making incorrect placement difficult. Next, position your new EGR valve over the gasket and align the bolt holes.
Always start threading the new bolts by hand. This ensures they are aligned correctly and prevents the disastrous mistake of cross-threading the holes in the manifold or engine block.
Once the bolts are finger-tight, use a torque wrench. Tightening the bolts to the manufacturer's specified torque is essential. Overtightening can warp the new valve or crush the gasket, while under-tightening will result in a leak. You can find the correct Nm setting in your car’s service manual or through a quick online search.
With the bolts torqued, re-attach any coolant hoses, ensuring the clamps are secure. Finally, plug the electrical connector back in, listening for the reassuring ‘click’ that confirms it is properly seated. In the UK, the push for cleaner emissions since the Euro 6 standards in 2014 has led to a lot more EGR-related jobs. Getting the cleaning and installation right can prevent an estimated 30% of repeat failures. You can read more insights on EGR valve changes and their importance.
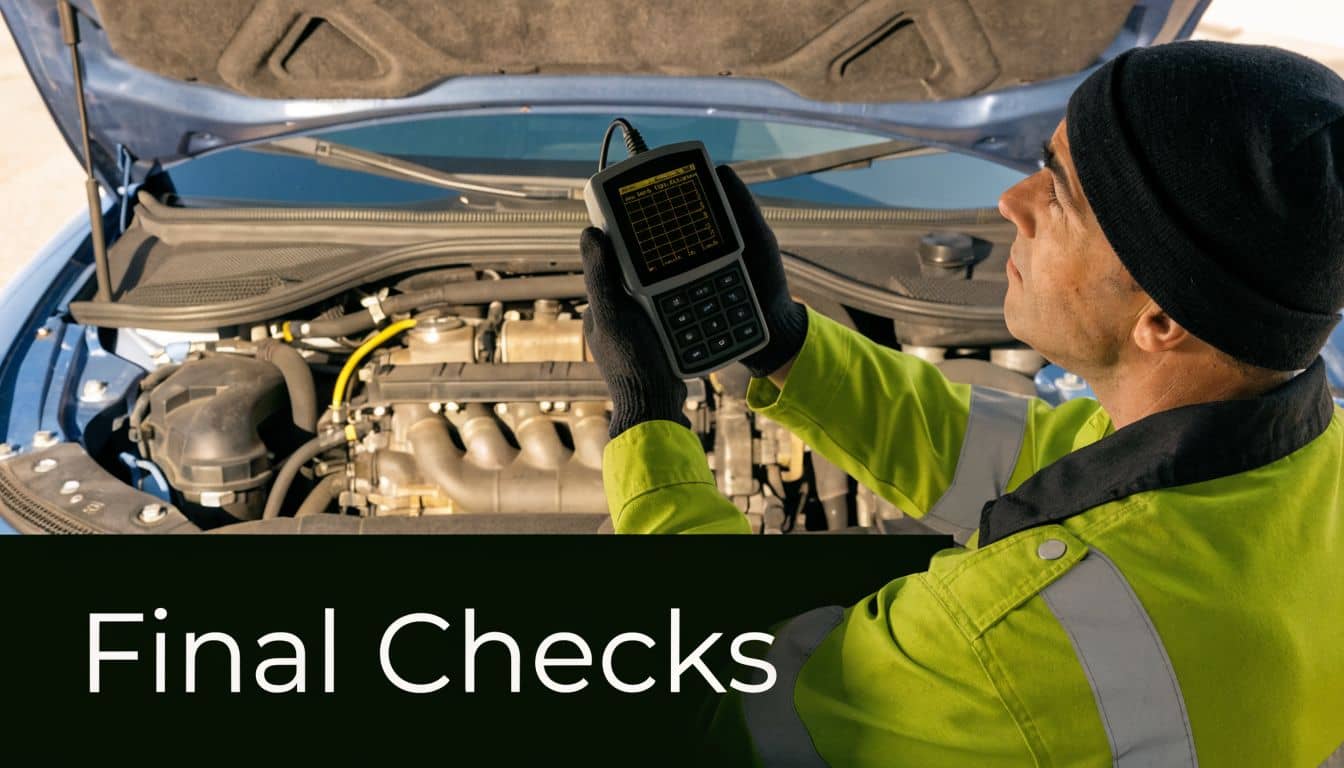
Post-Installation Checks and Troubleshooting
With the new EGR valve installed, you are almost finished. Resist the temptation to close the bonnet immediately. These final checks are crucial for ensuring a successful repair and preventing a repeat of the job. A few extra minutes now can save you a major headache later.
First, reconnect the negative terminal on your battery, ensuring it is secure. Then, perform a quick scan of the engine bay to clear away all your tools. A stray spanner can cause a dangerous short circuit across the battery terminals.
The First Start and Initial Checks
This is the moment of truth. With the bonnet still open, start the engine and let it idle. Use your senses to perform an initial diagnosis.
Listen for Leaks: A faint hissing sound may indicate a vacuum leak, possibly from a disconnected hose. A "chuff-chuff-chuff" sound near the valve suggests an exhaust leak, which usually means the gasket is not seated correctly.
Look for Leaks: If your car has a coolant-fed EGR valve, carefully inspect the hose connections for any drips of coolant. A small weep can become a significant leak as the system pressurises.
Let the engine run for several minutes. As it warms up, the metal expands and coolant pressure builds, making any potential leaks more apparent.
A Note on First Starts: Don't be alarmed if the engine runs slightly rough for the first 30 seconds. After disconnecting the battery and replacing a major sensor, the Engine Control Unit (ECU) is rebooting and adapting to the new component. If the idle does not smooth out after a minute, further investigation is needed.
Clearing Codes and The Test Drive
If the engine is running smoothly with no visible or audible leaks, it's time to use your OBD2 scanner again. The fault codes that initiated this repair will not clear themselves. You must inform the ECU that the issue has been resolved.
Access the scanner's menu and use the 'Clear All Codes' or 'Erase Faults' function. This should extinguish the engine management light. With a clean slate, you are ready for a test drive.
A thorough test drive should include a mix of driving conditions. Drive in slow-moving traffic and then find a safe road to accelerate firmly. The car should feel responsive and smooth, free from the hesitation or rough idling that prompted the repair.
Troubleshooting Common Post-Installation Issues
Even experienced mechanics encounter occasional problems. If something isn't right, it is usually a simple fix.
1. The Engine Light Comes Back On If the engine management light reappears, the first step is to scan for codes again. If it's the same EGR code (like P0401), the vehicle may require more than just a new part. Some modern ECUs need an 'adaptation' or 'relearn' procedure, which tells the computer that a new component has been installed. This is done with a more advanced diagnostic tool.
2. Rough Running or Stalling This is most often caused by a leak. It’s time to retrace your steps.
Vacuum Leak: Double-check every rubber hose you touched. A tiny split or a loose connection is all it takes to disrupt the system.
Exhaust Leak: Use your torque wrench to re-check the bolts on the EGR valve. An imperfect gasket seal can allow air to enter the system, confusing the engine's sensors.
Following these final checks will help you complete your EGR valve replacement with confidence, knowing the job was done correctly from start to finish.
EGR Replacement Costs vs DIY Savings
You're likely weighing the cost-effectiveness of replacing the EGR valve yourself versus hiring a professional. The decision often comes down to one key factor: money.
Hiring a professional is a common but often expensive solution. In the UK, the average cost for an EGR valve replacement at a garage is approximately £372. This figure varies depending on the vehicle; a Ford owner might pay around £358, while a Nissan owner could see a bill closer to £293. You can explore these car maintenance cost breakdowns at RAC.co.uk.
This is where the DIY approach offers significant savings. The largest portion of any garage bill is labour, and by performing the work yourself, you eliminate this cost entirely.
Calculating Your DIY Savings
For a DIY repair, your primary cost is the part itself. By purchasing a high-quality aftermarket EGR valve from GSF Car Parts, you can acquire a component that matches the original's performance for up to half the price of a main dealer part. This alone could save you over £100 before you even begin the work.
The Bottom Line: When you combine the savings from an affordably priced part with zero labour costs, a DIY EGR valve replacement can easily save you £200-£300 compared to a garage bill. This represents a substantial return for a few hours of your time.
Factoring in Your Time
Realistically, your time is also a factor. If this is your first time performing this repair, allocate 3-4 hours. You may encounter stubborn bolts or struggle with access in a cramped engine bay. In contrast, an experienced mechanic might complete the job in under two hours.
Considering the significant financial savings and the satisfaction of a self-completed repair, dedicating an afternoon to this task makes excellent sense. With services like free Click & Collect from GSF Car Parts, you can get the right part quickly and start the job without delay.
Common Questions About EGR Valves
Even after a successful replacement, you may still have questions about the function of the EGR valve and the repair itself.
Let’s address some of the most common queries to provide you with a comprehensive understanding and help you maintain your vehicle effectively.
Can I Just Clean My EGR Valve Instead of Replacing It?
This is a very common question. The idea of cleaning the valve instead of buying a new one is appealing, especially given the cost. In some cases, if the issue is merely a blockage from carbon buildup, a thorough cleaning might temporarily resolve the problem.
However, from an experienced perspective, cleaning is often a false economy. An EGR valve is a complex component with moving parts (like a pintle or diaphragm) and electronic sensors. If the internal diaphragm has failed, the spring mechanism is worn out, or the electronic position sensor is faulty, no amount of cleaning will restore its function.
Considering the time and effort required to remove the valve, installing a brand-new, warrantied part is the most reliable long-term solution. It provides peace of mind that you will not have to repeat the job in the near future.
It's worth remembering that a dodgy EGR valve isn't just an inconvenience; it can be a legal issue. A lit-up engine management light is an instant MOT failure here in the UK. If the valve is causing excessive smoke or your car fails its emissions test, you won't be going anywhere.
What Happens If I Ignore a Faulty EGR Valve?
Postponing this repair is a classic example of a small problem escalating into a larger, more expensive one. Ignoring a faulty EGR valve will lead to persistent issues like poor fuel economy, sluggish performance, and rough running.
More seriously, the problem can compound. A valve stuck open or closed can lead to severe carbon accumulation in the intake manifold, a much more difficult and costly part to clean. For diesel engines, the stakes are even higher, as a malfunctioning EGR system can contribute to the premature failure of the expensive Diesel Particulate Filter (DPF).
Think of a timely replacement as an investment. It prevents a cascade of related failures and saves you from a much larger repair bill down the road. Other related parts can also be affected, and you can learn more about components like the EGR cooler in our detailed articles.
Ready to get the right parts for your vehicle? Find high-quality components from trusted brands at GSF Car Parts. Simply enter your number plate to see the correct parts for your car, available for free Click & Collect in as little as 30 minutes. Visit gsfcarparts.com to get started.


