You usually start looking up how to replace a fuel pump after the car has already given you a bad day. It cranks longer than normal. It fires, then stumbles. It pulls away from a junction and suddenly feels flat, as if someone has closed the tap on the engine.
That pattern matters. A fuel pump isn't just another electric motor buried in the car. It's the part that moves fuel from the tank to the engine at the pressure the system expects. When it weakens, the car often tells you in ways that feel random at first, but they're usually connected.
A careful DIYer can replace a fuel pump at home. The trick is not rushing straight to the spanners. The expensive mistake is fitting a new pump to cure a fault that's a relay, fuse, wiring issue, blocked filter, or poor seal at reassembly. If you approach the job in the right order, you'll save money, avoid repeat work, and understand your car's fuel system far better by the end of it.
What a Failing Fuel Pump Sounds and Feels Like
A failing fuel pump often telegraphs its decline through a predictable pattern of symptoms. The engine may crank longer than normal, start and then stumble, or feel weak only when you ask for power climbing a hill, joining fast traffic, or accelerating out of a junction.
What matters is the pattern, not any one symptom by itself. Fuel pressure can be just good enough for idle and light throttle, then fall off when demand rises. That is why pump problems often feel intermittent at first.
The symptoms drivers notice first
The usual complaints are hard starting, hesitation, loss of power under load, sputtering, stalling, or a check-engine light. Some drivers also notice the car surging slightly at steady speed, as if fuel delivery is coming and going.
You may hear it too. On many vehicles, the pump gives a short, steady hum from the tank area when the ignition is switched on. A tired pump may sound louder than usual, rough, or inconsistent. No sound at all can point to a failed pump, but it can also mean a blown fuse, bad relay, wiring fault, or poor connection. If you suspect the control side of the circuit, it helps to compare your car's setup against a correct fuel pump relay listing before blaming the pump itself.
Practical rule: If the engine idles fairly cleanly but goes flat or hesitates under acceleration, low fuel delivery belongs high on the suspect list.
Why these faults feel inconsistent
Weak pumps rarely die all at once. More often, they lose output gradually or cut out when they get hot. That can give you a car that starts fine in the morning, struggles after a stop for fuel, then behaves again long enough to make diagnosis frustrating.
Age and use count, but they do not prove anything on their own. Pumps in older, heavily used vehicles fail more often as they have done more work, and a habit of running the tank very low can shorten their life by reducing the fuel around the pump that helps keep it cool.
The key point is simple. These signs tell you the pump is suspect. They do not confirm it.
Confirming the Fault Before You Touch a Wrench
A lot of DIY fuel pump jobs start the same way. The car cranks, refuses to fire, and the owner orders a pump that afternoon. Then the old pump comes out, the new one goes in, and the fault is still there because the underlying problem was a relay, a fuse, a bad ground, or low voltage at the connector.
That is why proper diagnosis comes first. A pump can fail, but it should be proved faulty before you open the tank or crawl under the car.
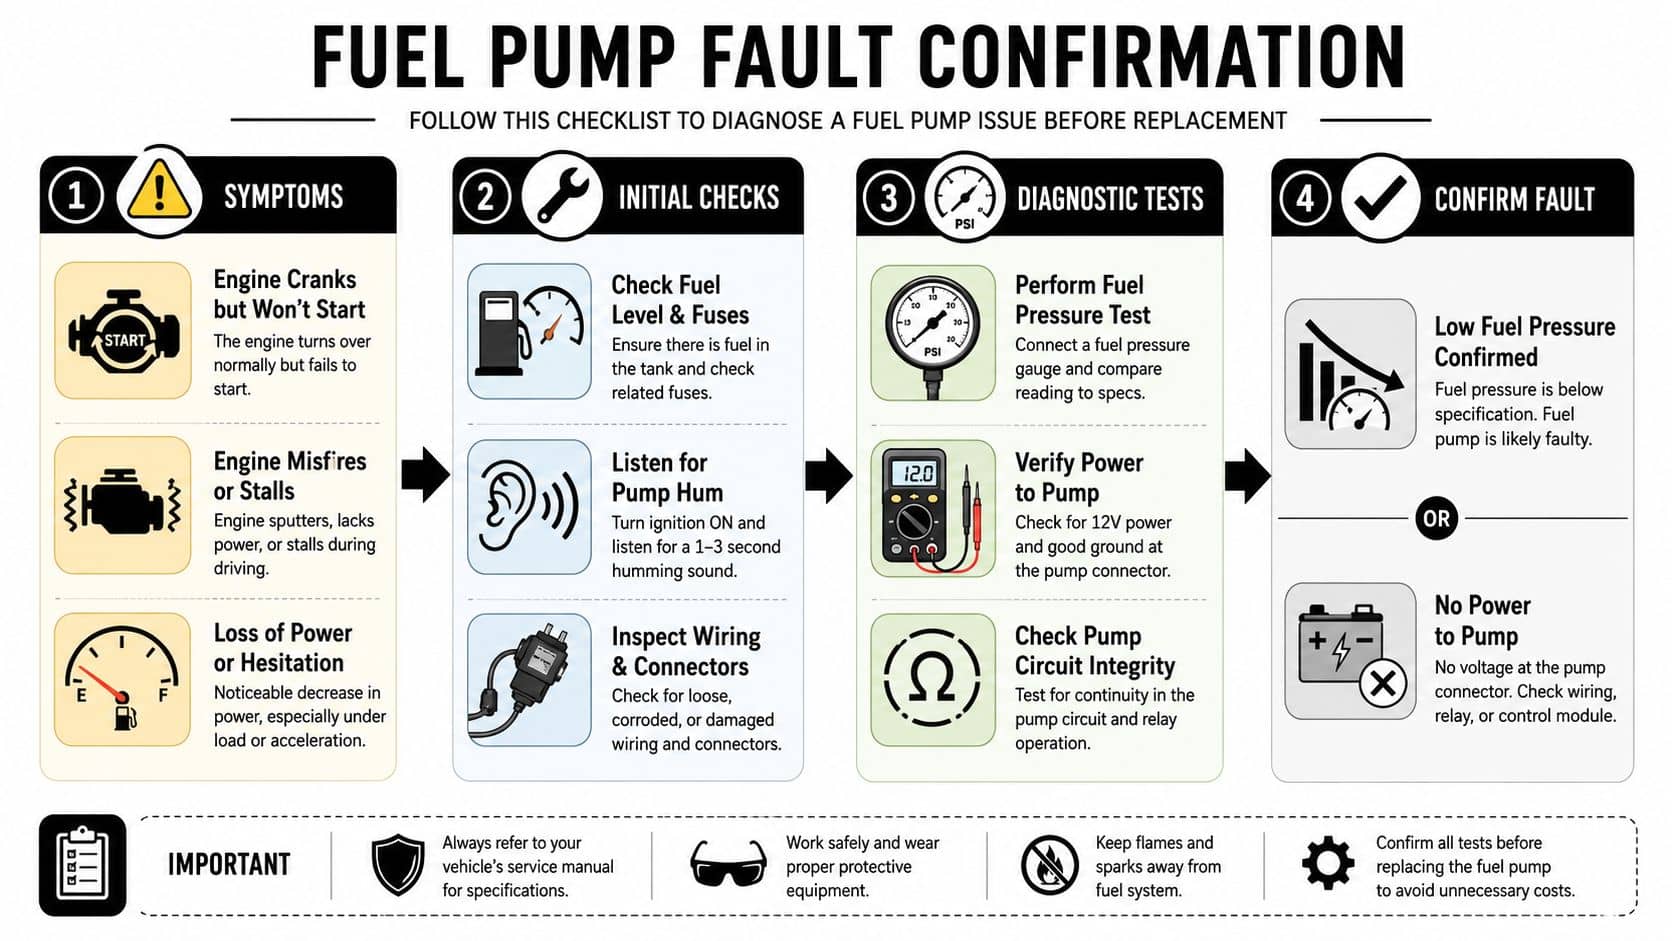
Start with the simple checks
Begin with the faults that are quickest to verify and cheapest to fix. It saves time, money, and a lot of unnecessary dismantling.
Fuel in the tank: Do not trust the gauge blindly, especially if the fault appeared all at once or the car has been parked on a slope.
Fuse condition: A blown fuel pump fuse stops the system before the pump ever has a chance to run.
Relay operation: A dead relay can copy pump failure almost perfectly. If you need to confirm the correct part for your setup, check a fuel pump relay listing for your vehicle.
Connector and wiring condition: Look for corrosion, loose pins, melted plastic, chafed wiring, or signs of heat at the pump connector.
If the fuse keeps blowing, stop and find out why. A shorted wire or failing pump circuit can take out the new part too.
Listen for the prime, but do not stop there
Turn the key to ignition on without cranking the engine. On many cars, the pump runs for a second or two to build pressure.
A clean, steady hum tells you the pump is being switched on. That does not confirm it is healthy. Weak pumps can still make noise and fail to deliver proper pressure under load.
No sound at all points the diagnosis in a different direction. The pump may be dead, but it may also be getting no power or no ground.
No prime sound and no fuel pressure usually means you need to test both the pump and the electrical supply to it.
Use fuel pressure to confirm the fault
This is the check that separates suspicion from proof. Fit a fuel pressure gauge to the fuel rail or test port if the vehicle has one, then compare the reading with the specification for your exact engine.
Do not skip the spec. A reading that looks “close enough” can still be wrong on a modern fuel system.
Result | What it usually suggests |
Pressure within spec | The pump is likely doing its job. Keep diagnosing. |
Low pressure | The pump may be weak, the strainer may be restricted, or the filter may be blocked. |
No pressure | The pump may not be running, or power and ground are missing at the pump. |
This check is important for separating a failing pump from simpler electrical faults that cause the same symptoms.
Check power and ground before condemning the pump
If pressure is missing or too low, test what is happening at the pump connector. You are looking for two things. Proper battery voltage when the pump is commanded on, and a good ground path back to the vehicle body or control unit.
Often, a lot of misdiagnosis occurs. I have seen pumps replaced because they were “not running,” when the actual issue was a burnt connector dropping voltage under load. The pump was fine. The wiring was not.
Use a wiring diagram and a multimeter if you are comfortable with electrical testing. If you have full power, a good ground, and poor or no fuel pressure, the pump has a strong case against it. If power or ground is missing, repair the circuit first.
That extra half hour of testing can save you from replacing a working in-tank pump, or blaming an inline pump that is only being starved by an upstream electrical fault.
Preparation Is Key Safety Tools and the Right Part
Poor preparation is the primary cause of trouble in a fuel pump replacement. The mistakes usually happen before any bolts come loose. A cluttered work area, the wrong seal, dirt left around the pump opening, or no plan for handling fuel can turn a straightforward repair into a leak, a no-start, or a fire risk.
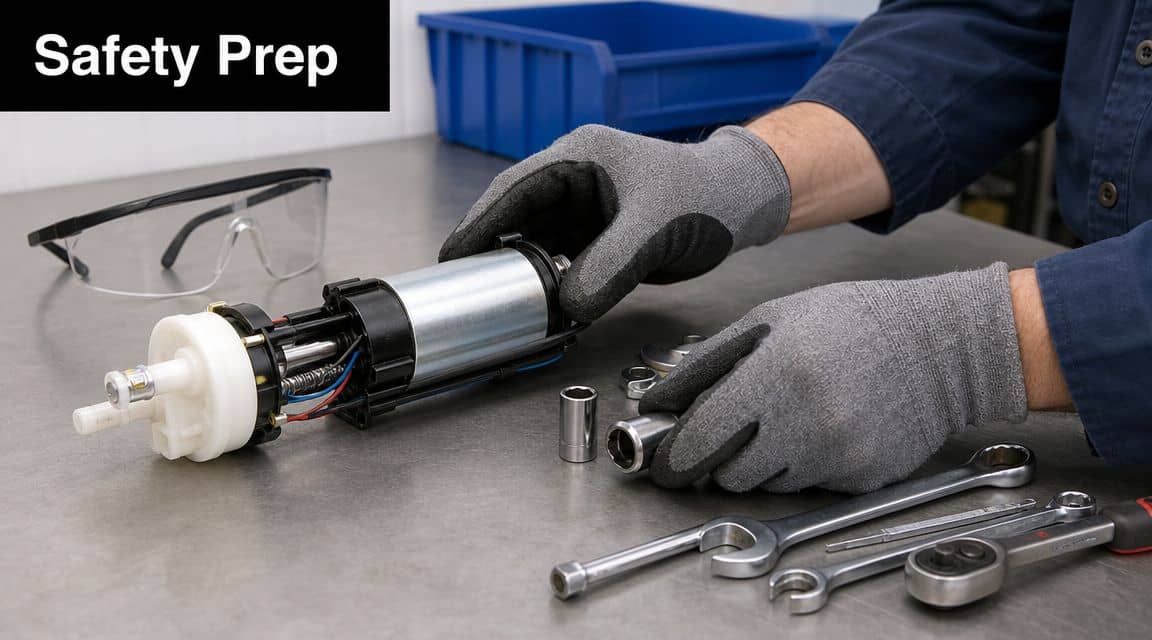
Safety rules that are not optional
Fuel vapour is the part of this job that deserves your full attention. You are opening a system designed to stay sealed, often with petrol still in the tank and fumes collecting in places you cannot see. One spark from a work light, charger lead, or nearby heater is enough to create a bad day.
Work outside or in a well-ventilated space. Keep ignition sources well away from the car. Have a suitable fire extinguisher within reach. Wear gloves and eye protection, and set out approved fuel containers before you disconnect anything.
A good seal matters just as much as avoiding sparks. If the new module or inline pump is installed with the wrong O-ring, a twisted gasket, or a dirty sealing surface, you can end up with fuel leaks, vapour smell in the cabin, or an evaporative emissions fault. That is why I always clean the area first and lay out every sealing part on the bench before starting.
What to have ready before you begin
Set the job up so you do not have to stop halfway through with the car apart. Depending on the vehicle and pump type, gather:
Basic hand tools: Socket set, ratchet, extensions, screwdrivers, pliers.
Fuel line tools: Disconnect tools for quick-connect fittings if your car uses them.
Tank support gear: A jack and solid supports if the tank has to be lowered.
Cleaning supplies: Brush, cloths, and a safe way to clean around the pump opening before it is opened.
Replacement parts: The correct pump module or inline pump, a new strainer where applicable, and the correct
Drain and spill control: Approved fuel container and absorbent cloths.
If you are working on an in-tank pump, add a marker pen for hose and connector orientation, plus a tray for small fasteners. If you are working on an inline pump, check the mounting rubbers and hose condition before the new pump goes in. A noisy old pump can be the result of restriction or poor mounting, not just pump wear.
Choosing the correct part
A fuel pump is not a part to force into service because it looks close. Connector style, pressure output, housing shape, pickup arrangement, sender setup, and sealing ring all need to match the vehicle.
GSF Car Parts is one supplier many UK DIYers use for fitment lookup by registration. Whatever supplier you choose, verify the part yourself on the bench before installation. Compare connector shape, outlet position, lock ring or bracket style, hose size, and any parts that must transfer from the old unit.
That check matters more than people think. I have seen perfectly good pumps returned as “faulty” when the actual problem was the wrong module for the tank depth or a seal that did not match the opening. Five minutes of comparison before assembly is a lot easier than dropping a tank twice.
Replacing an In-Tank Fuel Pump Step by Step
Most modern fuel pump replacements involve an in-tank pump. That means one of two jobs. You either get lucky and reach it through an access panel under the rear seat or in the boot, or you lower the tank.
Before opening the fuel system, the standard procedure is to depressurise the fuel rail and disconnect the battery. It's also important to determine whether the vehicle has an access panel because if it doesn't, the tank usually has to be lowered with a jack, which increases labour and complexity. Cleaning around the pump opening before removal is vital so dirt doesn't fall into the tank, as noted in AutoZone's replacement procedure.
A quick visual summary helps before the spanners come out.
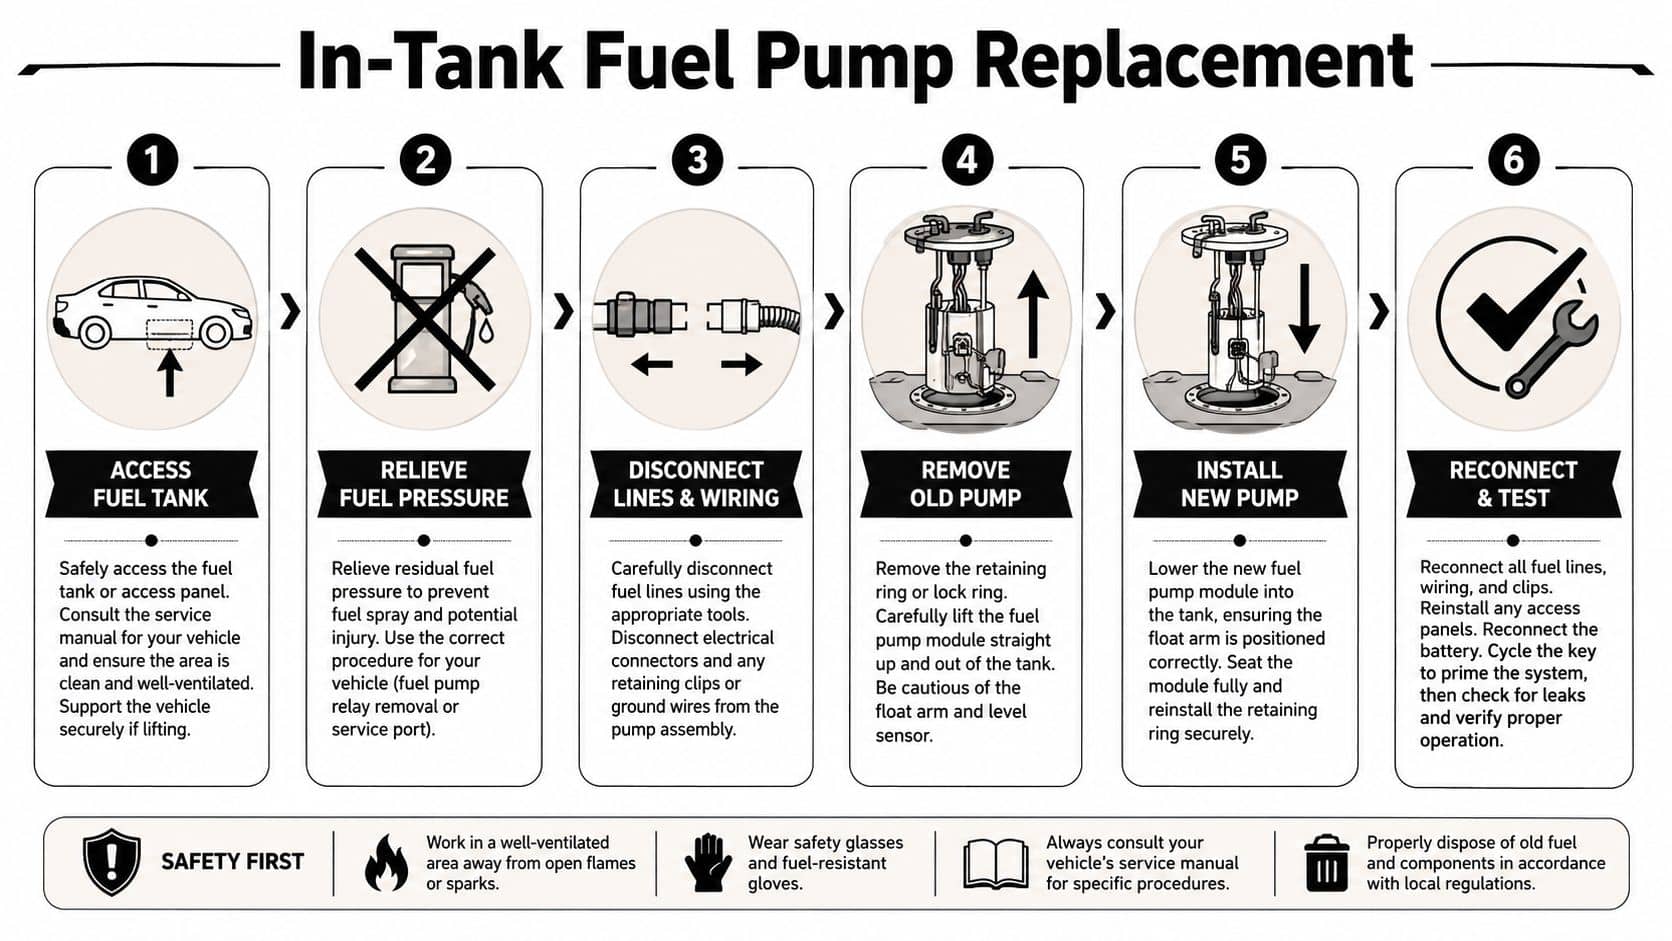
If the car has an access panel
This is the cleaner version of the job, though it still demands care.
Depressurise the system and disconnect the battery. Don't crack lines open on a live, pressurised system.
Remove the seat base or trim panel. Most access covers are held by screws or clips.
Clean the top of the tank thoroughly. Dust and grit sitting around the pump module love to fall into the tank once the seal is broken.
Disconnect the electrical plug and fuel lines. Label them if needed.
Remove the locking ring or retaining hardware. Use the correct tool if possible. Hammer-and-drift methods can work, but they also damage rings and slip at the worst moment.
Lift the pump assembly out carefully. Tilt it as needed to avoid bending the float arm if the assembly includes the level sender.
When the old module is out, compare it with the replacement. If your setup includes a level sender or matching assembly details, check them against a suitable fuel tank sender unit specification if you're replacing more than the pump itself.
If the tank has to come down
Many home mechanics at this stage decide whether the job still makes sense on the driveway. It's not impossible, but the tank can be awkward, fuel makes everything heavier, and access is often poor.
Use this approach:
Support the vehicle securely: You need room to work under it without balancing the tank dangerously.
Support the tank itself with a jack: Broad support helps avoid crushing or tilting it.
Disconnect filler neck, vent lines, and electrical connectors as access allows: Don't yank the tank down until you know what's still attached.
Undo the tank straps or fixings carefully: Lower the tank slowly and watch every hose and wire.
If the tank is fighting you, something is still connected. Stop and find it before you tear a hose or rip a connector out of the loom.
Once the tank is low enough, the pump removal is much like the access-panel method. Clean the area, disconnect the module, remove the locking ring, and lift the assembly out.
For a visual walk-through, this video is useful alongside your vehicle-specific procedure.
How to Diagnose and Replace a Fuel Pump
Installing the new module correctly
Many repeat failures often begin with these issues. The new pump can be perfect and the car will still run badly if the strainer is wrong, the seal is pinched, or transferred parts are fitted incorrectly.
Keep these points in mind:
Installation point | Why it matters |
Use the correct seal or gasket | A bad seal causes leaks, vapour smell, and warning lights. |
Replace the strainer where supplied | Reusing old filtration parts can create low delivery symptoms immediately. |
Match orientation to the old unit | Outlet and connector position matter for fit and hose routing. |
Seat the locking ring evenly | Uneven clamping often shows up later as leaks or vapour faults. |
Take your time lowering the new assembly into the tank. The float arm, strainer, and seal all need to sit properly. If the module doesn't want to seat, don't force it. Pull it back out and find what's hanging up.
How to Replace an Inline Fuel Pump
An inline fuel pump is usually easier to access because it sits outside the tank, commonly along the chassis or near the tank on older designs and some specialist applications. The process is different enough from an in-tank pump that it deserves its own approach.
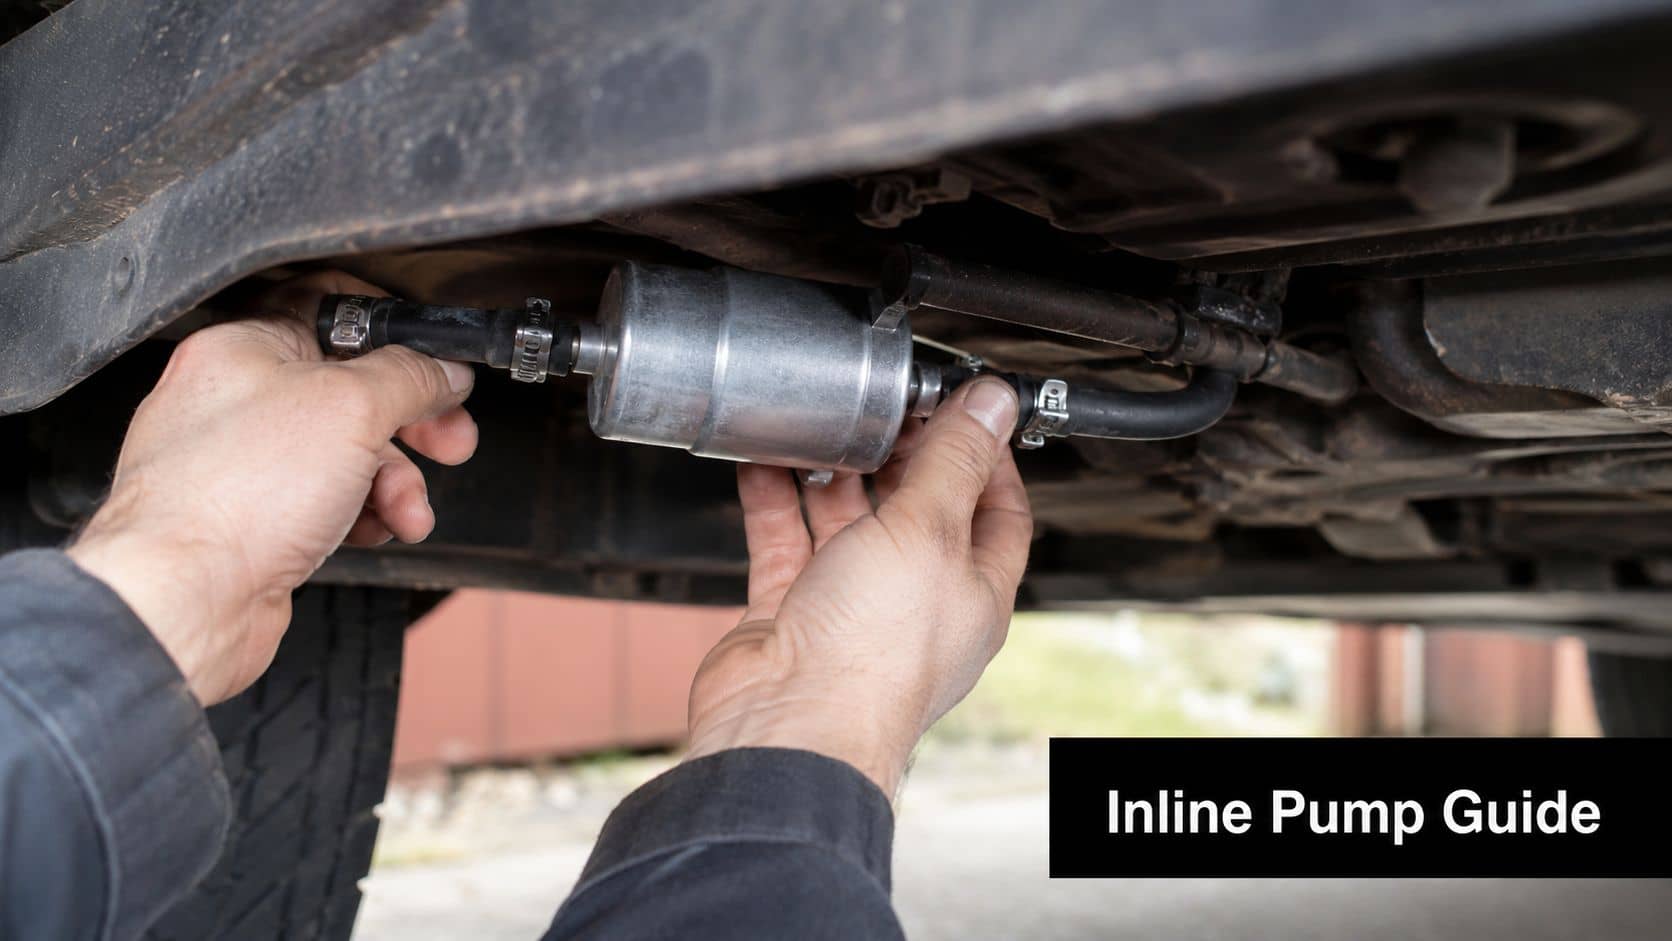
Locate and isolate the pump
Raise and support the vehicle safely if access underneath is needed. Find the pump along the fuel line and identify the inlet, outlet, electrical plug, and mounting bracket.
Before disconnecting anything, relieve system pressure using the proper method for the vehicle. Then clamp or manage the lines as needed to minimise spillage. Keep cloths and a fuel-safe container ready because some fuel loss is normal.
Remove the old pump without mixing up direction
Inline pumps usually come out with basic tools, but there's one detail that catches people out. Flow direction matters. Most inline pumps are marked with an arrow showing the direction of fuel travel.
Take a photo before removal. Mark the inlet and outlet if access is cramped.
A simple order works well here:
Unplug the electrical connector
Undo the fuel line fittings
Remove the mounting clamp or bracket
Compare the new pump to the old one
Install the replacement in the same direction of flow
Install an inline pump backwards and the engine may crank all day without proper fuel delivery, even though the pump itself runs.
Refit carefully and inspect the supporting parts
Inline pump jobs are a good time to inspect nearby hoses, clamps, and filters. If the hose ends are cracked or the clips are weak, sort that now rather than chasing a seep later.
Once the pump is mounted and connected, make sure the lines aren't twisted or pulled tight. A hose under tension may seal on the driveway and leak once the engine moves under load.
Final Checks Testing and When to Call a Professional
The installation isn't finished when the bolts are tight. It's finished when the system primes correctly, holds pressure, and stays dry.
A thorough post-installation check involves cycling the ignition on and off several times to prime the system. The new pump should audibly run for about 2 to 3 seconds at key-on, and after priming you need to inspect all lines and the main tank seal for leaks before starting the engine and road testing, as explained in Carter's post-install fuel pump procedure.
What to do before first start
Use this order instead of jumping straight into cranking the engine:
Reconnect the battery
Cycle the ignition on and off several times
Listen for the pump prime
Check every disturbed connection for leaks
Inspect the tank ring or gasket area closely
If you smell raw fuel, stop. If you see dampness, stop. A leak never fixes itself with “one more try”.
First start and road test
Once everything stays dry during priming, start the engine and let it idle while you watch and smell for problems. Idle quality should stabilise fairly quickly. If the engine starts but runs poorly, revisit the basics. Hose routing, electrical connection, seal seating, transferred components, and filtration parts are all worth checking.
After idle looks good, road test gently first. Don't go straight to a hard pull or motorway run. Build confidence in stages.
When handing it to a professional is the better call
Some fuel pump jobs are perfectly reasonable for a capable DIYer. Others become poor-value driveway battles. If the tank is awkwardly packaged, the fixings are heavily corroded, access is tight, or you're not confident with fuel system diagnosis, paying for the job can be the sensible decision.
That's especially true because replacing a fuel pump is often labour-heavy. On many vehicles the pump sits inside the tank, and if there's no access panel the tank must be lowered, drained, disconnected, removed, and refitted. That's why widely cited replacement totals are around $900 to $1,300, with labour often around $500 to $600 and parts about $400 to $600, as outlined in Kelley Blue Book's explanation of fuel pump replacement costs and labour.
That cost profile cuts both ways. It explains why garages charge what they do, and why diagnosis before replacement matters so much. If you can confirm the fault and handle the work safely, DIY may make sense. If you can't confirm the fault with confidence, paying for proper diagnosis can still be cheaper than fitting the wrong part.
If you're ready to tackle the job, GSF Car Parts is one place to find fuel pumps, gaskets, filters, tools, and other fuel system parts for UK cars and light commercial vehicles. The registration lookup can help narrow fitment before you order, and Click & Collect is useful when the car is off the road and you need parts the same day.


