You lift the bonnet to check a fluid level, and the first thing you see is a film of grime over everything. Dust stuck to oily patches. Old leaves tucked into corners. Plastic covers that look faded rather than finished. You might close it again and decide the engine bay can wait.
That's usually the wrong call.
Learning how to clean a car engine bay properly isn't just a detailing exercise. It's one of the simplest ways to turn a dirty, hard-to-read space into something you can inspect. Once the muck is gone, hoses, wiring, clips, reservoirs and seals become easier to check, and small problems stop hiding in plain sight.
Why You Should Clean Your Car's Engine Bay
A clean engine bay matters for the same reason a clean workshop bench matters. You can see what's going on.
When an engine bay is covered in grease and road dirt, fresh leaks blend into old mess. A light coolant weep can disappear under dust. A small oil seep around a rocker cover gasket can look like nothing until it spreads. Power steering fluid, where fitted, can collect grime and mask the source. Once the area is clean, new fluid trails stand out quickly, and that gives you a much better chance of catching faults before they grow into bigger repairs.
There's also a parts-preservation reason that gets overlooked. According to MotorWeek's engine cleaning guidance, a dirty engine bay can reduce the life expectancy of expensive hoses by 50% to 75% because grime and heat accelerate deterioration. That's the bit many owners miss. Cleaning under the bonnet isn't only about looks. It helps protect rubber and plastic components from oily build-up and trapped moisture.
What grime actually harms
Some contamination is harmless dust. Some of it isn't.
A greasy film can sit on coolant hoses, vacuum lines, plastic covers and wiring insulation for months. Once that layer starts holding heat and moisture, materials age harder than they should. On older cars, that matters even more because the rubber, seals and clips are already dealing with age.
Practical rule: If you can't tell whether a hose is stained or actively leaking, the bay is too dirty to inspect properly.
Why this matters in normal UK driving
UK roads don't have to be off-road rough to make a mess under the bonnet. Wet weather, road spray, winter residue and general traffic grime all work their way into the engine bay. If you mostly do short runs, the bay often never gets the kind of heat cycle that dries everything out cleanly.
That's why I treat engine bay cleaning as preventative maintenance. You're not polishing hidden metal for the sake of it. You're giving yourself a clear view of:
Hoses and joints that may be starting to crack or sweat
Reservoirs and caps that can show staining around a leak
Electrical connectors that shouldn't sit in grime
Plastic trims and covers that last better when they aren't coated in residue
A tidy engine bay also makes routine jobs less unpleasant. Checking oil, topping up washer fluid, changing a battery or replacing a filter is easier when you're not reaching through grease.
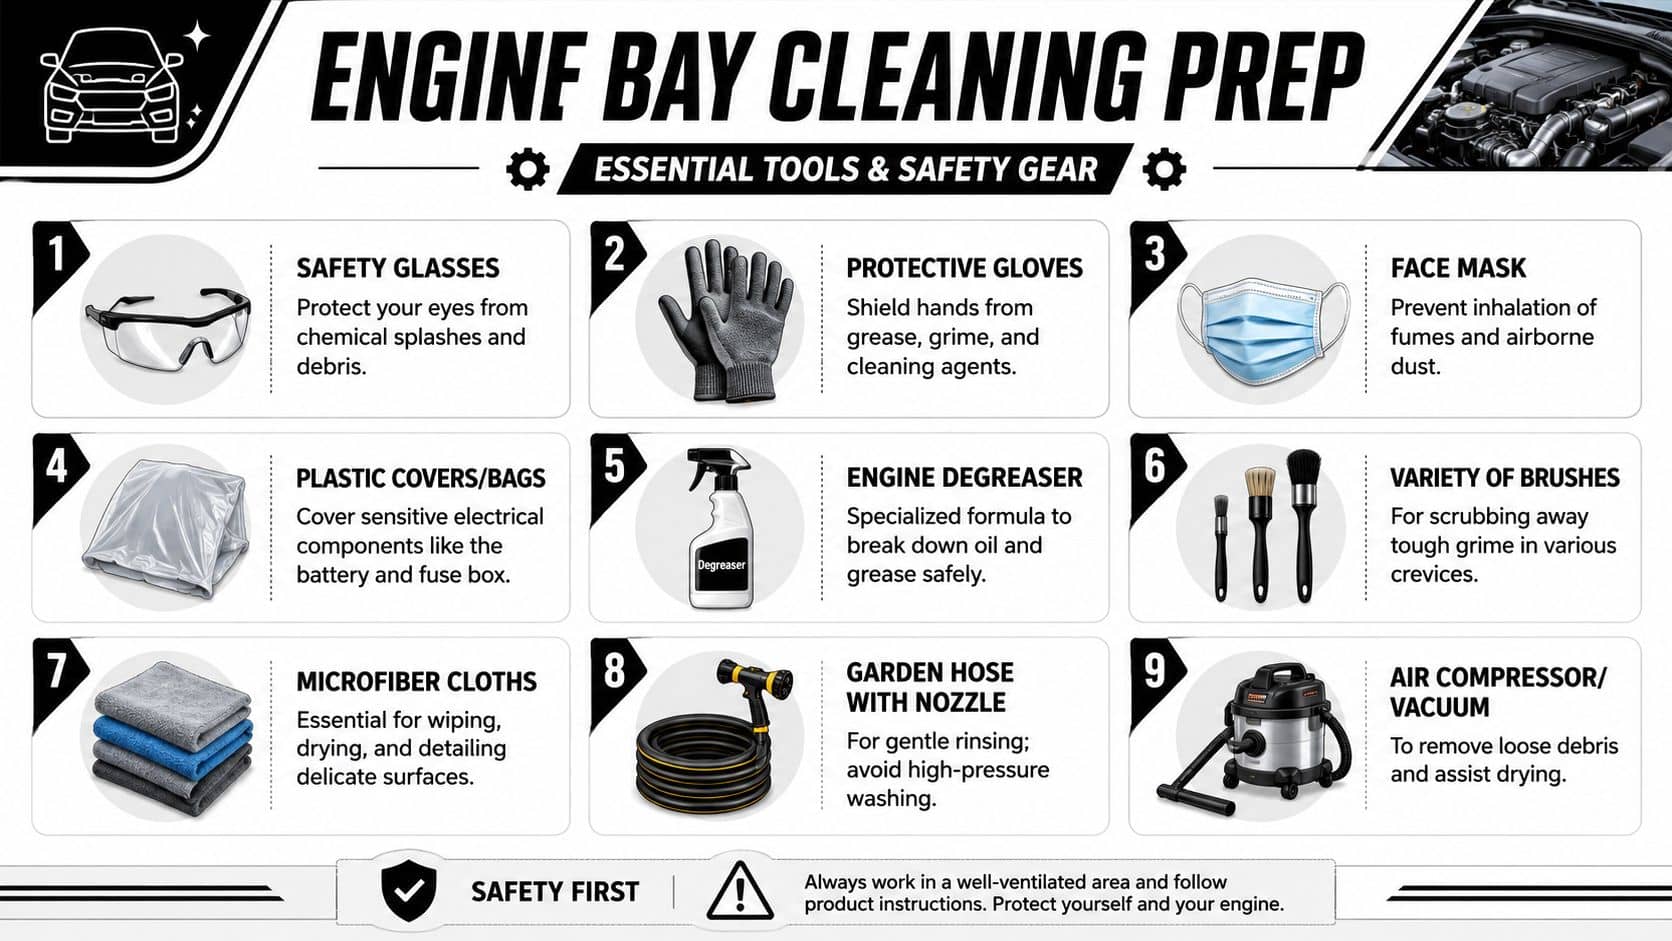
Gathering Your Tools and Preparing for Safety
Preparation makes the difference between a controlled clean and a nervous spray-and-hope job. Most problems happen before the first rinse, usually because the engine is still warm, the wrong cleaner gets used, or nobody thinks about where the runoff is going.
What to have ready
You don't need a van full of detailing gear, but you do need the basics laid out before you start.
Gloves and eye protection keep degreaser, loosened grime and splashback off your skin and out of your eyes. A simple pair of protective gloves for garage jobs is worth having on hand.
Plastic bags or covers are for shielding components you don't want soaked.
A proper engine degreaser or APC does the heavy lifting on oily build-up.
A few different brushes matter more than one aggressive brush. Soft detailing brushes are useful around plastics and connectors, while stiffer brushes help on greasy metal areas.
Microfibre cloths are for wipe-down and drying.
A hose with a gentle spray is enough. You're rinsing dirt away, not cutting concrete.
Compressed air, a blower or a vacuum with blow function helps clear trapped water from seams and brackets.
The safety checks that actually matter
Start with a cool engine. That isn't a fussy detailing rule. If the bay is hot, cleaner can dry too quickly, leave residue, and make the whole process harder to control. It also isn't sensible to spray liquid around hot components.
If the battery terminals are exposed or you'll be working closely around them, disconnecting the negative terminal is a cautious move. On some cars, owners prefer to leave the battery connected to avoid resetting settings. Either approach can work, but if you leave it connected, be more careful around exposed electrical points and don't let pooled water sit anywhere near them.
Work in the shade if you can. Cleaner that flashes off too fast leaves you chasing stains instead of removing them.
Don't ignore the runoff
This is the part many driveway guides skip. In the UK, runoff from engine cleaning can contain oil, degreaser, fuel residue and grime. According to CRC's guidance on cleaning an engine bay, local authorities and the Environment Agency warn that this runoff must not enter surface-water drains, because those often discharge directly into rivers.
That changes where and how you clean.
A practical setup includes:
Absorbent mats under the front of the car
A controlled wash area rather than the edge of the road
Low water use so you create less contaminated runoff
Collected waste cloths and pads disposed of responsibly
If you can't control the wastewater on your driveway, it's better to use a suitable workspace or leave the rinsing stage to a professional detailer.
Protecting Sensitive Engine Components Before You Start
Most modern engine bays can tolerate careful cleaning. The key word is careful. Water itself isn't the enemy. Poor aim, too much pressure and soaking the wrong component is what causes trouble.
The parts that deserve protection
If you're new to this, focus on identifying a few vulnerable areas before you touch any cleaner.
Component | What it does | Why you protect it |
Alternator | Charges the battery and powers electrical systems while the engine runs | Excess water can affect bearings and electrical internals |
Air intake opening | Feeds air into the engine | Water ingestion is never worth the risk |
Fuse box | Distributes electrical power through protected circuits | You don't want water sitting around fuses and terminals |
ECU or exposed control modules | Manages engine and vehicle systems | Electronics and chemical overspray don't mix well |
Coil packs and ignition areas | Help generate spark for combustion | Moisture can trigger misfires or hard starting |
Aftermarket filters or open intakes | Draw in engine air with less shielding than stock systems | They're often more exposed than factory parts |
How to cover them without making a mess
You don't need elaborate wrapping. A plastic bag, cling film, or plastic sheeting secured lightly with tape is usually enough. The idea is to shield from overspray and light rinse water, not vacuum-seal the whole engine bay.
Focus on openings and exposed tops, especially around the intake path. If your car has a standard sealed airbox, you still shouldn't blast it with water, but it's less vulnerable than an aftermarket cone filter sitting in the open. If the battery is exposed, cover the terminals rather than wrapping the whole battery so tightly that you trap water beneath the cover.
A simple way to identify what matters
Use this quick test before cleaning. Ask what would happen if water sat inside or around the part for an hour.
If it draws air in, protect it
If it contains electronics, protect it
If it houses fuses or relays, protect it
If it spins and generates electrical power, protect it
That mindset is more useful than memorising a giant list, because engine layouts vary a lot between cars.
The safest engine bay clean is the one where water lands only where you intended it to.
Areas people forget
The obvious components get attention. The smaller ones often don't.
Look for exposed connectors near the front slam panel, loom junctions near the suspension turrets, and any cracked plastic covers that no longer seal properly. On older cars, previous repairs can leave clips missing or covers loose, which changes how much protection a part really has. If something looks fragile, treat it as fragile.
Also check the bonnet insulation and underside if you plan to clean there. A light mist and wipe is fine. Saturating it usually isn't.
The Step-by-Step Guide to Degreasing and Rinsing
The safest method is controlled, patient and a bit boring. That's a good thing. Engine bay cleaning goes wrong when people rush the chemical stage and overdo the rinse.
Start with the bay dry or only lightly dusty. If there are loose leaves and debris around the scuttle, hinges or slam panel, remove those first by hand or with air before you introduce any liquid.
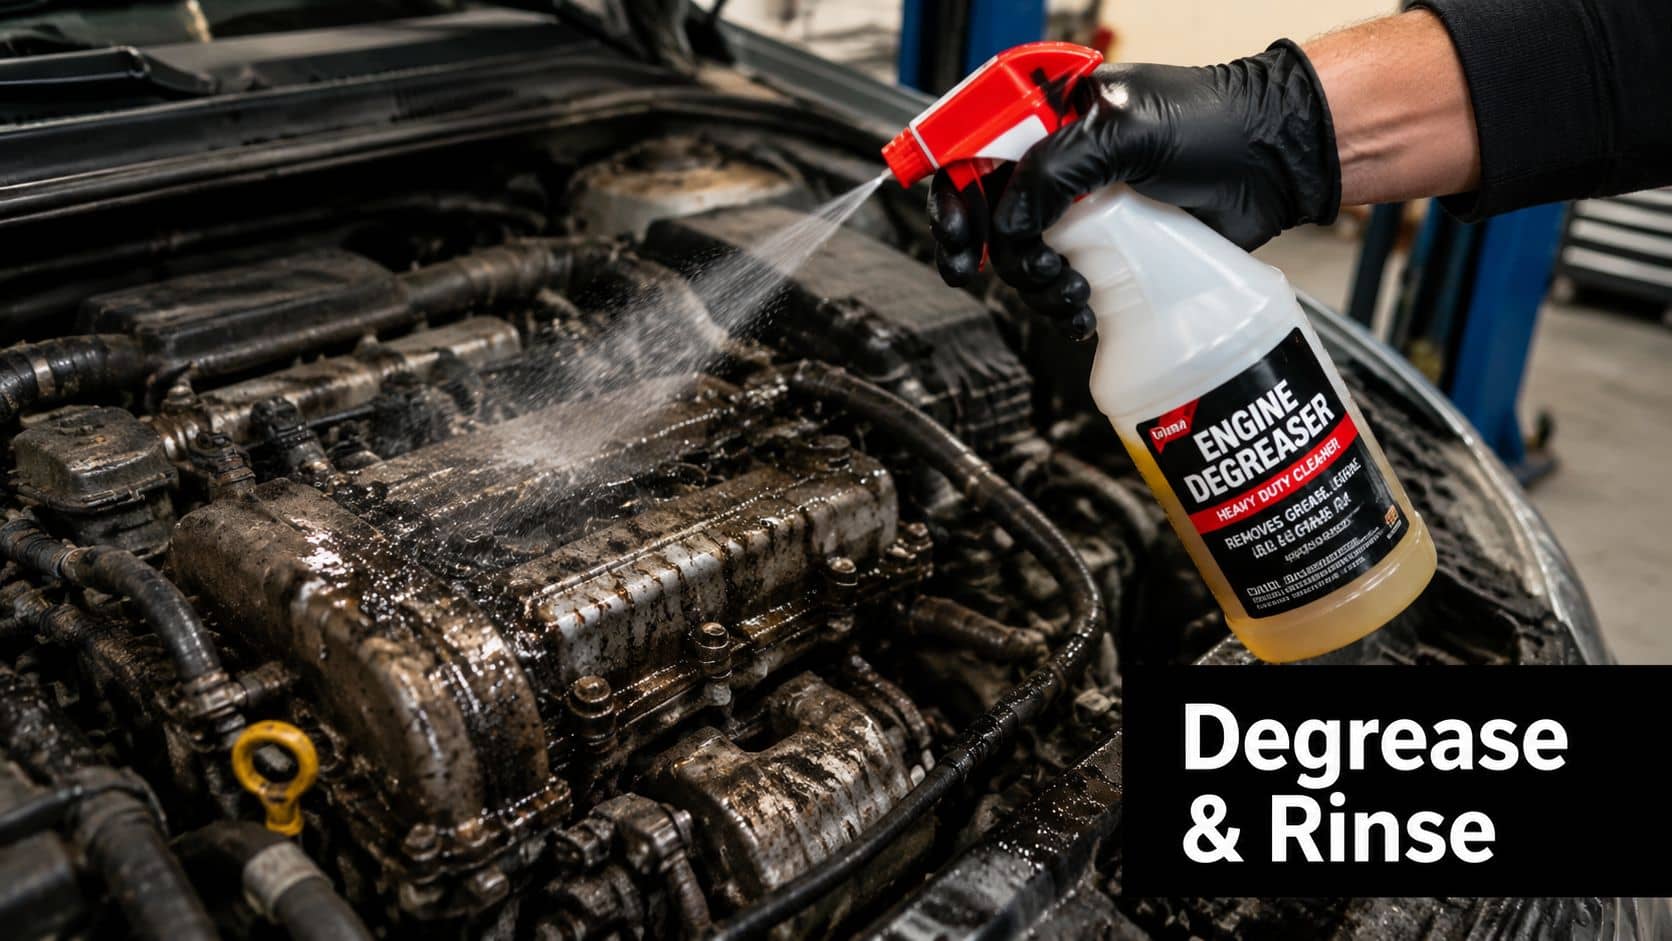
Apply cleaner to a dry surface
A degreaser works best when it can sit on grime and break it down. If the bay is already wet, the product gets diluted immediately and tends to run off before it has done much.
Detailing guidance from The Rag Company's engine bay cleaning process recommends starting with a diluted engine cleaner at around 10:1 or 12:1. That's a strong benchmark for general dirt and oily film. For many DIY jobs, a purpose-made engine degreaser is the simplest route because it's intended for this kind of contamination.
Spray with intent. Put product on the dirtiest zones first:
Front of the engine
Around covers and brackets
Bulkhead corners
Around reservoirs and caps
The underside of the bonnet if it's dirty
Don't flood the bay. You want coverage, not dripping excess.
Agitate instead of attacking
Most of the cleaning happens here.
Use brushes to move the cleaner through seams, bolt heads, hose junctions and textured plastic. A soft detailing brush works around electrical areas and badges. A firmer brush helps on greasy brackets and painted metal. If you've ever wiped an engine cover with a cloth and just smeared the grime around, this is why. Dirt in an engine bay usually needs to be lifted, not merely spread.
Work top-down and in sections. That stops dirty cleaner from drying in awkward places while you're busy elsewhere.
Workshop habit: One small area at a time always beats soaking the whole bay and trying to save it afterwards.
If a patch is especially stubborn, reapply cleaner and agitate again rather than reaching for more pressure. Thick grime often responds better to a second short application than to one aggressive scrub.
A visual walk-through helps if you want to see the pace and restraint this job needs: Steam Cleaning Car Engine - How To!
Rinse gently and keep control
Once the grime has been loosened, rinse with a low-pressure flow. The same expert guidance linked above recommends a low-pressure rinse so contaminants come away without forcing water into connectors and protected areas.
A hose on a shower or gentle spray setting is ideal. Keep the water moving. Don't hold the stream on one connector, one fuse box edge or one seal and hope for the best. Think of the rinse as carrying dirt away, not power-washing a driveway.
What works well:
Short passes
Top-down rinsing
Standing back slightly
Watching runoff so you can see where dirt remains
What doesn't:
High-pressure washers
Jetting directly into wiring plugs
Soaking one area repeatedly
Leaving cleaner to dry on the surface
If needed, do a second spot-clean on missed patches rather than turning the rinse stage into a battle.
Drying and Dressing for a Professional Finish
A lot of DIY engine bay cleans are let down right here. The dirt is gone, but water stays trapped in fixings, seams, coil recesses and plastic edges. If you stop at “that looks dry enough”, you're gambling with the fiddly parts.
Dry it properly before you dress anything
Start by removing your covers and checking that no water has pooled underneath them. Then blow out trapped moisture with compressed air, a car dryer, a small leaf blower or whatever safe airflow tool you have. After that, use microfibre cloths to dry accessible surfaces by hand.
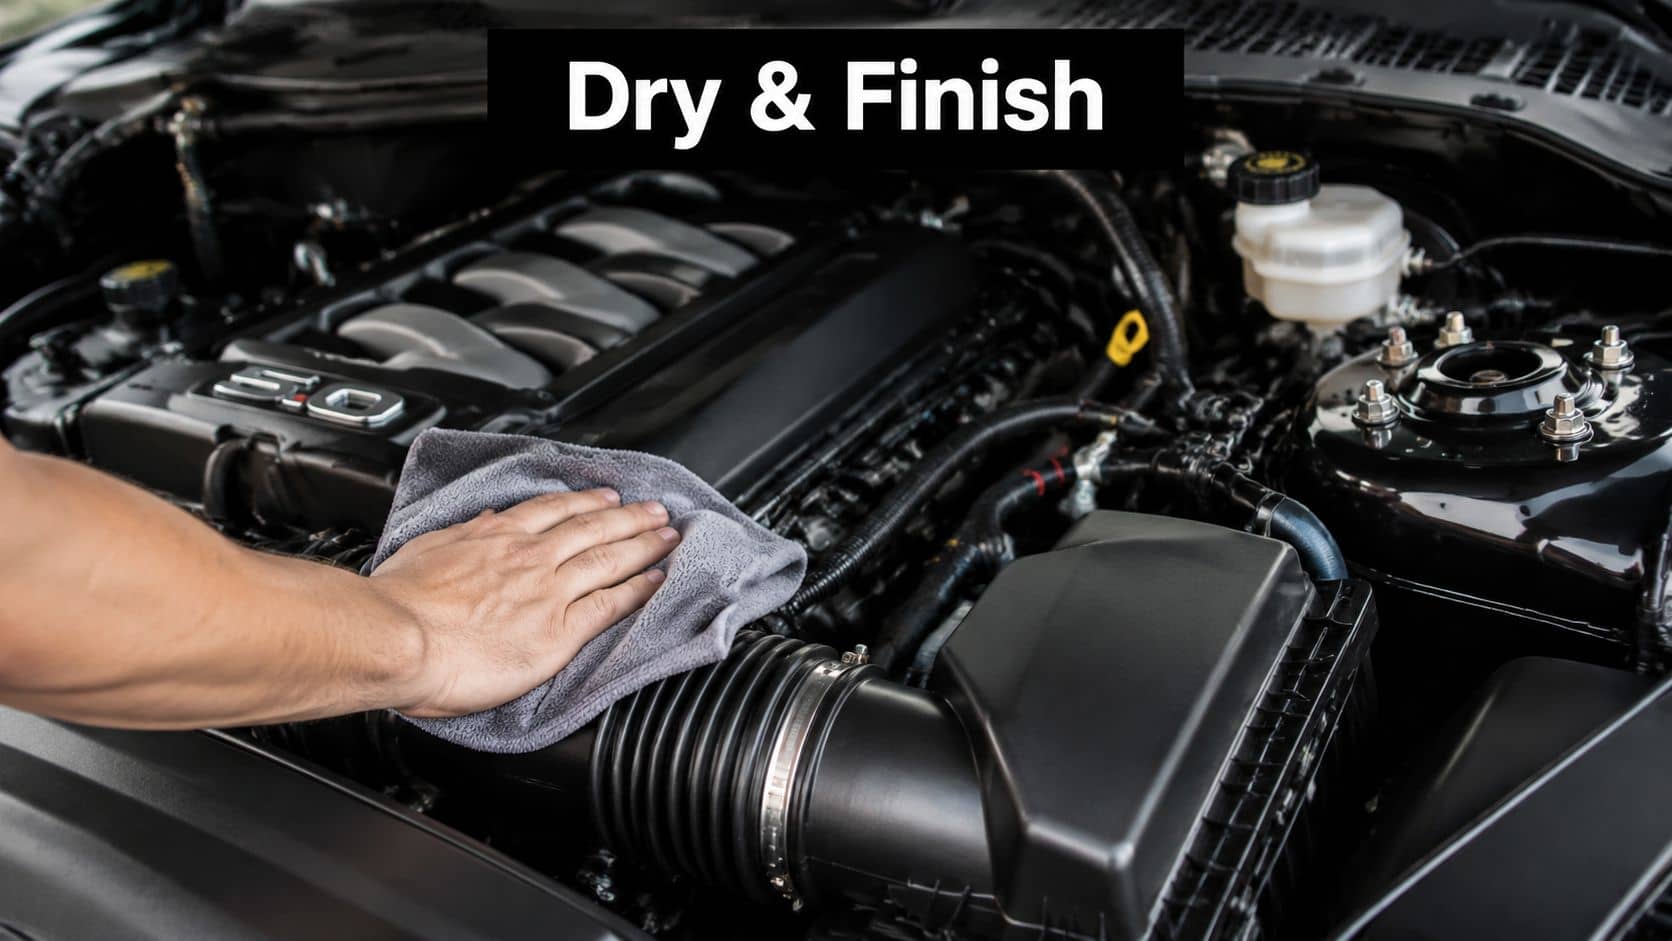
Pay extra attention to:
Around ignition components
The tops of inner wings and seams
Around the battery tray
Under plastic covers
The lip around the bonnet shut line
If you can, leave the bonnet open for a while after towel drying. Airflow helps more than people think.
Dressing is protection, not just shine
Once the bay is dry, a water-based dressing on plastics and rubber can make the area look finished and help keep trim from looking chalky or tired. This is the stage where many bays go from “clean” to “properly sorted”.
Use a light coat on trims, covers and rubber components. Avoid belts, pulleys, and any surface where slipperiness would create a problem. If you want a ready-made option, engine dressings made for under-bonnet finishes are designed for this type of job.
The trade-off is simple:
Approach | Result |
Too much dressing | Greasy finish that attracts dust |
Light, even application | Natural finish and easier maintenance later |
The more professional look is usually the less glossy one.
Let it cure before closing the bonnet
According to the same detailing process referenced earlier, the final dressing should be allowed to cure for around 2 hours before shutting the bonnet. That waiting time matters because uncured product can transfer, smear, or trap residue where you don't want it.
Once everything has settled, reconnect anything you disconnected, remove all masking, and start the engine. Letting it idle briefly can help evaporate traces of moisture from areas that are warm but not overheated.
If the engine starts cleanly and idles normally, that's your confirmation that the job stayed controlled from start to finish.
Engine Cleaning Mistakes and Maintenance Schedule
Most engine bay problems come from enthusiasm rather than neglect. People use too much water, too much pressure, or too much product and assume more force means a better result.
The common mistakes are easy to avoid:
Cleaning a hot engine leads to fast-drying chemicals, awkward residues and unnecessary risk.
Using high pressure can force water where seals and connectors were never meant to deal with it.
Skipping protection around the intake and exposed electrics turns a careful clean into a fault-finding session.
Using household cleaners is rarely worth it when engine-safe products exist.
Closing the bonnet too soon traps moisture and smears dressing.
For most drivers, this doesn't need to become a monthly ritual. According to Detailed Image's engine bay detailing guide, a full engine-bay detail 1–2 times per year is usually enough. That timing suits UK use well. A spring clean helps remove winter salt and road grime, while an autumn clean gets the bay sorted before colder, wetter conditions return.
There are times when doing it yourself isn't the smart option. If you're dealing with a classic car with brittle wiring, an engine bay covered in heavy baked-on grease, or a modern car with tightly packed electronics you're not confident identifying, paying for a careful professional clean can be the safer move.
A well-cleaned engine bay should make maintenance easier, not create new problems. If you keep that in mind, you'll approach the job with the right level of caution.
If you're getting ready to clean under the bonnet or replace tired hoses, clips, fluids and finishing products afterwards, GSF Car Parts is a practical place to source engine care items, workshop consumables and service parts for a DIY job done properly.


