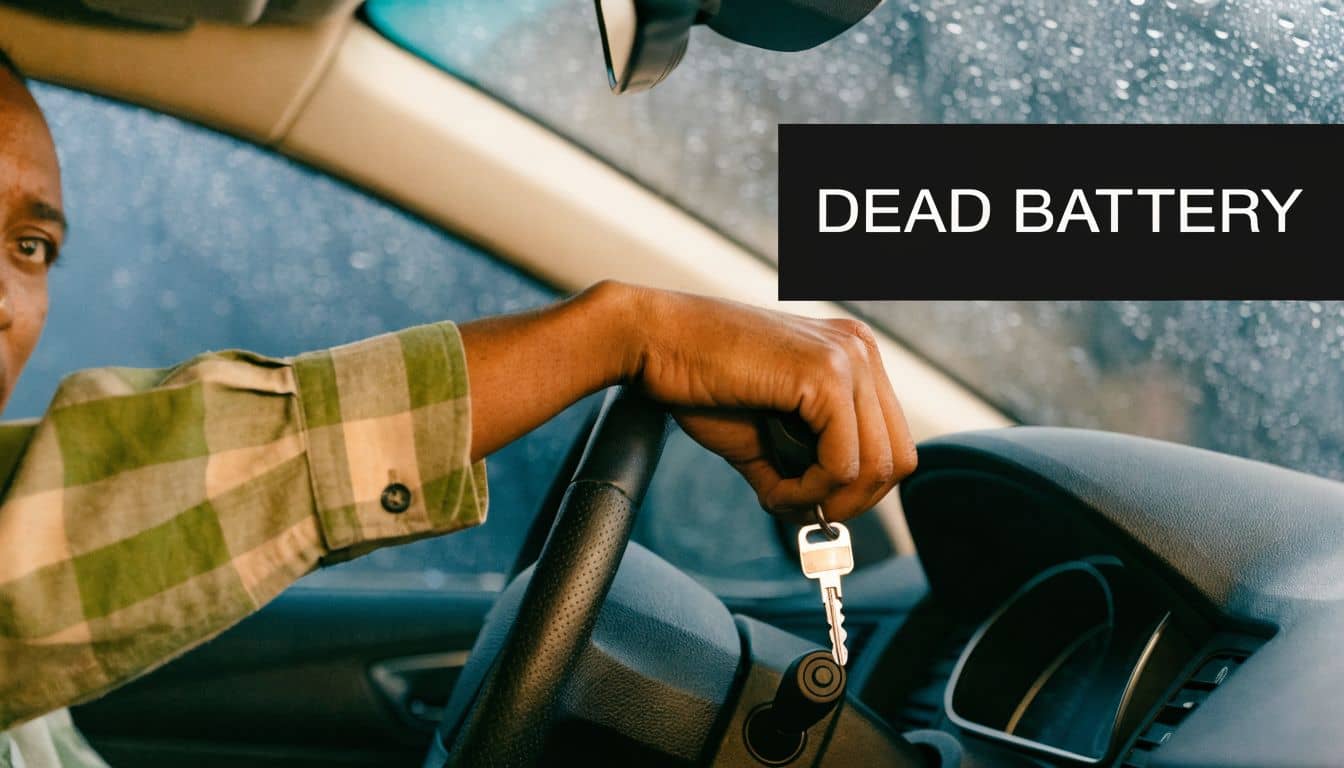
You go to start the car before work. The dash lights up, you turn the key, and instead of a clean crank you get a dull click, a sluggish turnover, or nothing at all. It’s one of the most common ways a normal day turns awkward fast.
The good news is that a battery change is one of the most manageable jobs you can do at home if you prepare properly and respect the safety steps. It’s not just about swapping one box for another. It’s about fitting the right part, disconnecting it in the right order, and knowing when a modern car needs more than a spanner.
That Dreaded Silence When You Turn the Key
Cold mornings tend to expose weak batteries. A car that seemed fine yesterday can suddenly act lifeless today, especially if the battery was already on borrowed time.
That’s why this job matters. In the UK, car batteries account for approximately 25% of all automotive breakdown incidents, and changing one at home can save an average of £100-£150 in garage labour costs, according to the verified data provided via this reference.
What the symptoms usually mean
A battery on its way out often gives you a warning before it fails completely.
Slow cranking:The engine turns over, but it sounds lazy and laboured.
Clicking only:You may hear a relay or solenoid click, but the starter doesn’t spin the engine properly.
Electrical oddities:Interior lights dim, the central locking hesitates, or the dash behaves strangely.
Sometimes the battery is flat because something drained it. Sometimes the battery itself is finished. Either way, if the battery needs replacing, knowing how to change car battery at home stops the problem from becoming a tow truck job.
Why this is a useful DIY skill
A battery change sits in a sweet spot for home maintenance. It’s practical, it usually doesn’t need specialist workshop gear, and the result is immediate. Fit the battery properly and the car either starts with confidence or it tells you there’s another fault worth investigating.
Practical rule: If you can work methodically and follow the terminal order exactly, this is a realistic first DIY job.
The biggest mistake beginners make isn’t lack of strength or lack of tools. It’s rushing. A careful battery swap is straightforward. A rushed one can create sparks, damaged clamps, lost settings, or faults in newer cars.
Gather Your Tools and Find the Right Battery
Preparation does most of the work for you. If the new battery is wrong, the clamp hardware doesn’t match, or you start without eye protection, the job becomes harder than it needs to be.
The first thing to remember is simple. A car battery contains sulphuric acid, so gloves and eye protection aren’t optional. If there’s corrosion around the terminals, you don’t want that on your skin or in your eyes.
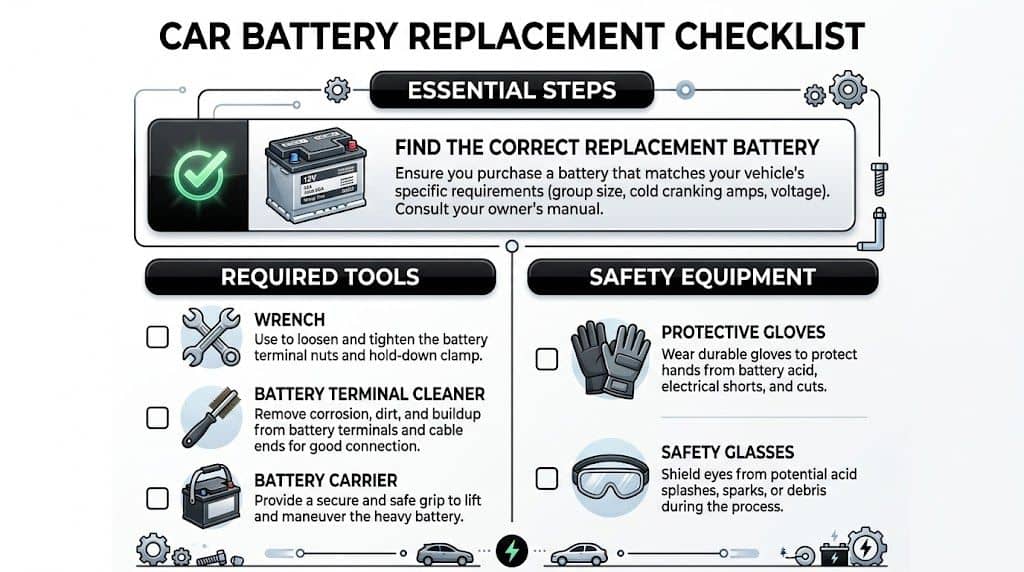
What to lay out before you start
You don’t need a full workshop trolley. You do need the basics ready and within reach.
Item | Specification / Size | Purpose |
Protective gloves | Acid-resistant if possible | Protect hands from corrosion and acid residue |
Safety glasses or goggles | Close-fitting | Protect eyes while loosening clamps and cleaning corrosion |
Spanner or socket | Typically 10-13mm | Loosen terminal clamps and battery hold-downs |
Ratchet and extension | To suit battery clamp bolts | Reach awkward bracket bolts |
Wire brush | Handheld | Clean corrosion from terminals and tray |
Baking soda and water | Mixed into a mild cleaning solution | Neutralise corrosion on tray and clamps |
Clean cloths or paper towel | Dry, lint-free if possible | Wipe down tray and terminals |
Battery carrier or lifting strap | Optional but useful | Help lift a heavy battery safely |
Replacement battery | Correct fitment and spec for the car | Restore starting power and support vehicle electrics |
Getting the correct battery matters
Many DIY jobs go wrong at this stage. A battery isn’t just a rough size match.
You need the correct physical dimensions, terminal layout, and vehicle-appropriate specification. On some cars, a battery that physically fits can still be the wrong choice because the posts sit on the wrong side or the electrical demands of the vehicle are higher than the battery can handle.
Modern cars are less forgiving than older ones. If the replacement battery is poorly matched, you can end up with weak starts, charging issues, warning lights, or premature battery failure.
One practical way to narrow it down is to use a registration-based finder such as the one on GSF’s car battery range. That sort of lookup helps you check fitment before you start unbolting anything.
Check the old battery before you buy
Take a look at the battery already in the car.
Pay attention to:
Terminal position: Positive and negative posts must line up with your existing leads.
Battery type: Stop-start systems often use a different type from older standard setups.
Mounting style: The base lip and hold-down arrangement need to match the tray and clamp.
A battery that “almost fits” usually causes trouble later. Buy the one that fits properly and connects without strain on either cable.
If your car hides the battery under trim, in the boot, or beneath a seat, it’s worth checking access before collection day. There’s no point buying the right battery and then discovering you also need trim tools or more clearance than you expected.
How to Safely Remove the Old Car Battery
This is the part where method matters most. The battery might be dead, but it can still cause a live short if you handle the terminals carelessly.
Start by parking on level ground with the handbrake on. Switch the ignition off fully, remove the key, and open the bonnet. Then find the battery. Most cars keep it under the bonnet, but some place it in the boot or under a seat.
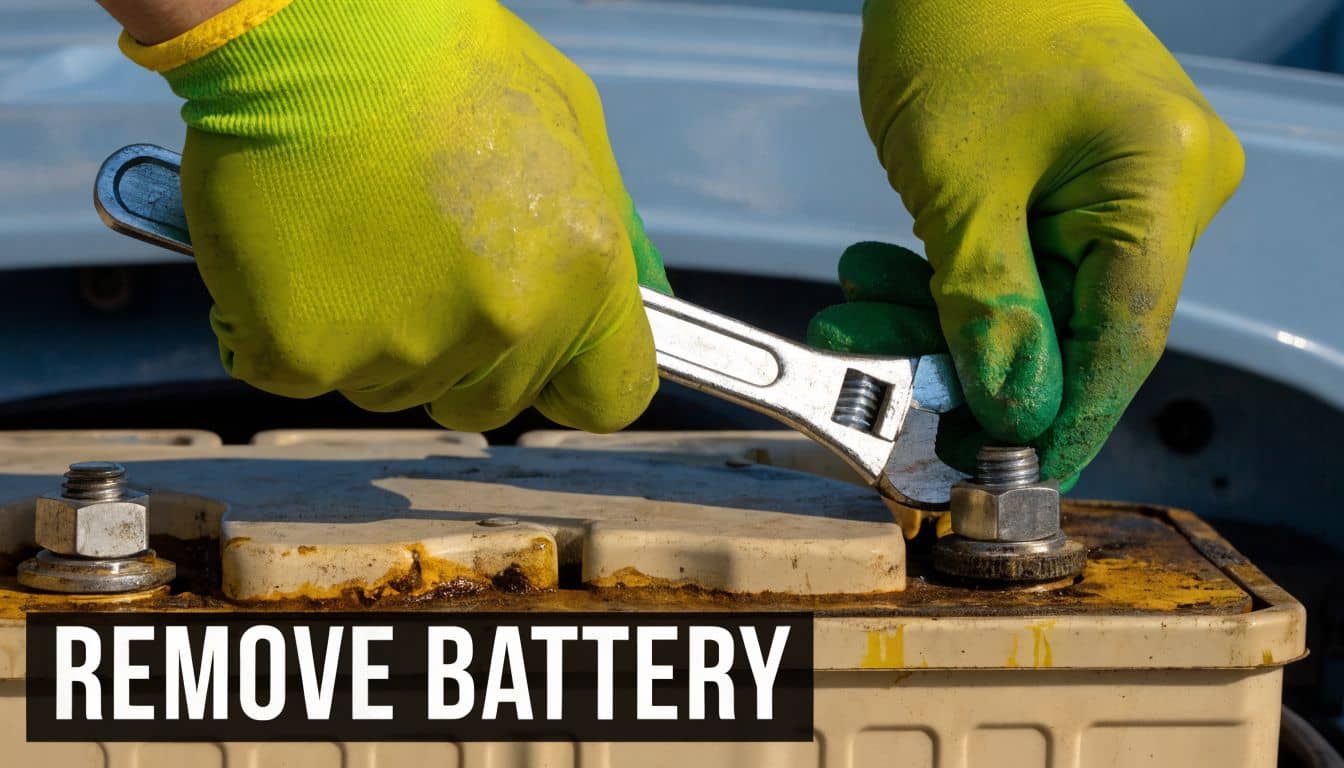
The one rule you must not ignore
Always disconnect the negative terminal first. It’s usually black and marked with a minus sign.
That order matters because the car’s metal body is connected to the negative side of the electrical system. If you undo the positive terminal first and your spanner touches bodywork, you can create a direct short. Verified guidance states that you should disconnect the negative terminal first with a 10-13mm wrench, and that improper disconnection causes around 25% of DIY electrical mishaps according to the linked reference from RAC guidance here.
Once the negative clamp is loose, lift it clear and tuck it aside so it can’t spring back onto the post. Then undo the positive terminal and move that clear too.
What to remove after the terminals
With both clamps disconnected, look for the battery hold-down. This may be a top strap, a wedge clamp at the bottom, or a bracket across one edge. Remove it fully and keep the hardware somewhere safe.
The battery may be heavier than it looks. Some car batteries can weigh a lot more than people expect, so lift with care and keep it upright.
If the terminal clamps are badly furred up or damaged, inspect them now. It’s much easier to sort a poor connection while the battery is out than after you’ve fitted the new one. If the clamp itself is tired, a replacement battery terminal component can make the final fitment safer and more secure.
Here’s a visual walkthrough if you want to see the motion and order before you do it on your own car.
How to Disconnect and Reconnect a Car Battery | Which Battery Terminal To Disconnect First
If the battery won’t come out easily
Don’t lever against plastic covers or force the case sideways.
Check for:
A hidden lower clamp: Common on many cars.
A vent tube: Some batteries have one attached and it needs to be pulled free gently.
A snagged cable: Leads can hook under the battery lip or hold-down tray.
If the battery feels trapped, assume there’s still a fixing in place. Don’t wrestle it out and crack the casing.
Fitting Your New Battery and Reconnecting Power
A clean installation lasts longer than a hurried one. Before the new battery goes in, deal with any corrosion and make sure the tray is ready.
White, blue, or chalky residue around the tray or clamps is corrosion. That build-up restricts electrical flow and makes even a good battery look weak. A small amount of baking soda mixed with water helps neutralise it. Brush it into the affected area, wipe the residue away, and dry the tray and clamps properly.
Set the new battery in correctly
Lower the replacement battery into the tray carefully. Don’t drag it across the metal edge or force it down at an angle.
Check three things before you tighten anything:
The battery sits flat
The terminals face the correct direction
The cables reach naturally without stretching
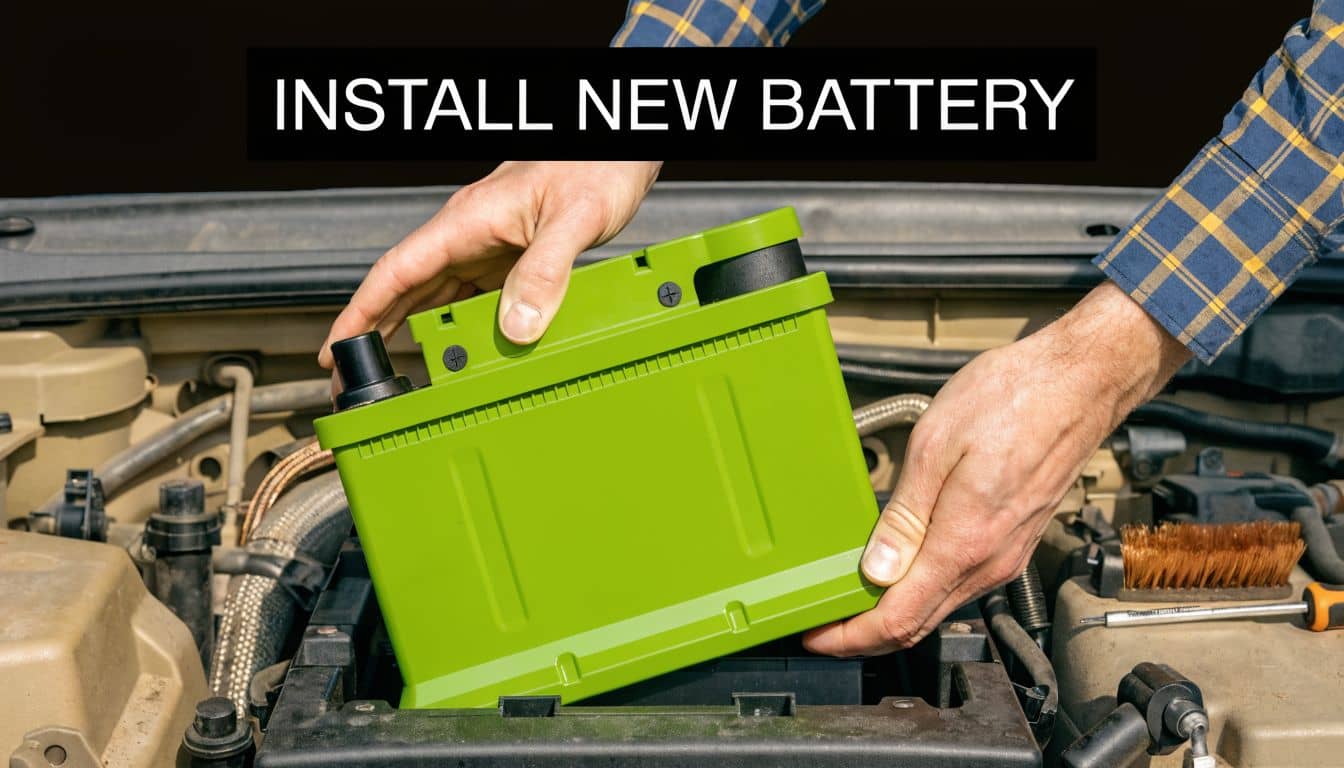
Refit the hold-down clamp or bracket and tighten it until the battery is secure. You’re aiming for snug, not crushed. If the battery can move, vibration will shorten its life. If you overtighten the retaining hardware, you risk damaging the tray or the casing.
Reconnect in the reverse order
Now, the sequence flips.
Connect the positive terminal first, then connect the negative. The reason is the same logic you used during removal. While the negative side is still disconnected, the car body isn’t completing the circuit in the same way, so there’s less chance of an accidental short if your tool touches metal during the positive connection.
Make sure the clamps are firmly seated on the posts before tightening them. A loose terminal can give you intermittent starting trouble, random warning lights, or heat build-up at the connection.
After that, apply a light smear of dielectric grease to the outside of the terminal connection area. It helps keep moisture and corrosion at bay. Don’t pile it on. A thin layer is enough.
What works and what doesn’t
Some habits make battery fitting smoother. Others create faults that look bigger than they are.
What works:
Cleaning before fitting: A clean tray and clean clamps give the new battery the best start.
Keeping the battery upright: This helps avoid spills and keeps handling controlled.
Checking cable routing: Leads should sit naturally, not twisted or under tension.
What doesn’t:
Hammering clamps down onto posts: If the clamp won’t seat, stop and inspect alignment.
Skipping the hold-down bracket: An unsecured battery is unsafe and can damage itself.
Guess-tightening until something creaks: Battery hardware doesn’t need brute force.
A battery is both a power source and a heavy component. Treat it like both.
Final Checks and Modern Car Considerations
Once the clamps are on and the battery is secure, the physical side of the job is finished. The electrical side still deserves a quick check.
Start the engine. It should crank with far more confidence than before. If it does, let it idle for a moment and check that the dashboard behaves normally.
The basic checks after installation
A few minor resets can be normal after power has been disconnected.
You may notice:
Window auto-up functions need relearning
The radio asks for a code on some vehicles
A warning light appears briefly and then clears after a short drive
Those little quirks aren’t unusual. What matters is whether the car starts cleanly, charges properly, and doesn’t keep showing persistent warning messages.
If the car still cranks weakly after a correct installation, stop guessing. Recheck terminal tightness, battery fitment, and whether the car may have another fault such as a charging issue or a parasitic drain.
Why some modern cars need more than a battery swap
Many newer vehicles use a Battery Management System, often shortened to BMS. That system monitors battery condition and charging behaviour.
When you fit a new battery to a car with stop-start technology or certain premium electrical systems, the car may need to be told that a new battery has been installed. If you skip that step, the car can continue charging as if the old battery were still fitted.
That’s not a minor detail. In modern cars with stop-start systems, 30% of DIY battery replacements can lead to issues if the Battery Management System isn’t reset, according to the verified data linked in this reference.
When to pause and get help
If your car is known to require battery registration, this is the point to be honest with yourself.
You may need:
A diagnostic tool capable of battery registration
The correct replacement battery type for the system
A charger to support battery health during testing and setup, such as options in a battery charger range
If you’ve got an older, simpler petrol hatchback, a home battery change is usually very manageable. If you’ve got a stop-start saloon packed with control modules, the physical swap may still be easy, but the electronic handshake after fitting is where things get serious.
Don’t judge the difficulty by the battery alone. Judge it by the car wrapped around it.
Responsible Recycling and Your Next Steps
Once the car is starting properly again, you’ve still got one job left. The old battery needs to be disposed of correctly.
A lead-acid battery isn’t ordinary rubbish. It contains hazardous materials and should never go in the household bin or be left sitting in a shed until you forget about it.
Why proper disposal matters
Battery recycling isn’t just tidy behaviour. It’s the legal and responsible route.
Under the Batteries Regulations 2009, UK retailers must provide free take-back for lead-acid batteries. Verified guidance also states that GSF Car Parts offers free recycling at over 190 UK stores, which makes disposal easier for drivers who are replacing a battery themselves, as noted Here.
That matters because the old battery is part of the job. Finishing properly means removing the risk from your property and putting the battery into the correct recycling stream.
The practical way to handle it
Keep the old battery upright. If you’ve still got the box or protective caps from the new one, use them to transport the old battery safely.
Take it back promptly rather than storing it for months. Batteries don’t become safer by sitting around. They just become easier to knock over, leak, or forget.
Common Questions About Changing Your Car Battery
Will I lose my radio code
You might. Some older cars ask for the radio security code after battery disconnection. Check the owner’s manual before you start, and make sure you know where that code is kept.
How long does it take
For a first attempt, give yourself about an hour and don’t rush it. If access is simple and nothing is seized, the job often becomes much quicker once you’ve done it once.
When should I avoid a DIY change
Skip the home approach if the battery is awkwardly buried, the terminals are badly seized, or the car needs battery registration and you haven’t got the right diagnostic capability. There’s no shame in stopping before a simple battery job turns into an electrical fault.
What if the car still won’t start
Check the basics first. Make sure the clamps are tight, the battery is the correct fitment, and nothing was left disconnected. If all that looks right, the fault may not be the battery alone.
If you’re ready to replace yours, GSF Car Parts lets you check fitment by vehicle, compare battery options, and sort the job with the right parts before you pick up a spanner.


