You spot it when you pull away. A small pinkish or reddish puddle under the front of the car, just enough to make you stop and look back. Then, a day or two later, the steering feels a bit heavier in a parking bay, or you hear a faint whine as you wind the wheel on full lock.
That is how a lot of power steering trouble starts in the UK. Not with a dramatic failure, but with a slow leak that gets ignored until the fluid drops, the pump runs dry, and a manageable job turns into a much bigger bill.
The good news is that not every leak means a full rack straight away. Some are simple hose or reservoir issues. Some seal leaks can be slowed with a stop power steering leak additive if you use the right product in the right situation. Others need proper parts and a proper repair. The trick is knowing which is which before you waste time, fluid, or money.
That Puddle Under Your Car A Guide to Power Steering Leaks
A customer will often describe it the same way. “I thought it was just a bit of oil at first.” Then they top up the reservoir, carry on driving, and a week later the steering starts groaning. By then, the leak has usually spread over the subframe, splash guard, or anti-roll bar, which makes the source harder to spot.
Power steering fluid leaks matter because the hydraulic system relies on fluid for both pressure and lubrication. Once the level drops, the pump can pull in air. That gives you noise, inconsistent steering assist, and extra wear inside the pump itself.
This is not a rare nuisance either. UK AA reports note a 15% annual rise in hydraulic steering leaks from 2024 to 2026, often linked to potholes and ageing vehicles (power steering stop leak trend data). That fits what many drivers already know from experience. Older hoses harden, seals shrink, and rough roads do the rest.
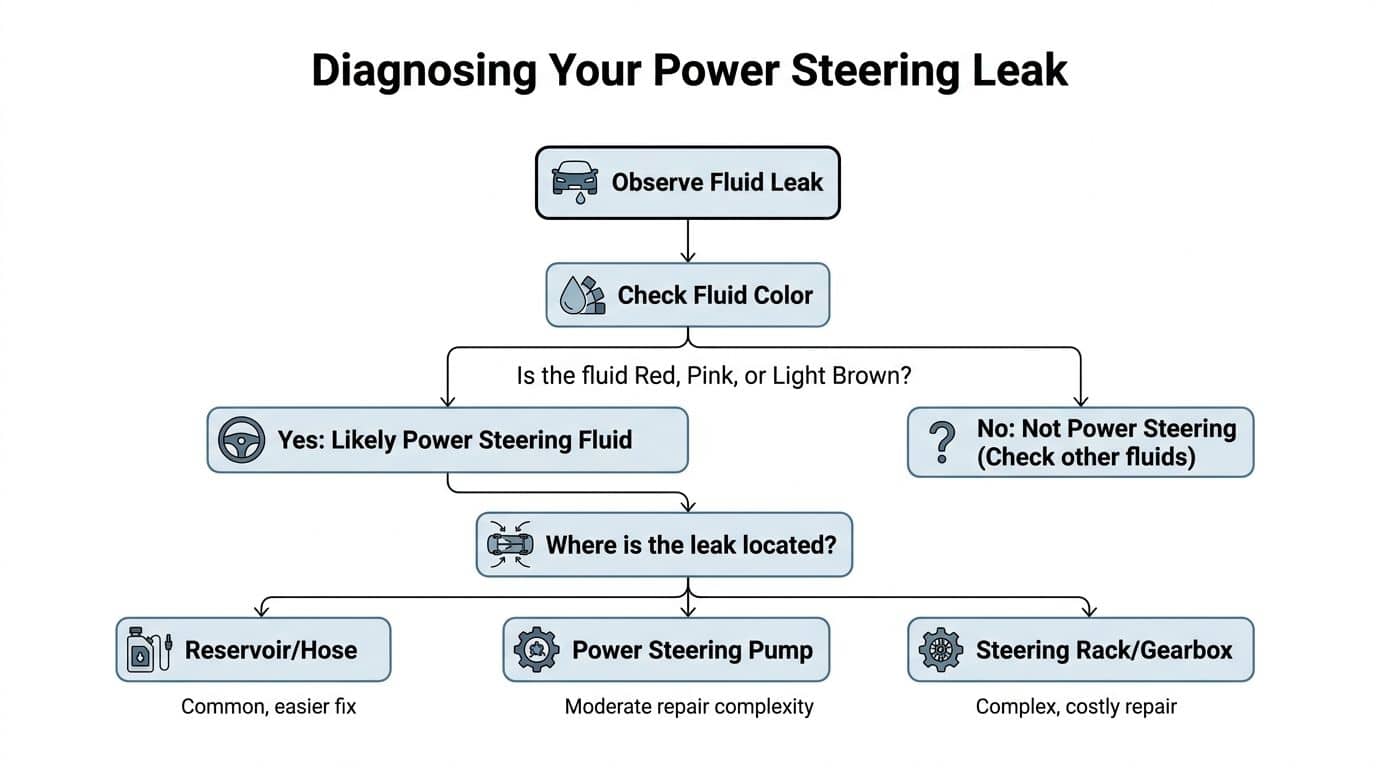
What the puddle is telling you
A fresh leak under the front of the car usually points to one of four places:
Reservoir area: Cracked plastic, a poor cap seal, or seepage from the return line.
Hose connections: Common on older cars and vans where rubber and crimps have aged.
Pump body or shaft seal: Often leaves fluid around the pulley side.
Steering rack: Usually the expensive one, and often hidden until it gets worse.
A small leak is still a steering fault. If you keep topping it up without finding the source, you are gambling with the pump.
A stop-leak bottle can help in the right case. A new hose or rack is the right answer in others. The job starts with diagnosis, not guesswork.
Diagnosing the Drip Finding the Source of Your Leak
Before you try to stop power steering leak issues, confirm that the fluid really is from the steering system. Plenty of people chase the wrong problem because fluid has blown backwards under the car while driving.
Start with the basics
Power steering fluid is usually red, pink, or light brown. It often feels oily but thinner than engine oil. If it has sprayed around the front of the engine bay, the colour can darken once road grime sticks to it.
Get the front end safely up if needed, place cardboard underneath, and clean the wet area before inspecting. Brake cleaner and rags help. A dirty system hides leaks.
Look for:
Fresh wetness: Old staining tells you little. Fresh fluid tells you where to focus.
Spray pattern: A pump or pressure hose can fling fluid outward.
Drips after shutdown: These often reveal gravity-fed seepage from hoses or the reservoir.
Know what each part does
The hydraulic system is simple once you break it down.
Reservoir
The reservoir stores the fluid supply. On many cars it is a plastic container mounted high in the engine bay, with a cap and level marks.
Common faults here are straightforward:
Cracked body: Heat and age make plastic brittle.
Cap seal seepage: Fluid sweats around the top and runs down the side.
Return hose leak: The low-pressure hose can harden or loosen at the clamp.
If the top of the reservoir is wet but nothing else is, start there.
Pump
The pump is the heart of the hydraulic system. It takes fluid from the reservoir and pressurises it so the steering rack can assist your input at the wheel.
A leaking pump often shows up in two ways:
Fluid around the pulley or front seal area
Wetness on the pump body or fittings
If the pulley is flinging fluid, the whole area can look worse than it is. Clean it first, run the engine briefly, then recheck.
A noisy pump does not always mean the pump is the source of the leak. It can be the first part complaining because the fluid level is low.
Hoses
The hoses connect everything together. One side handles high pressure. The return side handles low pressure. Both age, but the pressure hose tends to fail more dramatically.
Inspect:
Crimped ends: These often seep first.
Rubber sections: Look for cracks, swelling, or rubbing damage.
Metal pipe sections: Rust and chafing can open pinholes.
A hose leak is often the most satisfying DIY repair because it is visible, accessible, and usually avoids deeper steering work.
Steering rack or gearbox
The steering rack converts your steering wheel movement into side-to-side movement at the front wheels. Hydraulic pressure assists that movement inside the rack.
Rack leaks are trickier because they can hide inside the gaiters or boots. If one boot is swollen, wet, or dripping, the rack seals may be leaking internally into the boot.
That is the point where stop-leak products and proper part replacement become a decision, not just a maintenance choice.
UK-specific faults that catch people out
Winter matters. Sub-5°C cold snaps in the UK can cause an 18% spike in power steering leaks as rubber seals contract, and 22% of UK vehicles now have EPS, where “leaks” may be battery cooling faults, with a 41% misdiagnosis rate (UK leak and EPS misdiagnosis data).
That means two things in practice:
On older hydraulic cars, a minor seal weep can suddenly become obvious in winter.
On newer vehicles, not every steering complaint is hydraulic at all.
A quick driveway routine
If you want a simple home diagnosis method, do this:
Top up only if needed to keep the system safe for a brief test.
Clean the suspect areas so new fluid stands out.
Start the engine and have someone turn the wheel gently while you watch from a safe position.
Check the reservoir and hoses first, then the pump, then the rack boots.
Leave clean cardboard overnight under the front end to confirm drip location.
If the rack boots are wet inside, the job has usually moved beyond a quick bottle fix.
Diagnosis is what saves money. A bottle of additive poured into a split hose does nothing. A new rack fitted when the fault was a cracked reservoir is money thrown away.
The Temporary Fix Using Power Steering Stop Leak Additives
Stop-leak additives have their place. They are not snake oil, and they are not magic either. Used properly, they can buy time on an older car with a minor seal weep. Used badly, they just delay the proper repair.
The basic idea is simple. These additives work on rubber seals and O-rings that have hardened, shrunk, or dried out with age. The fluid chemistry helps recondition the seal so it swells slightly and regains some flexibility. If the leak is small enough, that can slow or stop it.
When an additive makes sense
A stop power steering leak product is worth considering when:
The leak is slow: You are seeing dampness or a small drip, not rapid fluid loss.
The fault points to a seal: Pump seals and rack seals are the usual candidates.
The car is older and out of warranty: You are managing cost and trying to defer a larger repair.
You still plan to monitor it: This is not a “pour it in and forget it” fix.
For a minor leak in a high-mileage vehicle, UK forum reports showed a 70-80% reduction in leak rate, with one user stretching fluid loss from every 100 miles to every 2,200 miles and putting off an £800+ rack replacement (Lucas stop leak example). That is a useful real-world outcome, but only for the right sort of leak.
When it will not help
Additives do not repair damaged hardware. They will not fix:
Split or cracked hoses
Broken plastic reservoirs
Corroded metal lines
Large seal failures
Mechanical wear inside the pump or rack
If the fluid is contaminated, badly burnt, or full of debris, an additive can also be a poor choice. In those cases, you are better off sorting the fault and refilling with the correct fluid.
How to use it without making a mess
The biggest DIY mistake is overfilling the reservoir. If you are adding stop leak, make room for it first.
A practical method is:
Confirm the leak is minor and not from a hose split.
Remove a small amount of old fluid from the reservoir so the level will stay correct.
Add the product according to its instructions.
Run the engine and turn the wheel gently from side to side to circulate it.
Check the level daily and watch the leak area, not just the reservoir.
If you need options, power steering additives and maintenance products are sold in the same area as other fluid treatment products, which makes it easier to compare labels and intended use.
The trade-off nobody should ignore
A stop-leak additive is a temporary tool. That can be sensible if you need the car mobile while you line up parts, budget, or workshop time. It is less sensible if you are trying to rescue a badly worn steering system on the cheap.
Use stop leak for a seal weep you understand. Do not use it instead of diagnosis.
If the leak slows and the steering stays quiet, you have bought some breathing space. If the level keeps dropping, the pump whines, or the leak comes from a hose or rack boot, move on to the proper fix.
The Permanent Fix A DIY Guide to Replacing Leaky Parts
Once you know which part is leaking, replacing it is usually the smarter long-term move. Hoses are the most approachable DIY job. Pumps are more involved but manageable on many cars. Racks are the heavy one, especially on vans and front-wheel-drive cars where access is tight.
For persistent leaks, a steering rack replacement on vehicles such as a Ford Transit with a Delphi or DriveTec unit can be a significant investment, often around half main dealer price. Industry reports suggest these procedures have a high success rate with low recurrence over time. I am citing that once in this article as the hard benchmark for what a proper fix can achieve.
Start with the easiest proper repair
If your leak comes from a hose, do that first. It is common, direct, and often avoids disturbing steering geometry or subframes.
Tools that help
You do not need a full workshop, but the right tools matter:
Axle stands and trolley jack
Drain pan
Flare nut spanners
Socket set and extensions
Rags and brake cleaner
Gloves and eye protection
Correct replacement fluid
New sealing washers or O-rings if required
Flare nut spanners are worth mentioning because ordinary open-ended spanners love rounding hydraulic fittings.
Here is a useful visual guide before diving in:
Toyota Power Steering Problems
Replacing a leaking hose
Step 1 get the car safely supported
Park on level ground. Chock the rear wheels. Raise the front and support it properly. Never work under a car held only by a jack.
Turn the steering to improve access if needed, but do it with the engine off once the front is up.
Step 2 identify the exact hose
Follow the wet line from the reservoir to the pump and from the pump down to the rack. Clean everything first if needed, then recheck the leak point.
Do not order by guesswork. Steering racks and pumps sit alongside steering hydraulic components, which helps when you need to compare fitment and system layout before buying.
Step 3 drain enough fluid to work cleanly
Place a drain pan underneath. Undo the lowest practical connection carefully and let the system drain. Expect mess. Power steering fluid travels further than you think.
If the hose uses sealing washers, replace them. Reusing flattened washers is asking for a repeat leak.
Step 4 remove the old hose properly
Undo retaining clips and brackets before fighting the end fittings. On some cars, the line snakes around engine mounts, cooling pipes, or the subframe. Note the routing before pulling it free.
Do not twist the new hose during installation. A line fitted under tension will fail early.
Step 5 fit the new hose and tighten correctly
Thread fittings in by hand first. If they do not start cleanly, stop and realign. Cross-threading an aluminium pump or rack housing turns a routine repair into a much worse day.
Refit clips and supports. These stop vibration from fatiguing the new line.
Replacing a pump or rack
A leaking pump is usually manageable if access is decent. You remove the belt, disconnect the lines, unbolt the unit, swap over pulley or reservoir parts if required, then refill and bleed.
A leaking rack is more serious. Tie rods, hydraulic lines, mounting bolts, and often the subframe or crossmember come into play. On light commercial vehicles and some front-wheel-drive cars, access is awkward and heavy.
Rack replacement checklist
Mark steering position before dismantling
Disconnect battery if required by the vehicle procedure
Separate track rod ends carefully
Catch all drained fluid
Refit lines cleanly and without contamination
Torque fixings to the vehicle specification
Get the alignment checked after reassembly
If replacing the rack means dropping the subframe and you are working on the driveway, be honest about whether that is still a DIY job.
Why replacement usually wins long term
A new hose, pump, or rack restores the system mechanically. It does not rely on chemistry to improve a tired seal. If the old part is split, worn, or corroded, replacement fixes the cause rather than softening the symptom.
That is why the proper repair is the better answer when the leak is persistent, visible, or getting worse.
Choosing Your Path Stop Leak vs Full Part Replacement
Once the leak is identified, the decision gets clearer. You are weighing speed and low upfront cost against durability and lower long-term risk.
Quick comparison at a glance
Factor | Stop Leak Additive | Full Part Replacement |
Upfront cost | Lower | Higher |
Time needed | Minutes | Usually an afternoon or more |
Skill level | Basic | Moderate to advanced |
Best for | Minor seal weeps | Hoses, cracked parts, worn pumps, leaking racks |
Reliability | Temporary or uncertain | Proper mechanical repair |
Warranty position | Potential risk | Usually clearer if correct parts are used |
MOT confidence | Depends on result and condition | Stronger if leak is fixed |
The case for stop leak
Additive treatment makes sense when the car is older, the leak is mild, and you need breathing space. If the steering is otherwise quiet and the fluid loss is controlled, it can buy time.
That matters for people running an ageing commuter, a second car, or a van that needs to stay mobile until parts and workshop time are sorted.
The case for replacement
Replacement makes more sense when the leak is visible, worsening, or linked to a component that is physically damaged. It is also the more sensible route if the vehicle still has manufacturer cover or if you want a proper repair you do not need to keep second-guessing.
One of the most overlooked issues is warranty risk. Additives can void manufacturer warranties under the Consumer Rights Act 2015, and UK mechanic forum reports say 35% of vehicles treated with additives go on to suffer pump failure within 6-12 months (warranty and post-additive pump failure discussion).
That does not mean every additive-treated car will have trouble. It means the risk is real enough that you should treat stop leak as a calculated compromise, not a default answer.
A practical rule of thumb
Choose the additive route if all three are true:
The leak is minor
The source appears to be a seal
You accept it may only be temporary
Choose replacement if any of these apply:
The hose is cracked or split
The reservoir is damaged
The rack boots are wet with fluid
The pump is noisy and leaking
You want the fault sorted properly once
If you are already topping up regularly, the system has moved beyond “just keep an eye on it”.
Safety First and Finishing the Job Properly
Plenty of steering jobs fail after the new part is fitted, not because the part was wrong, but because the final steps were rushed. Air trapped in the system, dirty fluid, loose fittings, or poor support under the vehicle can undo good work quickly.
Workshop safety that is not optional
A power steering repair involves fluid, moving parts, and often working under the front end. Keep it simple and disciplined.
Support the car correctly: Use proper axle stands for lifting and support, not just a jack.
Wear eye protection: Fluid under pressure or trapped in a line can splash.
Keep hands clear of belts and pulleys: Never inspect near moving drive belts with loose sleeves or gloves.
Use a drain pan: Steering fluid spreads fast and makes the floor slippery.
Bleeding the system properly
After replacing a hose, pump, or rack, bleeding matters. Air in the system causes whining, foaming, jerky steering, and can shorten pump life.
A safe home method is:
Refill with the correct fluid for your vehicle.
With the front wheels off the ground and engine off, turn the steering slowly from lock to lock several times.
Check the fluid level and top up as needed.
Start the engine briefly and repeat gentle lock-to-lock turns.
Watch for bubbles or foam in the reservoir.
Recheck all fittings for fresh seepage.
Do not hold the steering hard against the stops for long. That puts extra load on the pump and heats the fluid.
Final checks that save call-backs
Once the system is bled, inspect it again with the engine running and then after a short test drive.
Look for:
Fresh wetness around fittings
Fluid level dropping suddenly
Whining noise
Uneven steering assist
Steering wheel not centred after rack work
If you replaced a steering rack or disturbed track rod ends, get the wheel alignment checked. A leak-free system is only half the job if the steering geometry is off.
Clean everything before the final road test. A dry system tells the truth. Old grime does not.
Dispose of old fluid responsibly
Old power steering fluid is waste oil. Do not pour it down a drain or onto the ground. Store it in a sealed container and take it to a local recycling or waste facility that accepts automotive fluids.
That part of the job is not glamorous, but it is part of doing the repair properly.
When to Put the Spanners Down and Call a Professional
Some steering jobs are sensible on the driveway. Some are not.
If the leak is from a return hose, reservoir, or an accessible pump fitting, a careful DIYer can often handle it. If the leak is inside the rack, the subframe needs to come down, or the pipe fittings are badly corroded, the risk rises quickly.
Modern systems complicate it further. Electric power steering faults, steering angle calibration issues, and hybrid-related system diagnostics are not jobs for guesswork. If you are not certain whether you are dealing with hydraulic steering fluid at all, stop there.
Call a professional if:
The rack boots contain fluid
The steering stays heavy after your repair
The pump is still noisy after correct bleeding
You cannot access the fittings safely
The job affects alignment or requires subframe movement
The vehicle has EPS or mixed electronic steering controls
A smart owner is not the person who insists on doing every job at home. It is the person who knows when the repair has crossed from manageable into risky.
If you need the parts, fluids, tools, or consumables to tackle a steering leak properly, GSF Car Parts is a practical place to start. Use the number plate finder to narrow down fitment, compare replacement components with the fluid and workshop gear you will need, and order what suits the job you have diagnosed, not the one you hope it is.


