You're standing beside a Ford Fiesta or VW Golf on a Saturday morning, with the kettle cooling on the step, a sheet of cardboard under the front end and a new filter still in its box. The job looks simple, but the details matter. The wrong oil specification, a damaged sealing washer or an overtightened filter can turn a routine service into an expensive repair.
Learning how to change oil and filter at home can save money and give you direct control over the parts fitted to your car. It also lets you inspect leaks, underbody damage and other wear while the vehicle is raised. This guide covers the UK-specific decisions that basic drain-and-fill instructions often miss, including oil specifications, sealed undertrays, service indicators, tightening procedures and waste-oil disposal.
Why a Home Oil and Filter Change Still Makes Sense
A home oil change remains practical when the drain plug and filter are accessible, the car can be supported safely and the handbook gives you a clear oil specification. You'll know exactly which oil went into the engine, whether the filter was replaced and whether the sump plug received the correct treatment.
The AA says most manufacturers advise a full service annually or every 12,000 miles, whichever comes first, with an interim service every 6 months recommended for high-mileage drivers. Its checklists include engine oil and oil-filter replacement as standard items, while full and major services typically cover 42 and 45 inspection points respectively. That wider inspection is important. An oil change is one part of engine maintenance, not a substitute for checking brakes, tyres, fluids, lights and wear items. (AA servicing guidance)
The practical advantages
A competent home mechanic can avoid booking delays, work around a weekend and inspect the car while the oil drains. You can also compare the old filter with the replacement, check the drain plug for damaged threads and look for fresh oil around the sump.
The saving can be meaningful, but it depends on what you already own. Parts, oil and a washer may cost much less than a professional service, while a first-time DIY job also requires safe lifting equipment, a torque wrench and a suitable drain pan.
Practical rule: The outcome you want isn't simply fresh oil. It's a leak-free filter and sump plug, the correct oil grade and a responsible plan for the used oil.
DIY isn't the right answer for every vehicle. A sealed undertray that needs extensive removal, a filter housing hidden behind panels or a sump made from torque-sensitive aluminium can make a garage safer and more economical overall. If you can't support the car securely or identify the correct oil specification, stop before loosening anything.
Tools, Oil Grade and Filter You Need Before You Start
Buy the parts before you put the car on stands. Check the handbook or a reliable vehicle parts catalogue using the registration, engine and model year, then confirm the oil viscosity, approval specification, capacity and filter design.
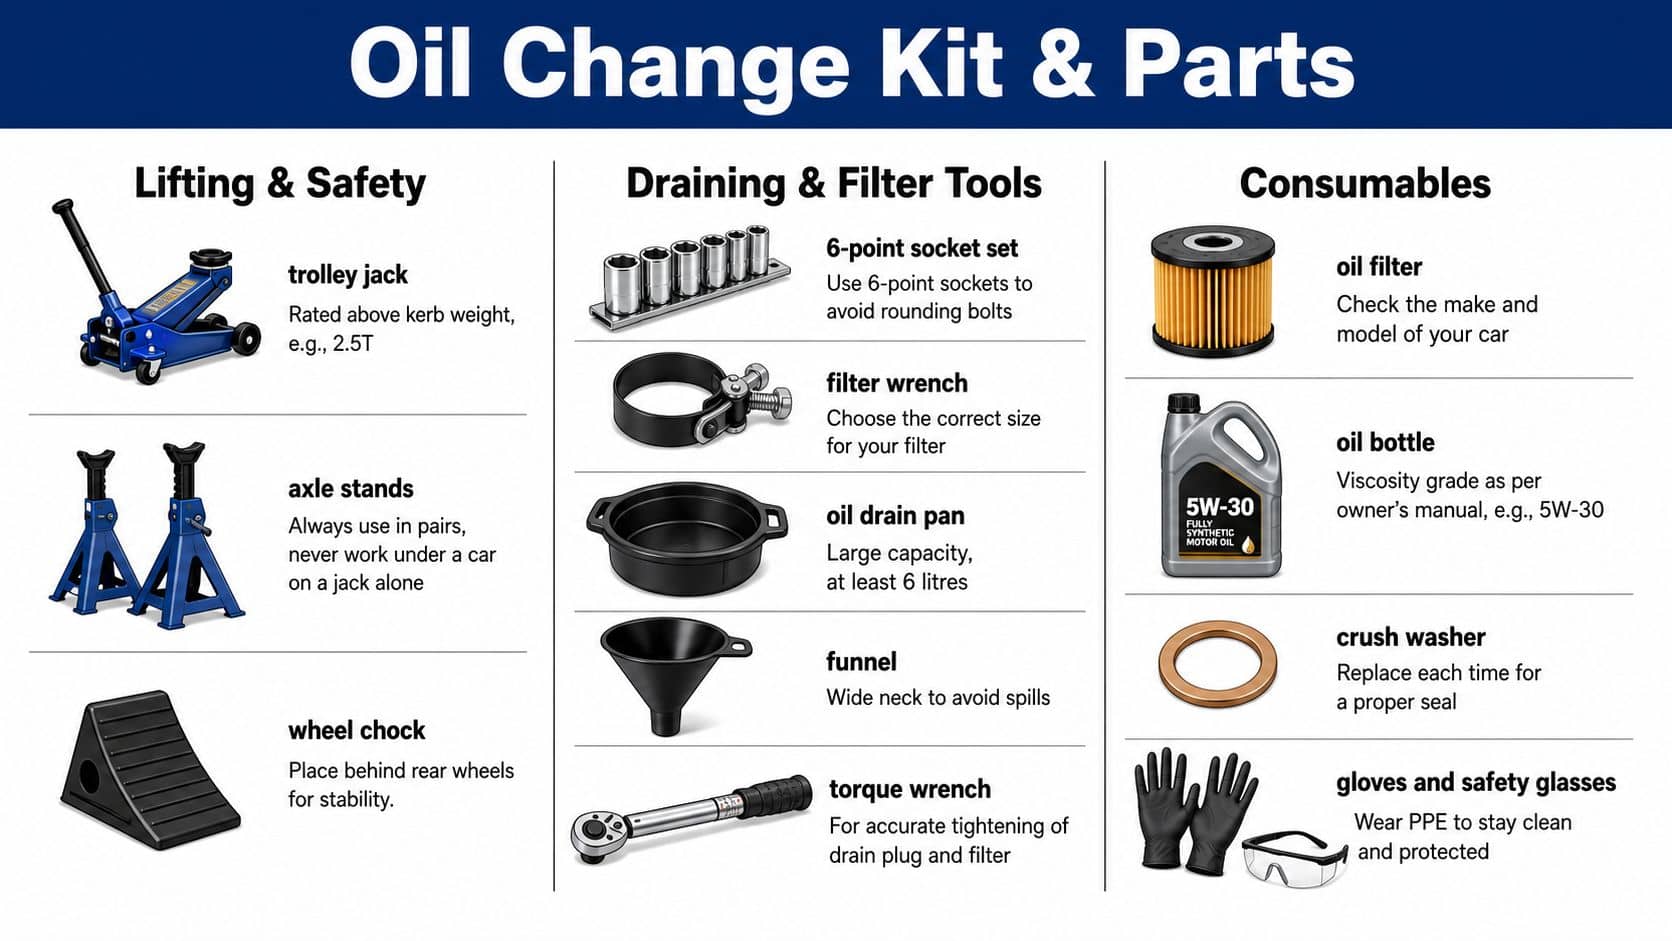
You'll normally need:
Trolley jack: Choose one rated above the car's kerb weight.
Axle stands: Use a pair on the manufacturer's approved support points. Never work beneath a vehicle supported only by a jack.
Wheel chock: Prevent movement on the end that stays on the ground.
Six-point socket: Sump plugs commonly use sizes such as 13, 15, 17 or 19 mm, although some vehicles use a square-drive tool.
Filter tool: Match the wrench to a spin-on filter, or buy the correct cap socket for a cartridge housing found on engines such as Ford EcoBoost, VW TSI, BMW and Mercedes units.
Torque wrench: A wrench covering 10 to 40 Nm is useful for many filter and drain-plug jobs, but the handbook figure always takes priority.
Drain pan: Use a container with capacity for the full oil charge. A pan of at least 7 litres gives useful room.
Funnel and protection: Add nitrile gloves, safety glasses, old rags, cardboard or a drip tray.
Choosing the oil
The viscosity is only half the decision. A bottle marked 5W-30, 5W-40 or 0W-20 must also meet the approval required by your engine, such as VW 504 00, Ford WSS-M2C913-D, MB 229.52 or dexos2. Those specifications relate to the engine's design and emissions equipment, so don't choose oil solely because the viscosity looks familiar.
Capacity varies by engine. As a buying guide, a 1.4 to 2.0-litre petrol engine typically takes 4.0 to 5.5 litres, but the exact quantity belongs to your handbook. Buy the filter at the same time. Spin-on filters commonly sit around £6 to £12, cartridge elements around £10 to £18, and a replacement copper sump washer is often £1 to £2. If your housing requires it, check whether you also need a 32 mm housing cap tool. (UK parts and oil-change guidance)
Step-by-Step Oil and Filter Change on the Driveway
Start with preparation, not the socket. Park on solid, level ground, gather the new oil and filter, and make sure the drain pan will fit beneath the sump before lifting the car.
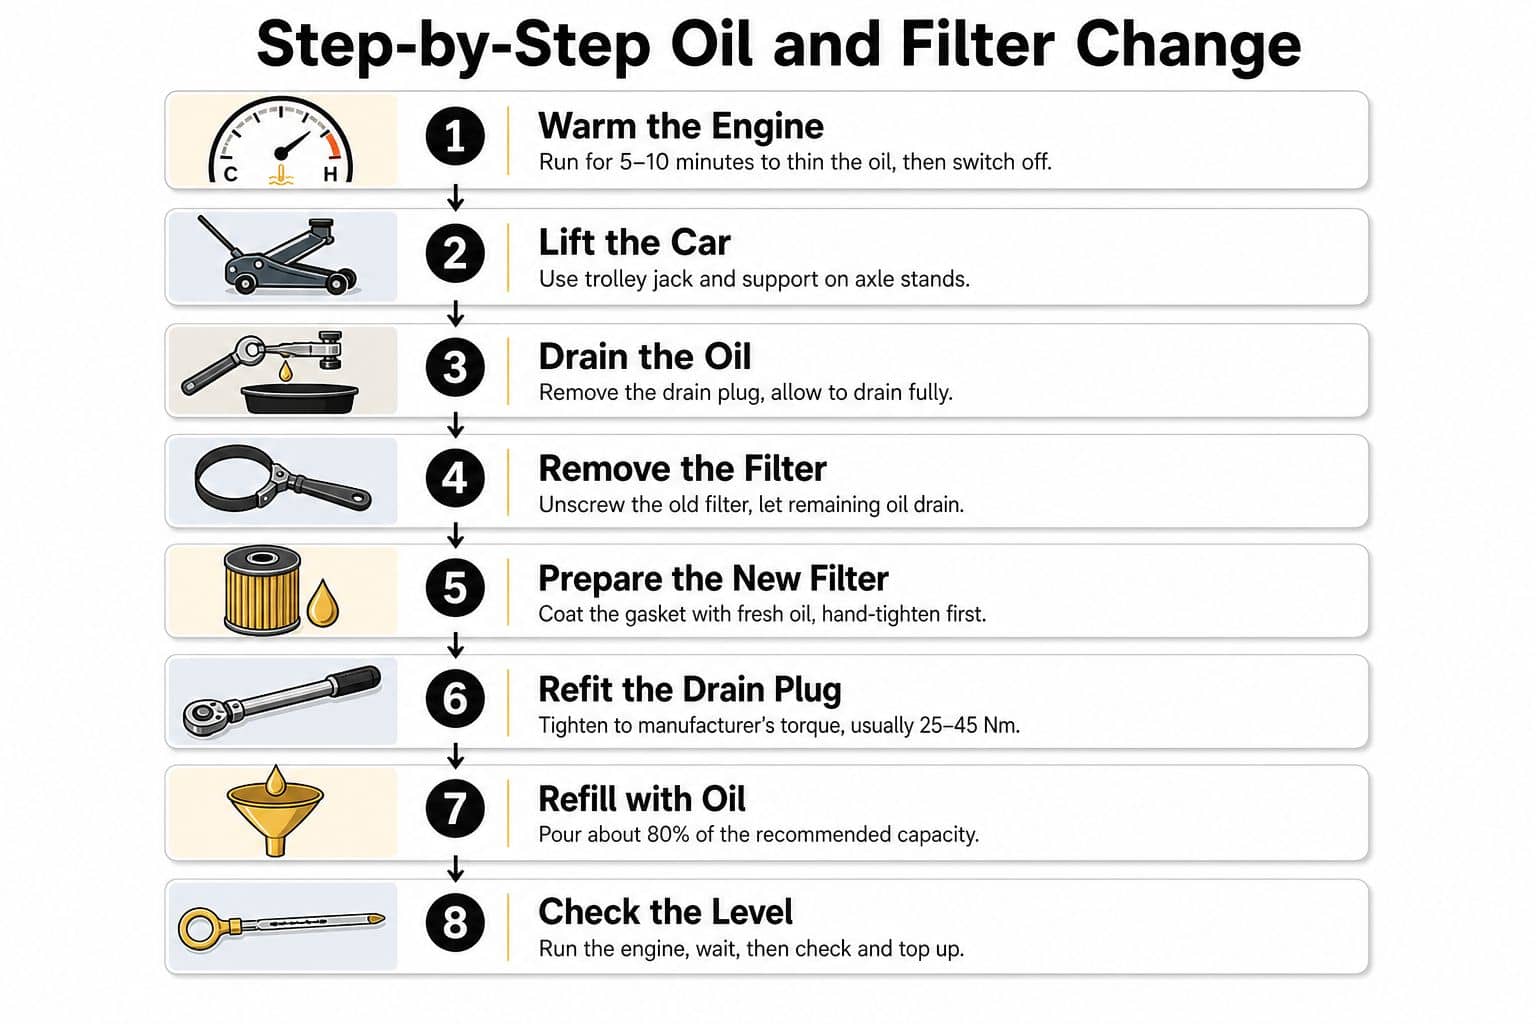
Warm the oil gently. Run the engine for about 5 minutes so the oil flows more easily, then switch it off. Warm oil drains better, but hot oil can cause serious burns, so don't begin while the exhaust and sump are dangerously hot.
Secure the car. Apply the handbrake, select Park or first gear, chock a wheel and use the specified jacking point. Lift the front with the trolley jack and lower it onto axle stands. Never get underneath while the car is supported by the jack alone.
Expose the service points. Locate the sump plug and filter. If a sealed undertray blocks access, remove its fasteners carefully and keep them organised. If removing the tray requires awkward access or bumper work, reassess whether the job belongs in a garage.
Drain the oil. Place the pan beneath the plug, crack it with the correct six-point socket and finish removing it by hand. Keep pressure on the plug as the final thread comes out, then let the oil drain for 10 to 15 minutes. Opening the filler cap can help the flow, provided you keep the cap nearby so dirt can't enter.
Remove the old filter. Spin-on filters loosen anti-clockwise. Break the seal with the correct wrench, then unscrew by hand while keeping the pan underneath. For a cartridge filter, use the specified housing-cap socket and watch for oil draining from the cap.
Fit the plug and filter. Install a new sump-plug washer, thread the plug by hand and tighten it to the handbook value. A commonly encountered range is 20 to 25 Nm, but the vehicle specification overrides that guide. Lightly coat the new filter gasket with clean oil. A spin-on filter is usually hand-tightened until the gasket contacts the mounting face, then turned a further three-quarter turn by hand. Fit a cartridge element and its new lubricated O-ring according to the housing instructions.
Lower the car. Once the plug and filter are secure and the draining equipment is clear, lower the vehicle carefully onto level ground. Filling and checking the oil on level ground gives a more reliable reading.
The UK oil and filter change guidance from Haynes gives the common annual or 12,000-mile maintenance benchmark, but your handbook and oil-life system may require a different schedule.
VW GTI: Oil Change Step by Step (How-To)
Torque and Tightening Rules for the Filter and Drain Plug
Tightening isn't a matter of making everything as tight as possible. The drain plug seals through its washer, while a filter seals through its gasket or O-ring. Excess force can strip threads, distort a housing or crack a sump. Too little force allows oil to escape, sometimes along the bellhousing where the original leak point becomes difficult to identify.
Use the handbook or manufacturer repair data before relying on a general value. Manufacturer-style replacement guides commonly specify filter values in the 18 to 30 Nm range and drain-plug values around 26 to 30 Nm, but these are examples across particular vehicles, not universal settings. (Vehicle-specific VW torque guidance)
Component | Typical torque | Notes |
Spin-on filter | Hand-tight plus three-quarter turn | Stop when the lubricated gasket contacts the face, then complete the turn by hand |
Canister-style filter | Around 25 Nm | Confirm the vehicle's specified value |
Housing cap | Around 10 to 17 Nm | Plastic caps are especially easy to overtighten |
Drain plug | Often 26 to 30 Nm | Use a new sealing washer where specified |
The filter torque guidance for common designs explains why filter installation is seal-based rather than bolt-tightening. A spin-on filter normally needs no wrench after the gasket touches. A cartridge housing may need a torque wrench, a new O-ring and careful alignment before the cap reaches its specified setting.
Inspect the old washer before disposal. Copper or aluminium washers can deform during sealing, and reusing one can produce a slow seep. Start both plug and housing cap by hand. If the threads feel gritty, stop and clean them. A plug that turns stiffly before the washer reaches the sump may be cross-threaded.
Cross-thread warning: If a component won't turn smoothly by hand for several complete threads, don't force it with a ratchet. Remove it, inspect the threads and correct the alignment before tightening.
Refilling, Dipstick Checks and Post-Change Verification
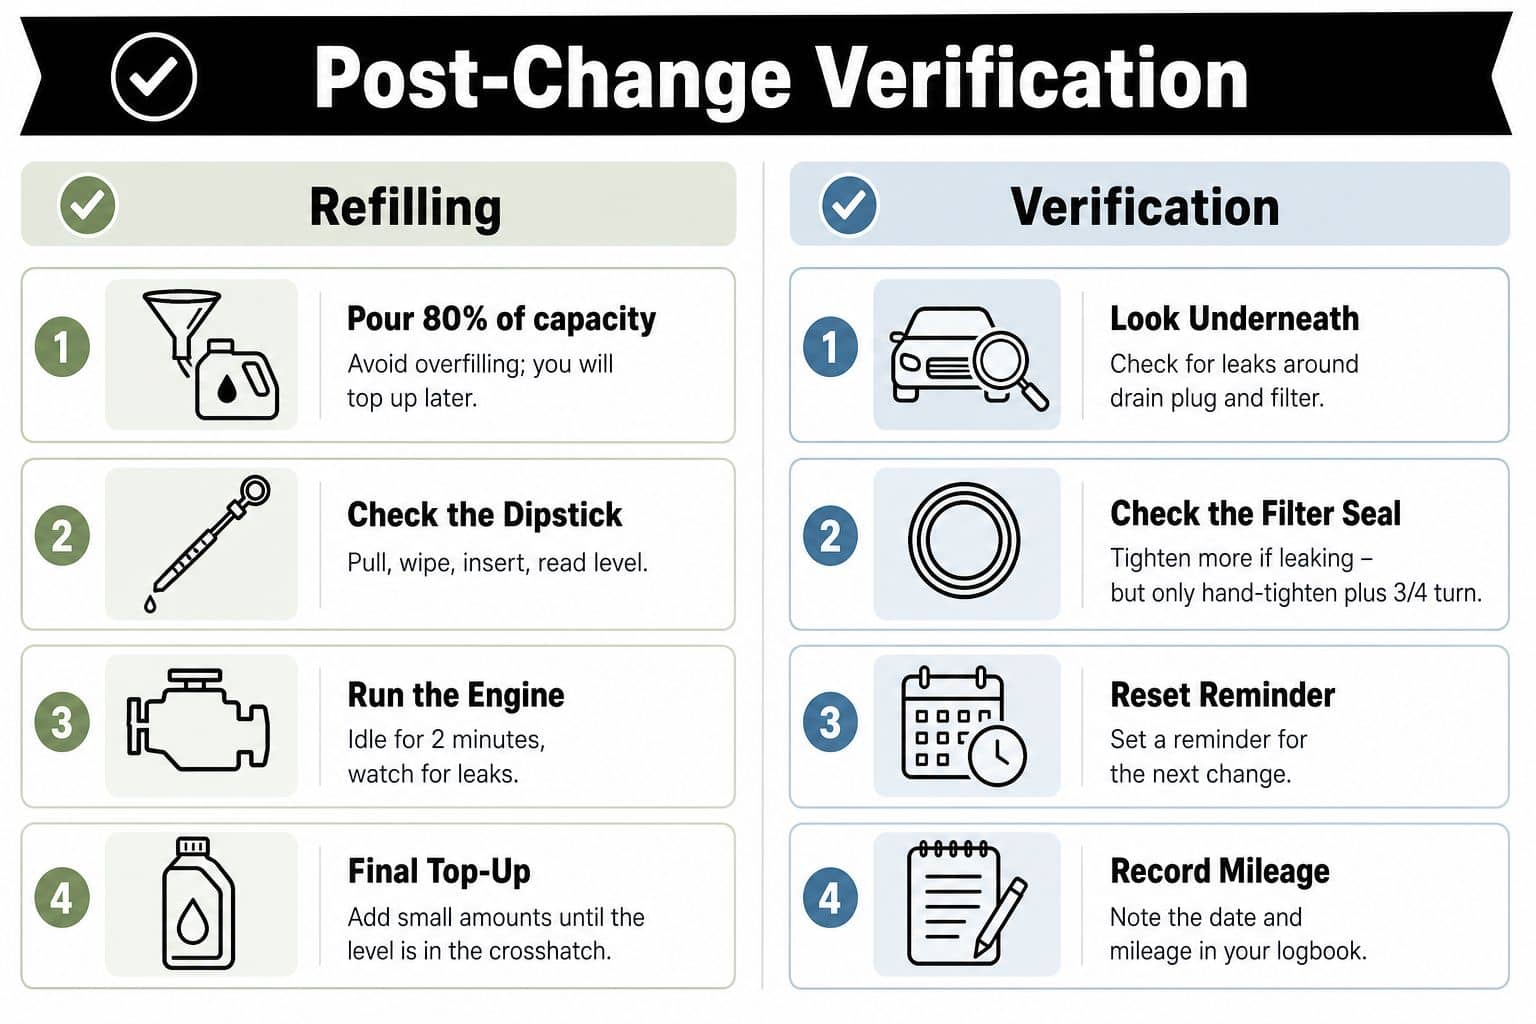
Keep the car level before adding oil. Insert a long-neck funnel into the filler opening and add roughly 80% of the handbook capacity first. This approach leaves room for the level to settle without creating an overfill, which is harder to correct than a small top-up.
Use only the approved viscosity and specification. A bottle marked 5W-30 may still be unsuitable if it lacks the required manufacturer approval, and the presence of a familiar grade such as 5W-40 doesn't make it correct for every engine.
The first level check
Start the engine and let it run briefly without revving it. Switch off, allow the oil to settle, then park on level ground and check the dipstick. Pull it out, wipe it clean, reinsert it fully and remove it again. The oil should sit at or near MAX, never above it, as UK motoring guidance recommends. (UK dipstick and oil-change procedure)
If the level is low, add small amounts and wait before checking again. Don't pour in the entire remaining bottle just because the dipstick looks close to MIN. If the level is above MAX, don't drive until the excess has been removed safely.
Look for fresh leaks
Use a torch to inspect the drain plug and filter while the engine runs briefly and again after switching off. Wipe away oil left from removal, place clean cardboard beneath the engine and look for fresh drops around the sump and filter. A light misting around a seal deserves attention before the car returns to regular use.
Reset the service indicator if your VW, BMW, Ford or Mercedes requires it, but use the model-specific dash-menu procedure rather than guessing. Some cars reset through the instrument cluster, while others need a diagnostic tool. Record the date, mileage, oil grade and filter part number in the service book or maintenance log.
Waste Oil Disposal and Keeping the Engine Healthy Between Changes
Transfer the used oil into a sound container with a screw cap. The empty oil container is useful, provided it closes securely and hasn't been damaged. Keep the old filter separate in a sealed bag or let it drain fully into the pan before taking it for recycling.
Most UK councils provide used-oil collection through Household Waste Recycling Centres, but rules vary by site, so check before loading the container into the car. Garages and motor factors may also accept used oil. Ask first, then transport it upright in a sealed container.
Never pour engine oil down a drain, into a household bin, onto soil or onto a bonfire. Used oil can contaminate water and land, and improper disposal can breach environmental duties under UK law. The RAC's UK oil-change guidance places the average RAC Mobile Mechanics oil and filter change at £192, which also highlights the value of planning disposal properly when comparing a home job with paid work.
Simple checks between services
Record the service: Note the date, mileage, oil specification and filter used.
Check the dipstick monthly: Do it on level ground with the engine off.
Inspect for drips: Look beneath the car after it has been parked.
Carry the correct oil: Keep a small bottle in the boot for approved top-ups.
Watch the dashboard: Treat an oil-pressure warning as an immediate stop-and-check issue, not a routine service reminder.
The RAC advises changing oil typically every 5,000 to 7,500 miles, particularly where short trips, stop-start traffic or heavy use accelerate degradation. Use that maintenance-oriented benchmark only when no vehicle-specific schedule is available, and follow the handbook when it gives a different requirement.
When DIY Is Not Worth It and Your Next Steps
A modern car can make a basic oil change surprisingly awkward. A sealed undertray may need extensive removal, a cartridge filter may sit beneath engine-bay components, and a service indicator may need a diagnostic reset. Hybrid systems, stop-start technology and manufacturer-specific oil approvals add further reasons to check the handbook before starting.
Book the job with a garage if:
Access is poor: The drain plug sits behind shielding that can't be removed safely with basic tools.
The housing is specialised: The manual specifies a particular cap tool or warns against damage to a plastic housing.
The sump is vulnerable: Aluminium threads, damaged plug heads or previous repairs make tightening uncertain.
The service record matters: A vehicle under manufacturer warranty may need documented servicing, approved parts and correct records.
The car uses unfamiliar systems: Hybrid drivetrains and electronic oil-life systems deserve model-specific procedures.
DIY makes sense when you have a level working area, proper stands, the correct oil and filter, and enough time to inspect your work. It doesn't make sense when the saving depends on skipping safety equipment or guessing the oil specification. A garage is also the better choice if the old oil contains metallic debris, the drain plug won't tighten or a leak continues after correct reassembly.
GSF Car Parts supplies oils, filters, washers, tools and workshop consumables, with a number plate parts finder, free UK mainland delivery on orders over £25 and free Click & Collect from more than 190 stores across the UK and Ireland. Visit GSF Car Parts to identify the correct filter and oil-change equipment before you put the car on stands.