You walk out to the car, spot a damp patch on the drive, and tell yourself it's probably nothing. Then the low coolant warning pops up on the next trip, or the temperature gauge starts creeping higher in traffic. That's usually the moment people think radiator, thermostat, water pump, head gasket, anything expensive before they think about the coolant expansion bottle.
Fair enough. It's just a plastic tank tucked into the engine bay. It doesn't look like much.
But this little bottle has a serious job. It gives hot coolant somewhere safe to go, helps the system stay pressurised, and collects air so the engine can cool properly. When it cracks, warps, or stops sealing properly, the rest of the cooling system starts playing catch-up. Sometimes you get a slow warning. Sometimes you get steam, coolant smell, and a ruined journey.
If you understand this one part, you can catch a lot of cooling problems early. You can also work out whether you're looking at a simple DIY fix or a job that needs a garage before the engine overheats.
Your Engine's Unsung Hero The Coolant Expansion Bottle
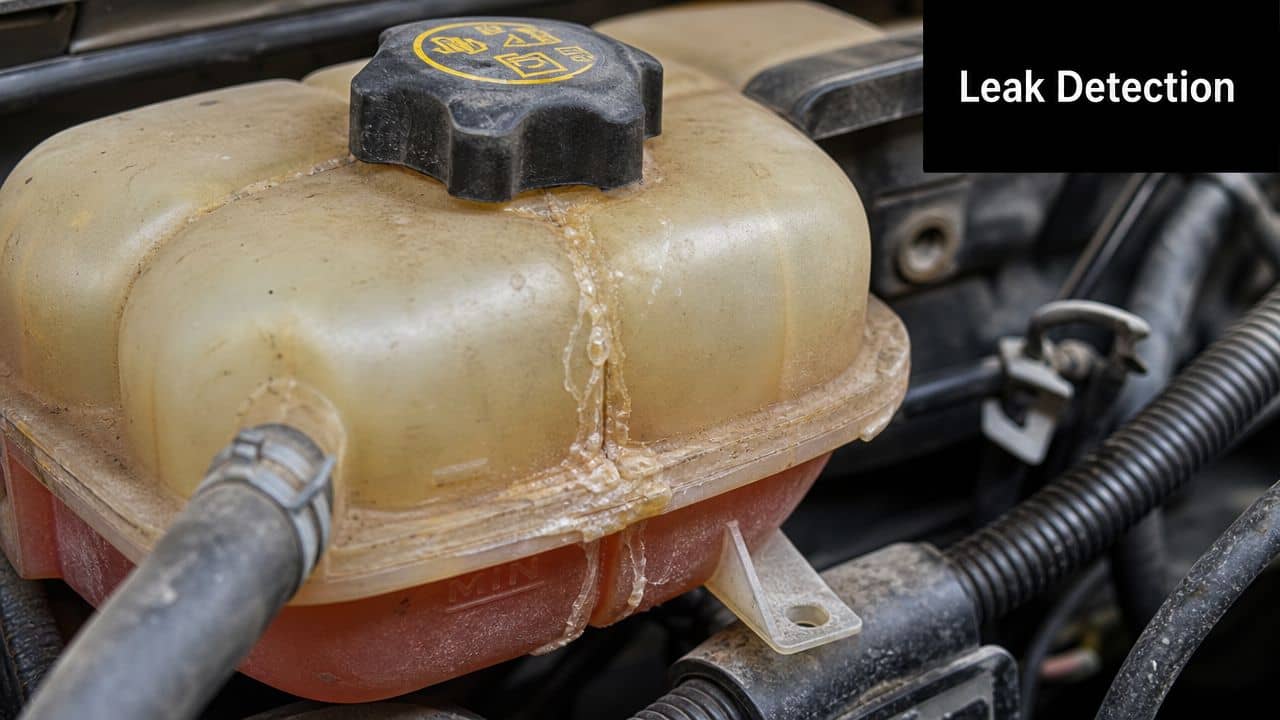
You usually notice this part on an inconvenient day. The car has been fine all week, then you lift the bonnet and see dried pink or white residue around the bottle, the level is lower than it was, or there is a faint coolant smell after a run. That small plastic tank often gets blamed last, even though it is one of the first places I check.
The coolant expansion bottle does more than hold spare fluid. It is part of the cooling system itself. It gives heated coolant room to expand, helps the system stay properly filled, and gives you a clear place to monitor level and condition. If the bottle or cap starts failing, a simple problem can look like a much bigger one.
That matters because coolant expands as it heats up. It can increase in volume by up to 6% at operating temperature according to the GoWesty explanation of expansion tank function, so the bottle has to absorb that change without leaking or drawing air into the system.
A good bottle also makes diagnosis easier. Clear level marks, sound plastic, and a cap that seals properly give you a baseline. If the level keeps dropping, you know to start checking for leaks. If the bottle is stained, brittle, or warped, deal with that first before chasing the radiator or water pump. The cooling system pressure cap options here matter too, because a weak cap can cause many of the same symptoms as a tired bottle.
I treat the expansion bottle as a first-line DIY check because it can save time and money. A cracked seam or bad cap is often a driveway fix. Persistent pressure loss, repeated overheating, or oil contamination is where home diagnosis should stop and a proper pressure test starts.
Practical rule: If the bottle looks aged, cloudy, cracked, or crusted with dried coolant, sort that out early. It is cheaper than guessing at bigger faults and much safer than waiting for an overheat.
How Your Coolant Expansion Bottle Works
Think of the coolant expansion bottle as the cooling system's lung. When the engine heats up, the coolant expands. When the engine cools down, the coolant contracts. The bottle gives the system somewhere to exhale and inhale without sucking in air or spitting coolant onto the road.

The hot and cold cycle
Here's the basic sequence:
Engine warms up and coolant absorbs heat from the engine.
Coolant expands as temperature rises.
Extra volume moves into the bottle instead of forcing its way out of the system.
The pressure cap regulates system pressure so coolant stays stable at higher temperature.
Engine cools down after shutdown or during lighter running.
Coolant gets drawn back into the system as it contracts.
That's why the bottle level moves up and down over time. A small change between cold and hot is normal. A bottle that empties itself, overflows repeatedly, or never seems to settle usually isn't.
Why pressure and air control matter
Modern systems moved away from simple overflow tubes that vented to atmosphere. A sealed, pressurised expansion bottle helps preserve pressure, raises boiling resistance, and purges trapped air, which improves reliability under heavier use such as traffic, towing, or hard driving, as outlined in this technical explanation of expansion tank function.
That pressurised cap is part of the system, not an afterthought. If the spring or seal in the cap is weak, the bottle might be fine but the system still won't behave properly. If you suspect the cap as well as the tank, it helps to compare it with the correct radiator cap options for your vehicle rather than guessing.
A cooling system full of air doesn't cool properly. The bottle's job is partly to collect that air where it can do less harm.
Why shape and size aren't random
The bottle also has to be engineered to suit the cooling system. It isn't just any container that happens to fit in the bay. Engineering guidance describes the bottle as part of the system's pressure control and air management, and notes that shape matters for strength and packaging. A spherical form is often considered ideal for strength and volume efficiency, although production cars use custom moulded shapes to fit the available space, as discussed in this engineering video on expansion bottle design.
That's why “close enough” fitment usually isn't good enough.
Signs of a Failing Expansion Bottle
A failing coolant expansion bottle usually leaves clues. Some are obvious. Others are easy to dismiss until the car starts overheating or asking for coolant every week.
What you can see
Start with your eyes. Most bad bottles tell on themselves.
Hairline cracks near seams or hose necks. These often leak only when the engine is hot and the system is under pressure.
Yellowed, brittle, or chalky plastic. Heat and age make the bottle less flexible and more likely to split.
Dried coolant staining. Look for white, pink, or coloured crust around the bottle, cap, or the parts directly below it.
A bottle that looks swollen or distorted. Plastic that has changed shape may no longer seal or cope with heat cycles correctly.
If your car uses an electronic level warning, a recurring alert may point to the bottle or sensor area. It's worth checking the relevant coolant level sensor listings for your vehicle if the warning keeps returning after topping up.
What you can smell and feel
Coolant has a distinctive sweet smell. If you notice it after a drive, especially when parking up, don't ignore it. A small leak from the bottle can evaporate on hot components and leave very little on the ground.
You might also notice:
Dampness around the bottle even when there's no obvious drip.
Mist or light vapour in the engine bay after a hot run.
Sticky residue where coolant has seeped and dried.
These are classic signs of a small pressure leak rather than a dramatic failure.
If you can smell coolant but can't see a puddle, check the bottle and cap area before you assume the leak is elsewhere.
What the car starts doing
The expansion bottle can also cause symptoms that feel less direct.
Symptom | What it may mean |
Coolant warning returns after topping up | The system is losing coolant or pulling in air |
Temperature runs higher in traffic | Pressure control or air management may be poor |
Heater output becomes inconsistent | Air may be moving through the cooling system |
Coolant level changes erratically | The bottle, cap, or bleed behaviour may be off |
A cracked bottle doesn't always fail all at once. Often it starts as a nuisance and turns into a breakdown later. That's why this is a good part to inspect early rather than react to late.
Simple Checks You Can Do Yourself
Only work on the cooling system when the engine is fully cold. A hot cooling system can stay pressurised, and removing the cap at the wrong time can send hot coolant out fast.
You don't need a workshop full of kit for a basic check. A torch, a clean rag, and a few quiet minutes are enough.
A quick driveway inspection
Check the level against the markings
Look for the MIN and MAX marks on the bottle. On a cold engine, the level should sit where the manufacturer expects. If it's below the mark, note it. Don't just keep topping up without finding out why it dropped.Inspect the plastic closely with a torch
Shine the light along seams, corners, and hose connections. Fine cracks often show up better at an angle than head-on.Look underneath the bottle
Coolant often runs down and collects elsewhere, which can make the leak source look misleading.Squeeze the attached hoses gently
You're checking for obvious brittleness, splits near the ends, or bulging. Don't force old hoses. If they feel hard and tired, that's useful information on its own.
Don't forget the cap
The cap matters as much as the bottle. Check for a damaged seal, cracked plastic, or signs that coolant has been venting around the cap neck.
Good sign. Clean sealing surface, no crust, no staining.
Bad sign. Crusty residue, distorted seal, or evidence of coolant pushing past the cap.
A bottle can look acceptable from a distance and still fail at the seam, neck, or cap seat. Get your eyes close to it.
If you find only a small issue, you may be looking at a manageable repair. If the bottle is badly cracked, the coolant level has fallen sharply, or the engine has already been running hot, that's the point to stop and think carefully before driving further.
Choosing the Right Coolant Expansion Bottle
You can lose a lot of time on a cooling fault by fitting a bottle that is almost right. It bolts up, takes coolant, and looks fine from above. Then the level starts drifting, the cap will not hold pressure properly, or the warning light returns because the sensor setup is different. That is the kind of mistake a careful parts check prevents.
Fitment comes first
Start with the exact vehicle details and match the bottle to the cooling system, not just the shape in a photo. Mounting points, hose diameters, sensor provision, cap style, and internal capacity all need to line up.
Engineering guidance says an expansion tank should hold about 18% of the total system coolant volume, split into roughly 12% for drawdown and 6% for thermal expansion, as explained in Canton Racing's guide to calculating expansion tank size. That is why the right bottle size matters even if a different one seems to fit physically.
Use the reg lookup, chassis number, or OE part number wherever possible. Guessing from pictures is how DIY jobs turn into repeat jobs. If you are comparing parts before ordering, having a fluid transfer tool for clean coolant handling on hand also makes it easier to swap parts without spilling coolant everywhere.
OEM or aftermarket
There is no one right answer here. The best choice depends on how long you plan to keep the car, how awkward the job is on your model, and whether the aftermarket brand has a decent reputation.
Option | When it makes sense | Watch-outs |
OEM | You want factory-spec fit, plastic quality, and sensor compatibility | Higher price |
Quality aftermarket | You want a sensible repair cost without cutting corners | Buy from a known brand and check reviews on fit and moulding quality |
Cheap unbranded part | Only if there is no realistic alternative and you accept the risk | Poor cap seat, weak seams, thin plastic, short life |
On a simple, easy-access car, a decent aftermarket bottle is often good value. On a cramped engine bay where replacement is awkward, paying more once can save doing the same job twice.
What to replace at the same time
Being your own first-line mechanic saves money. A bottle swap is a good chance to deal with the small parts that often cause the comeback.
Pressure cap. Replace it if the seal looks tired or the cap is the same age as the failed bottle.
Hose clips. Old clips lose tension and can spoil an otherwise sound repair.
Coolant. Use the correct spec if the system is due a change, has been topped up with the wrong type, or looks contaminated.
Level sensor seal or grommet. Reuse it only if it is in good shape and fits tightly.
A good choice is not just the bottle that fits the bracket. It is the one that fits the car, seals properly, and lets you trust the repair once the system is filled and bled.
DIY Replacement and Long-Term Maintenance
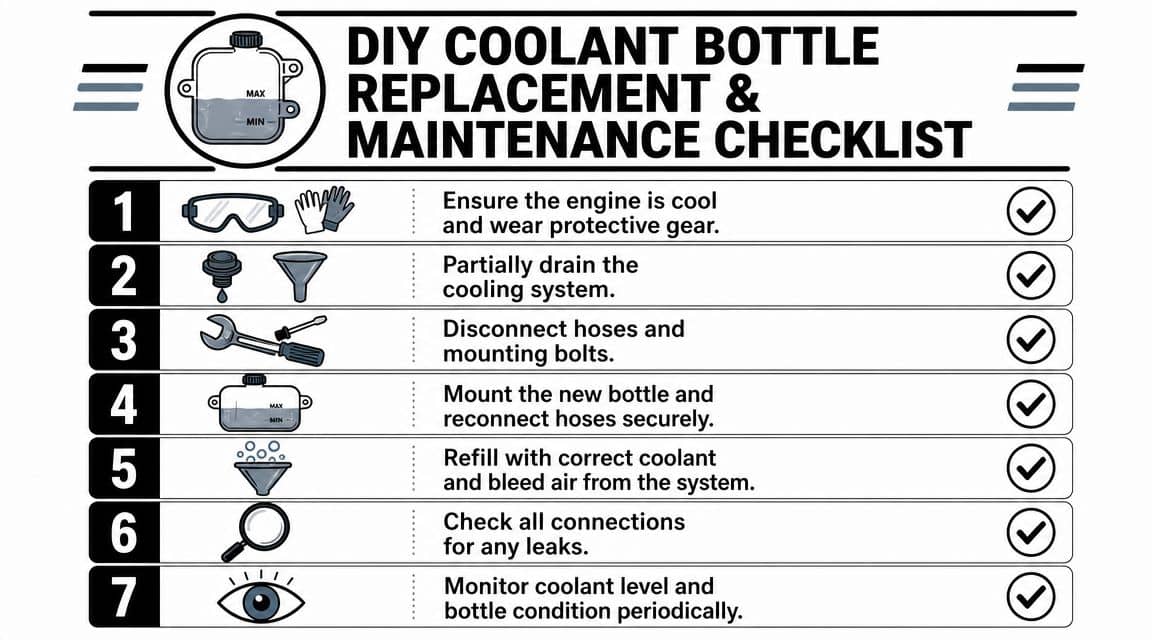
You spot a dried pink crust down the side of the bottle on a Saturday morning, the level has dropped again, and now you need to decide whether this is a driveway job or one to book in. In many cases, replacing an expansion bottle is well within DIY range. The catch is access. On some cars it sits right on top and comes out in minutes. On others, it is buried under covers, pipework, or intake parts that turn a simple swap into a frustrating afternoon.
A sensible DIY approach
Start by deciding whether the job is clean and controlled, or whether it is likely to snowball. If the bottle is easy to reach, the hoses are visible, and the engine has not overheated, a careful home mechanic can usually handle it. If access is poor or the cooling system has a fussy bleeding procedure, know that before you start pulling parts off.
Get the basics ready first. Gloves, eye protection, rags, a drain pan, and the correct coolant make the job much easier. A fluid transfer tool for draining and refilling coolant cleanly helps a lot if you want to avoid spilling coolant across the engine bay.
Let the engine go fully cold
Open a hot cooling system and you risk a face full of pressurised coolant. Leave it until the hoses feel cold and the system has settled.Catch and control the coolant
Some cars need only a small amount drained. Others will spill as soon as the lower hose comes off. Keep coolant off belts, wiring, and painted panels, and clean any spills straight away.Label or photograph hose routing
This takes seconds and saves doubt later, especially if the bottle has more than one hose connection or a level sensor plug.Remove the old bottle carefully
Check for hidden screws, sliding clips, rubber mounts, and brittle connectors. Older plastic can crack in your hand, so support it rather than tugging on it.
Fitting the new bottle properly
Before the new bottle goes in, clean the hose ends and the mounting area. Dirt, old coolant crust, and bits of degraded rubber can stop a good seal from sealing.
Then fit everything squarely and without forcing it:
seat the bottle properly in its mounts or bracket
push hoses fully home
reconnect the level sensor if fitted
fit the correct pressure cap
refill with the right coolant mix for the vehicle
bleed the system using the method the manufacturer specifies
Here's a visual walkthrough if you prefer to see the process in action: HOW TO clean your expansion tank BEST METHOD FOUND!!!
Judge the repair after a full warm-up, a complete cooldown, and a careful level check the next day.
That recheck matters. A bottle can look fine at idle on the driveway, then show a small seep from a hose seat or cap seal once the system has built pressure and cooled back down.
Keeping the new one healthy
A replacement bottle lasts longest when the rest of the cooling system is doing its job.
Use the correct coolant spec. Wrong coolant can affect seals, corrosion protection, and long-term plastic condition.
Check the level every so often. A small change caught early is usually cheaper than an overheating diagnosis later.
Look for staining or fresh crust marks. They often show where a tiny leak starts before it becomes obvious.
Inspect the hoses and cap around the bottle. A weak hose or tired cap can make a new bottle look like the problem when it is not.
This is also where being your own first-line mechanic saves money. A two-minute glance under the bonnet every few weeks can catch a loose clip, slow seep, or dropping level before it turns into a recovery truck problem.
When to leave it to a garage
Some jobs are better handed over, and that is just sound judgement.
Book it in if:
the engine has already run hot
the bottle is buried behind major components
the system is known to be awkward to bleed
the coolant level still drops after replacement
you can smell coolant inside the car or see signs of leaks elsewhere
oil contamination, heavy pressure, or repeated airlocks suggest a bigger fault
DIY works best when you are solving one clear problem. If the bottle failed because the system is over-pressurising, or because another leak has been ignored for months, replacing the bottle alone will not finish the job.
Coolant Expansion Bottle FAQs
Can I repair a cracked coolant expansion bottle
Replace it.
A coolant bottle lives in a harsh environment. It deals with heat cycles, pressure, vibration, and constant contact with coolant. Glue, plastic weld kits, and sealants might hold long enough to get you home, but they are not a repair I would trust for normal driving. If the bottle has split, gone brittle, or started leaking around a seam, fit a new one and remove the doubt.
Is the pressure cap really that important
Yes. The cap and bottle work together.
If the cap cannot hold the correct pressure, coolant can boil earlier than it should, the level can behave oddly, and small leaks become harder to judge. I have seen cars come in with a bottle blamed for the fault, only for the problem to be a weak cap. If you are replacing one and the other looks tired, changing both can save doing the job twice.
Can I top up with plain water
Only to get out of immediate trouble and get the car somewhere safe.
After that, drain and refill with the correct coolant mix as soon as practical. Water on its own does not give the same corrosion protection, boiling resistance, or cold-weather protection. For a short emergency limp-home, fine. As a plan, no.
If the level drops once, should I worry
Not always.
A small change after recent work or after the system has been opened can settle out. What matters is the pattern. If you top it up to the correct mark when the engine is cold and it keeps dropping, start checking for stains, damp hose joints, crusty residue, or a sweet coolant smell. That is the sort of early warning that lets you fix a minor issue before it turns into overheating or recovery costs.
If your coolant expansion bottle looks suspect, use GSF Car Parts to check the correct replacement for your vehicle, then compare fitment, cap type, and related cooling parts before you order. It saves guesswork and helps you decide whether this is a straightforward DIY job or one for a garage.


